As spring settles in, quilting projects often come back into focus. Whether you’re finishing a winter quilt or starting something new, hand quilting offers a rhythm that’s both productive and calming.
From traditional, fine hand quilting to the bold, modern look of big stitch quilting, the tools you choose can dramatically shape both your experience and your results.
If your stitches feel inconsistent, your needle is difficult to control, or your hands tire quickly, the issue may not be your technique—it may be your needle.
Let’s explore how the right needle supports both traditional and big stitch quilting.
The Stitching Scenario
Hand quilting & big stitch quilting
This includes:
Traditional hand quilting with small, even stitches
Big stitch quilting using thicker thread
Quilting through layered cotton, batting, and backing
Finishing quilt edges or adding decorative quilting
These techniques require stitching through multiple layers, which makes needle choice especially important.
The Common Challenges
When hand quilting, stitchers often experience:
Difficulty rocking the needle through layers
Uneven stitch size
Needle bending or breaking
Hand fatigue or finger strain
Trouble maintaining a smooth stitching rhythm
Layered fabrics and batting create resistance, so the needle must be both strong and responsive.
Why the Right Tool Matters
For quilting, a few key needle characteristics make all the difference:
Length & Flexibility Shorter needles are easier to rock in a quilting motion, while slightly flexible needles help create even stitches.
Shaft Strength The needle must be strong enough to pass through multiple layers without bending.
Eye Size A small eye works well for fine quilting thread, while a larger eye is necessary for thicker threads used in big stitch quilting.
Point Style A sharp point helps penetrate layers cleanly, reducing strain on your hands.
Choosing the right combination allows for smoother stitching and better control.
Our Recommendation: Needles for Hand Quilting
Betweens (Quilting Needles) – Sizes 8–10 These short, slightly stiff needles are designed specifically for traditional hand quilting. Their length makes it easier to rock the needle and create small, even stitches.
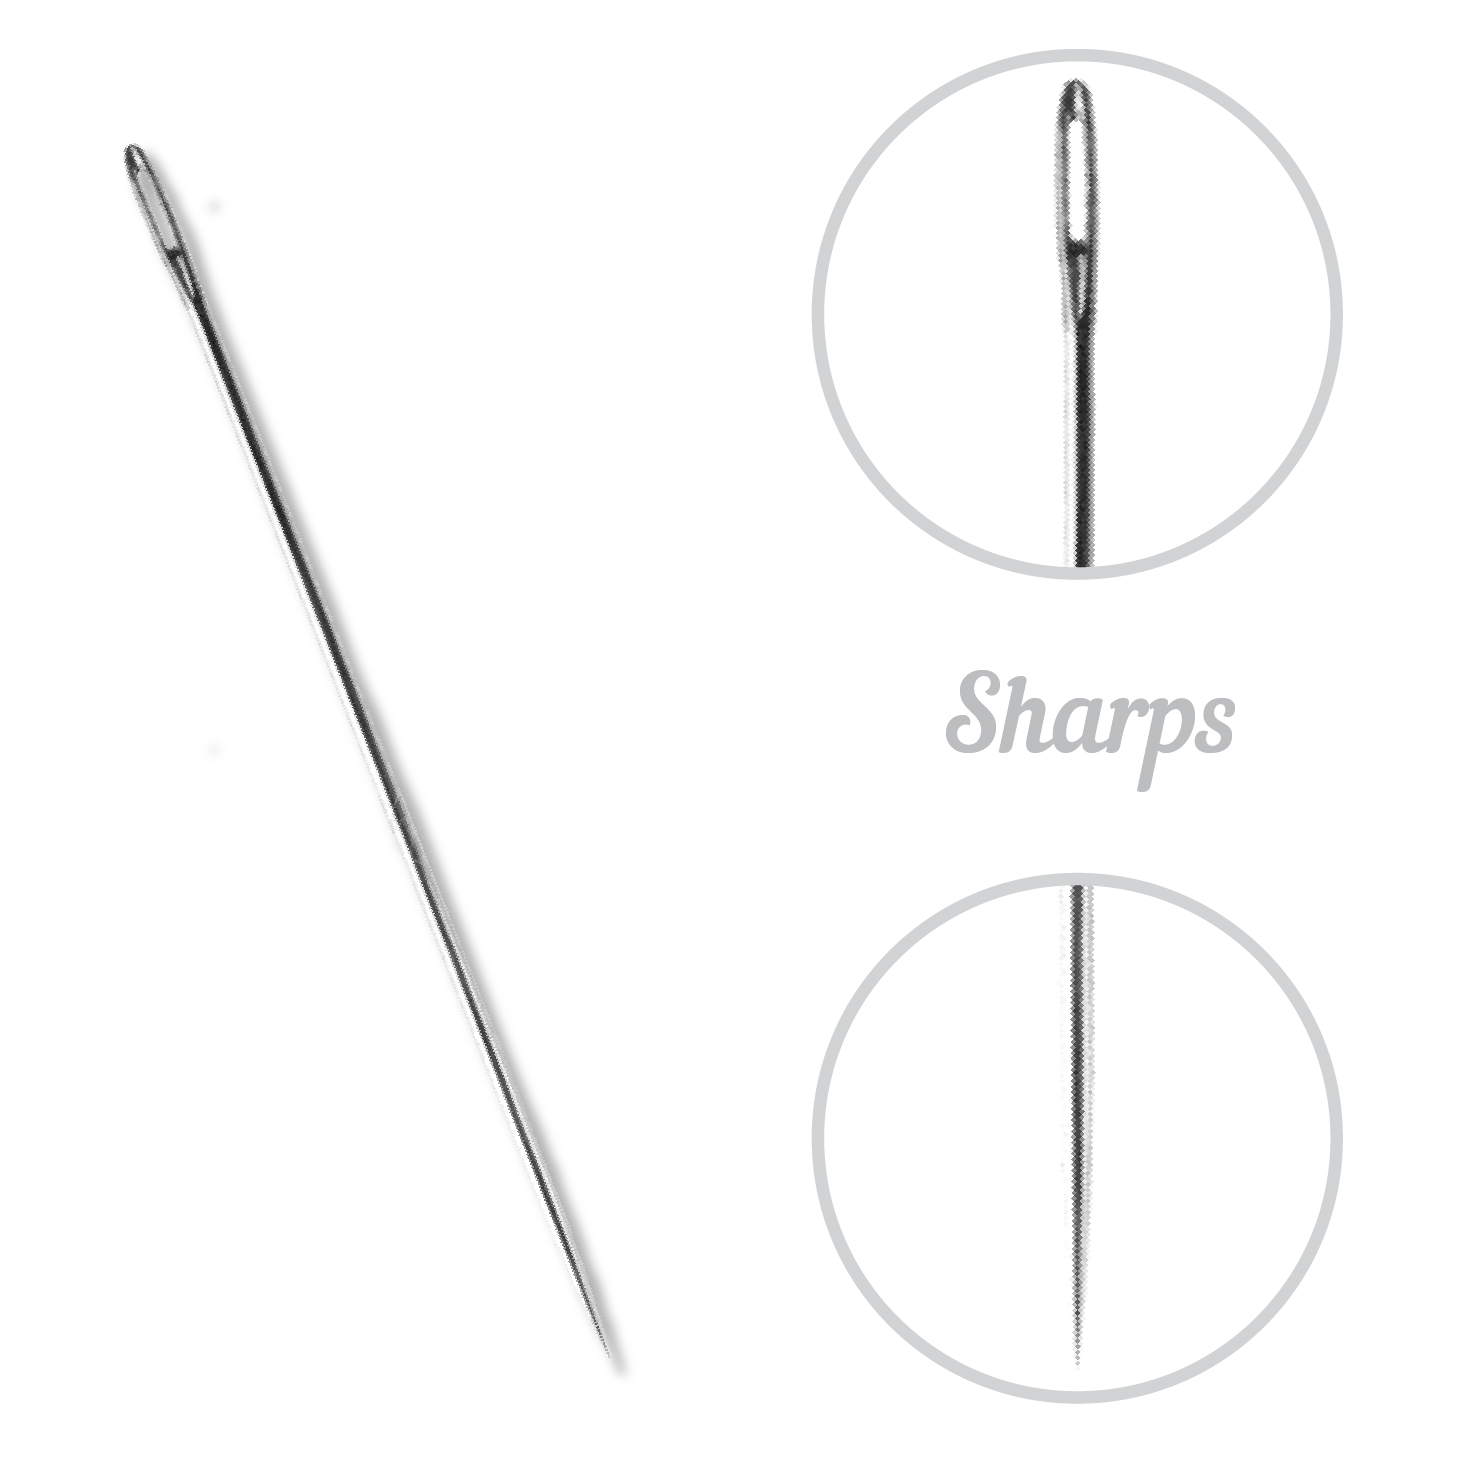
Sharps – Sizes 7–9 A versatile option for quilters who prefer a slightly longer needle or need more reach through thicker layers.
Our Recommendation: Needles for Big Stitch Quilting
Embroidery (Crewel) Needles – Sizes 5–7 With a longer eye, these are ideal for accommodating thicker threads like perle cotton while maintaining a sharp point for easy stitching.
Longer Sharps – Sizes 5–7 Helpful for creating longer, more visible stitches with a smooth, steady rhythm.
Pro Tip: Find Your Rhythm
Hand quilting is as much about rhythm as technique.
Load several stitches onto your needle at once (the “rocking” method)
Keep your grip relaxed
Let the needle do the work
If stitching feels forced, try a different needle size or length—comfort and consistency go hand in hand.
Special Considerations for Batting & Layers
Different batting types affect how your needle performs:
Cotton batting offers more resistance and may require a stronger needle
Poly or blends are easier to pass through but still benefit from a sharp point
If you feel resistance, don’t force the needle—adjust your tool instead.
Reader Takeaway: Quick Checklist
When hand quilting:
✔ Choose short needles (betweens) for fine stitches ✔ Use longer needles for big stitch quilting ✔ Match eye size to your thread thickness ✔ Let the needle move smoothly through layers—don’t force it
The right needle helps you stitch with ease and consistency.
Looking Ahead
Next month in The Right Tool for the Stitch, we’ll explore needle choices for cross stitch on linen and evenweave—where precision and fabric awareness are key.
Until then, enjoy the rhythm of stitching and the satisfaction of bringing your quilt to life, one stitch at a time.
Hi! I’m Megan Zaniewski, author of Stumpwork Studio: Mastering 3-D Embroidery (C&T Publishing), and I’m guest writing for Colonial Needle today to share some tips for selecting the correct needle type for your stumpwork embroidery projects.
What is Stumpwork?
Stumpwork is the term used to describe any and all types of 3-dimensional embroidery. It includes a wide variety of techniques that create varying degrees of depth and dimension. Everything from slightly raised embroidery stitches to fully sculptural free-standing designs fall under the broad umbrella of stumpwork. In this guide, I will be sharing needle recommendations for the following stumpwork embroidery techniques: surface beading, thread-wrapped beading, beaded slips, wireslips, fabric applique, felt padding, and dimensional stitches.
Why is needle choice important?
Did you know there are 100’s of needle variations? Navigating the many needle options out there can feel overwhelming even for an experienced embroiderer. And though the differences between different types of needles may seem slight or insignificant, choosing the appropriate needle for your project can make a big difference in both your stitching experience and the quality and look of your finished work.
When worked with stranded cotton embroidery thread, many stumpwork techniques can be accomplished with Sharps or Embroidery/Crewel needles . In some cases, though, you may find it easier or even necessary to work with other types of needles. While it can be helpful to have a small variety of needles available on hand, you certainly do not need to stockpile every needle type. With just the following 6 needles, you’ll be able to comfortably accomplish a wide variety of stumpwork techniques.
An Overview of My 6 Essential Needles
Needles have four variables: their point profile, diameter (i.e. thickness), eye size, and length. Understanding each needle type’s unique characteristics and how those features affect its function will help inform your needle choice.
Sharps These are general purpose sewing needles with a sharp point and small, rounded eye. They are well suited for many embroidery techniques and stitches done with sewing, silk, and cotton thread.
Embroidery/Crewel Embroidery/Crewel needles have a longer eye than a standard Sharps needle that can better accommodate multiple strands of thread. It also makes threading the needle easier. Otherwise, their length, diameter and point profile is the same as a Sharps needle. They are also suitable for many embroidery techniques worked in silk and cotton thread.
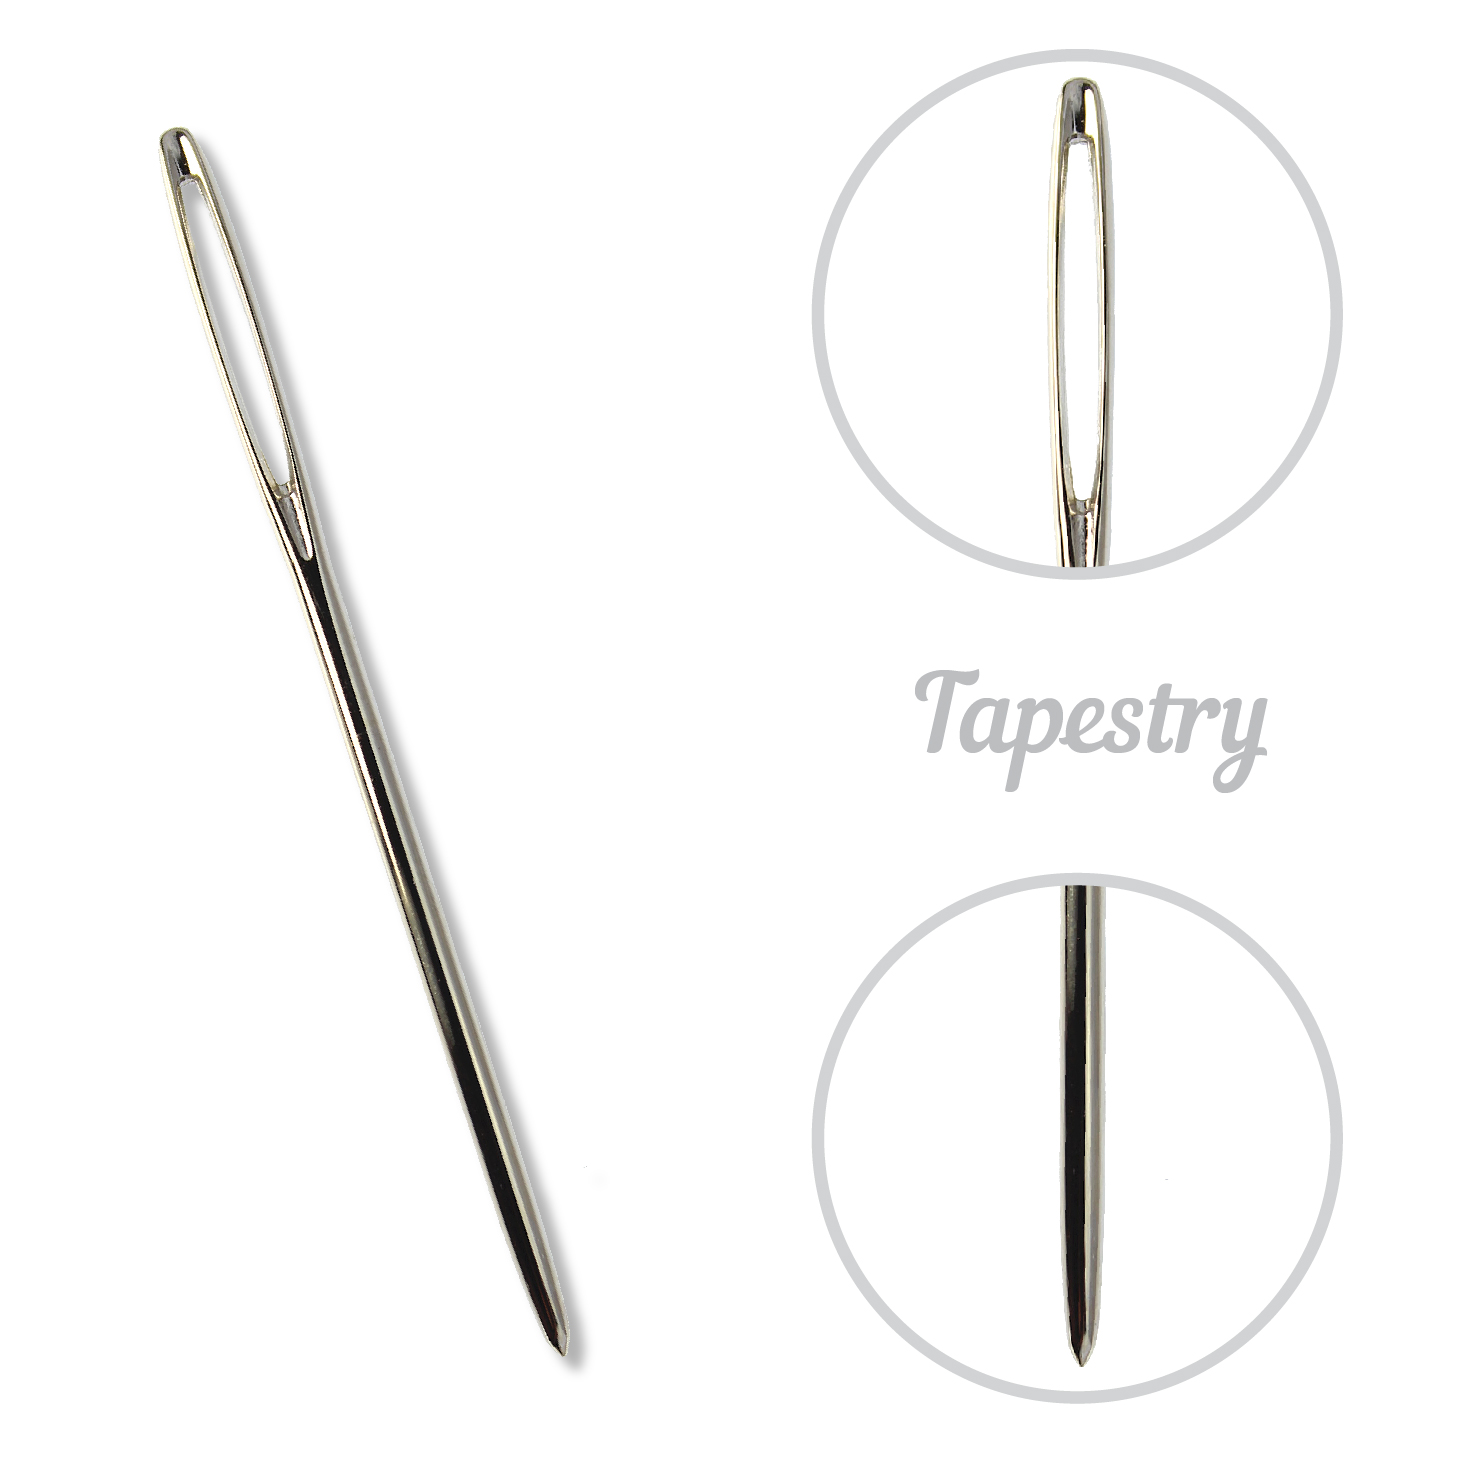
Tapestry Tapestry needles feature a blunt tip, large eye, and thick profile. They are designed to accommodate thicker, often delicate fibers like tapestry wool. The needle’s thick diameter creates a hole large enough for the thread to pass through the fabric easily with very minimal friction (which can cause wear and tear). Its blunt tip does not pierce fabric well, so this needle is best suited for canvaswork. The blunt tip also makes it an ideal needle for working dimensional stitches in stumpwork designs, such as woven stitches and detached stitches which require careful maneuvering apart from a fabric base.
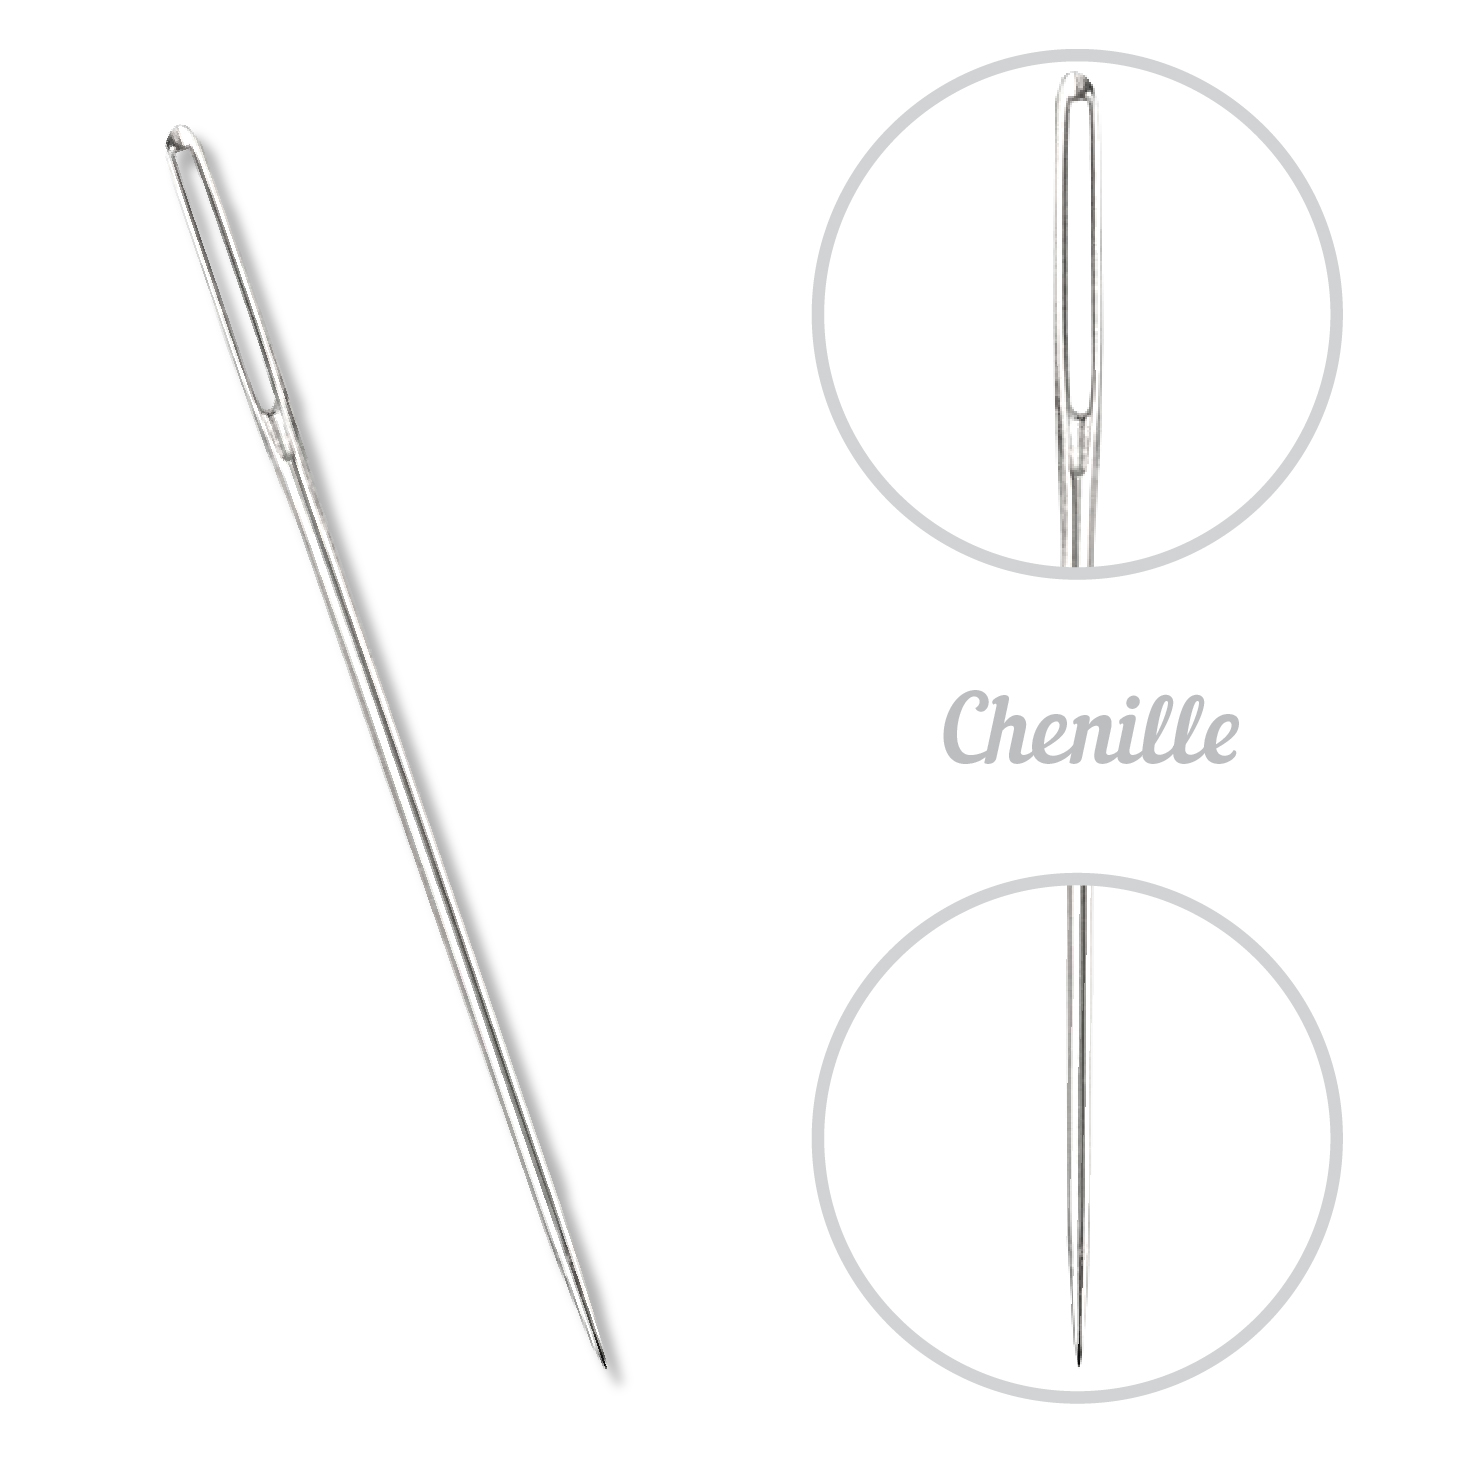
Chenille Chenille needles are identical to Tapestry needles in length, diameter, and eye size. These features make it well suited for working with thicker, textured, or more delicate specialty fibers like tapestry wool, silk ribbon, wool-silk blends, metallic threads, linen threads, and more. The difference between a Chenille needle and Tapestry needle is its point profile. A Chenille needle has a sharp point, enabling the needle and fiber to pass through even thick or coarse fabrics easily.
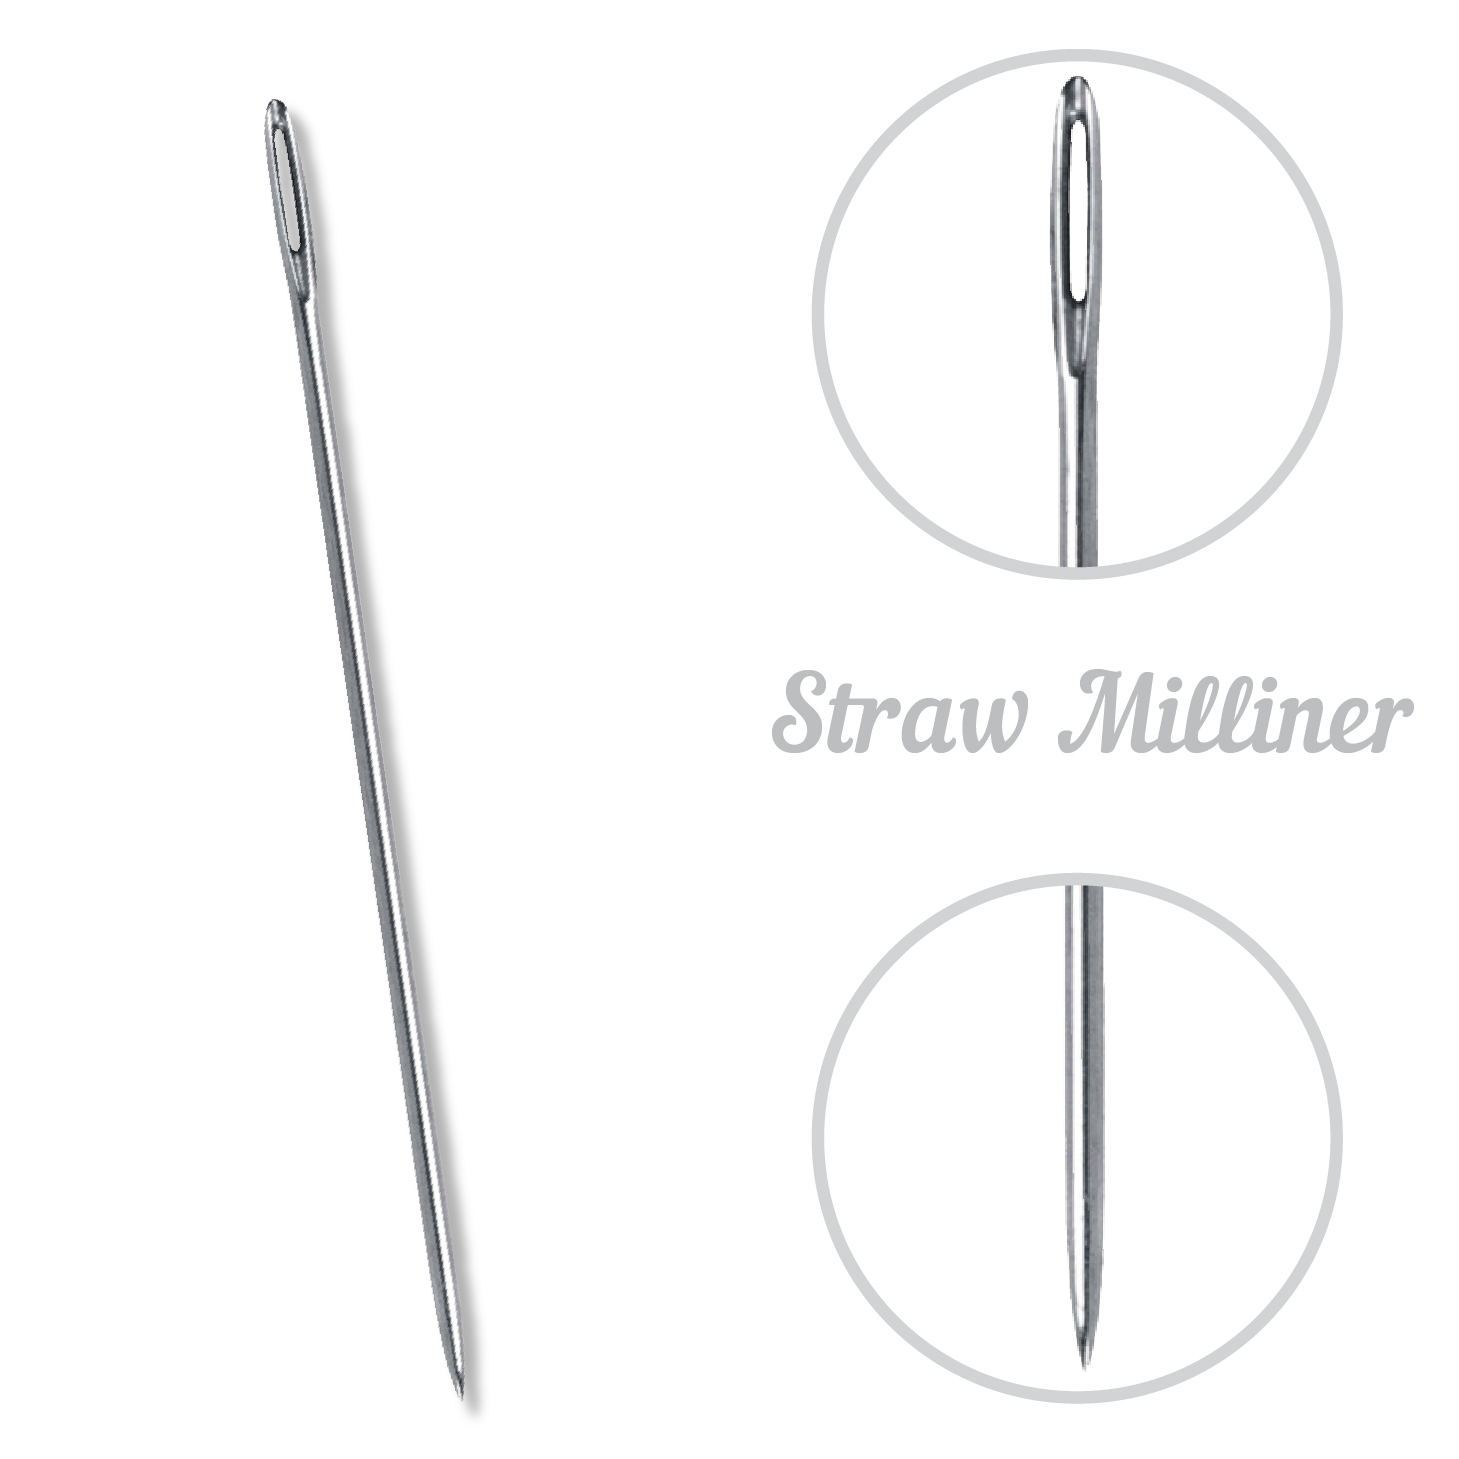
Milliner Milliner needles are similar to a Sharps needle. They have the same sharp point profile and small rounded eye as a Sharps needle, but they are longer. Their long length and small eye make them helpful needles for working dimensional stitches that require wrapping the thread around the needle multiple times (like Cast-on Stitch and Bullion knots).
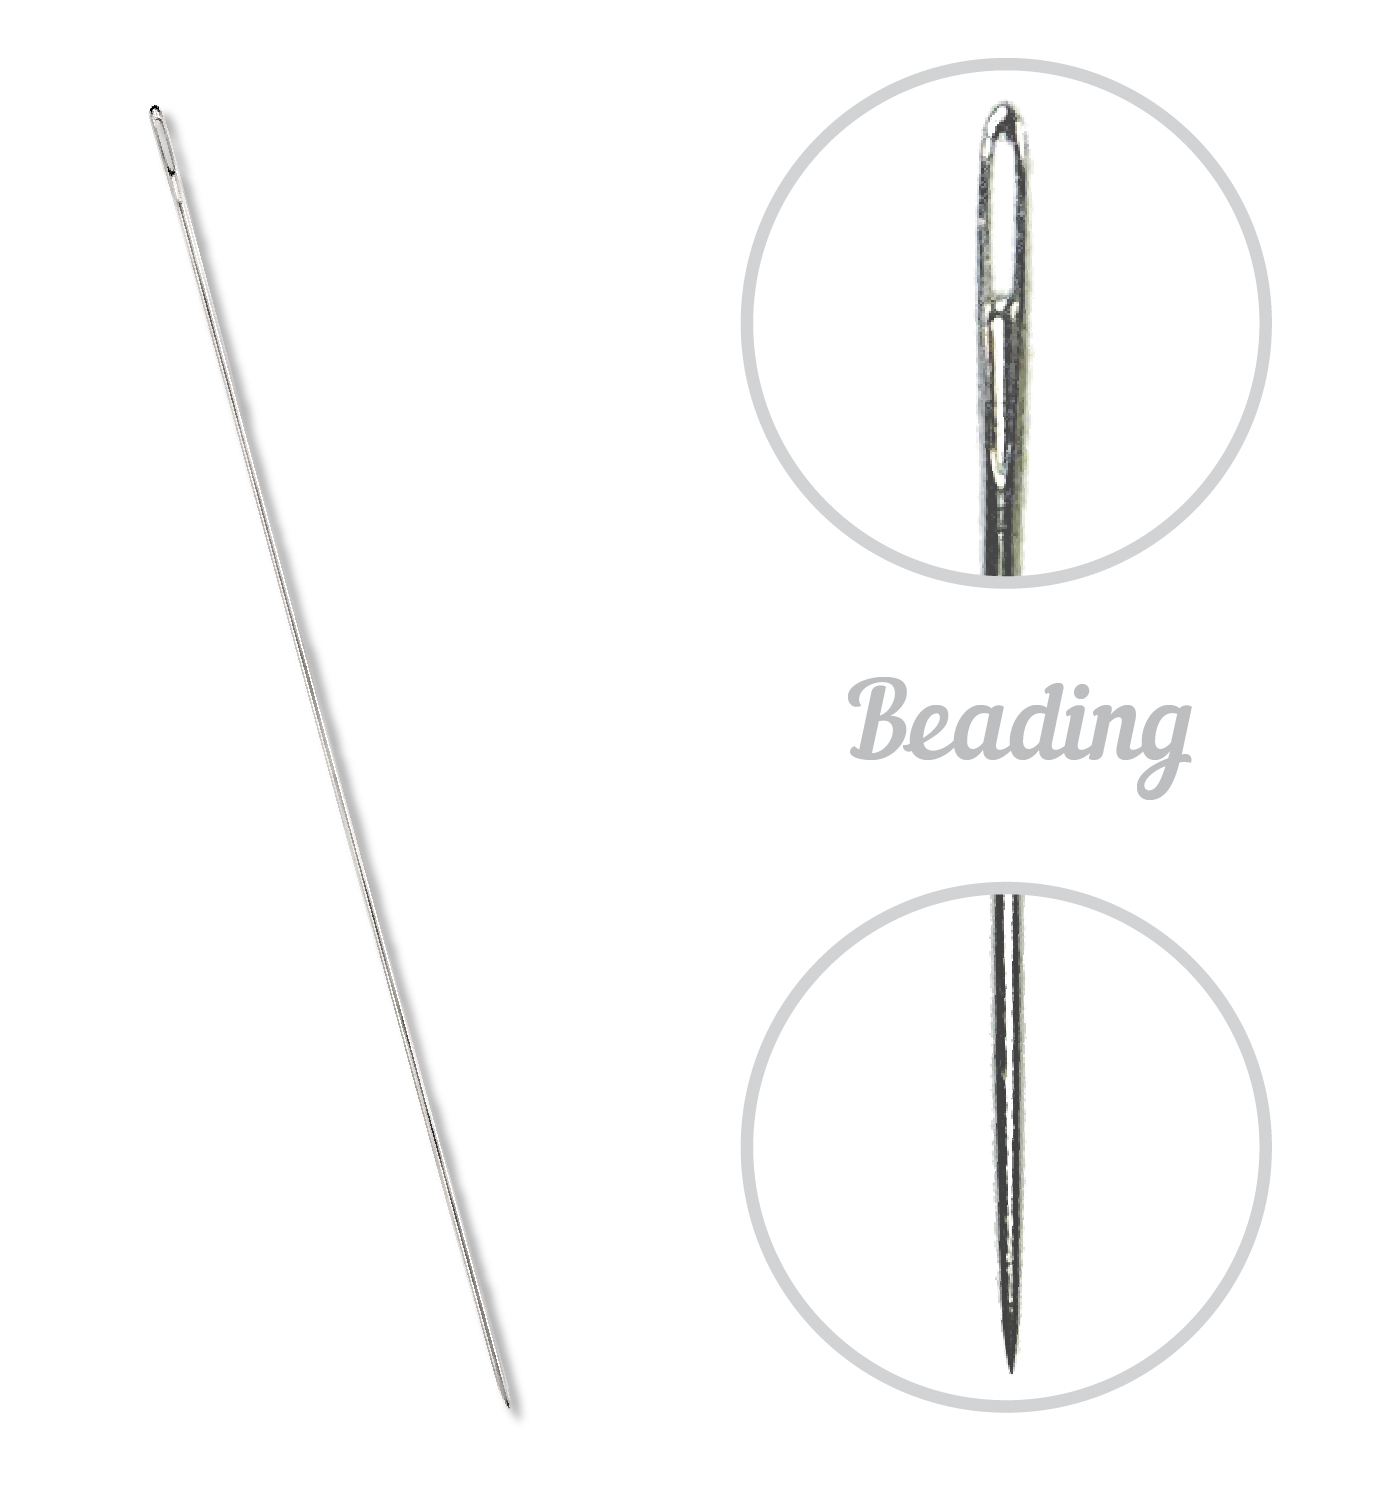
Beading Beading needles are made from steel wire, with a sharp point and a very long and thin profile. The eye is also small, allowing the needle to pass through beads and sequins easily without getting stuck. The long length allows you to easily scoop up and thread multiple beads at once.
With the defining features of each needle type in mind, let’s take a look at some stumpwork techniques and my recommended needle for each one.
Needles for Beading Techniques
Beads are a highly versatile material in stumpwork embroidery. As surface decoration, beads can elevate a design with texture, dimension, and sparkle. Beading needles are most often the suitable choice for embroidering with beads. Their elongated and uniformly thin profile allows you to easily scoop and thread even the smallest seed beads. Keep in mind, these needles are very long and pliable so they are prone to bending if used too roughly. If you find beading needles too difficult to maneuver, you can try working with a thin-sized embroidery/crewel needle such as a size #11 instead. This size will still accommodate many bead sizes, even the smallest seed beads.
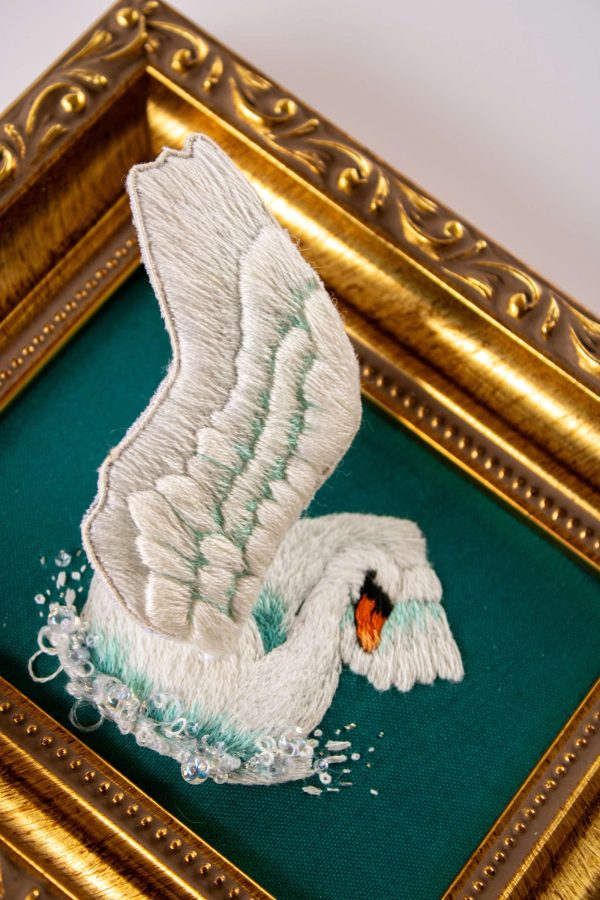
Surface beading is used to mimic bubbles and add sparkle to this stumpwork swan design
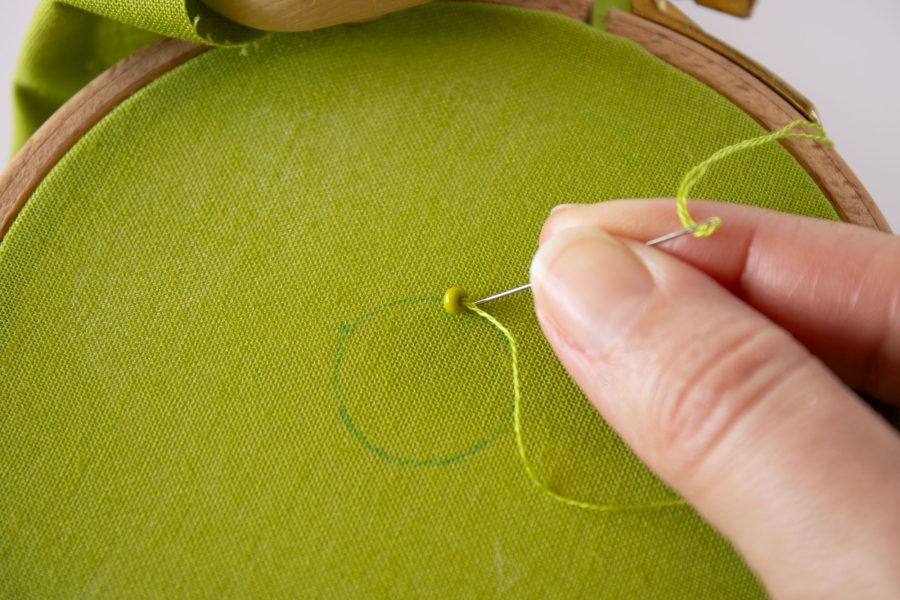
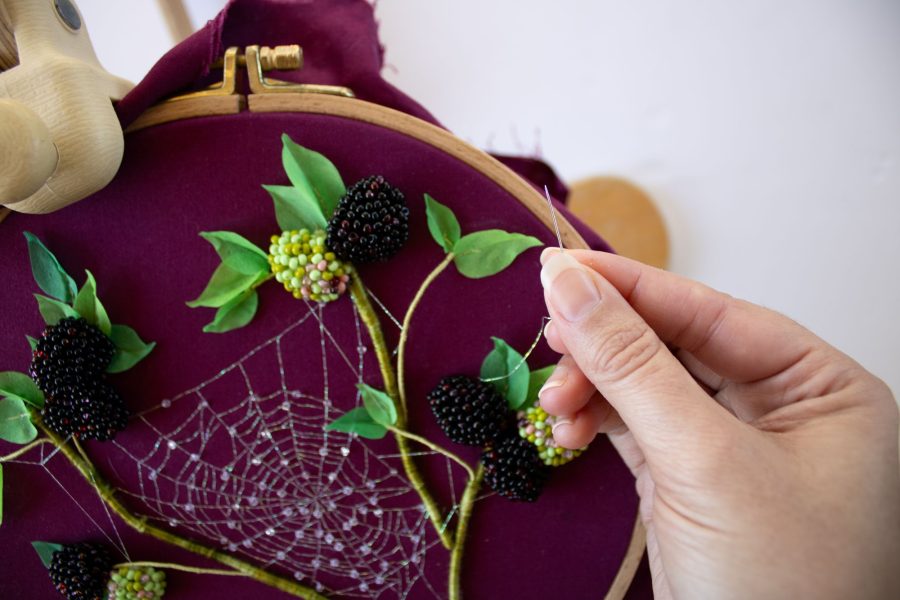
Beads can also be used to create more sculptural forms with a technique called a beaded slip. With this technique, beads are embroidered onto a flat surface before being sewn into a rounded shape. This technique is helpful for recreating things like berries or a flower center, though it can be modified in many ways for an entirely different look (ex. try using French knots instead of beads). Beading needles are again the most suitable needle for working this technique, though thin embroidery/crewel needles may also be used as an alternative for most bead sizes.
Embroidering beads onto a beaded slipBlackberries made from a beaded slip
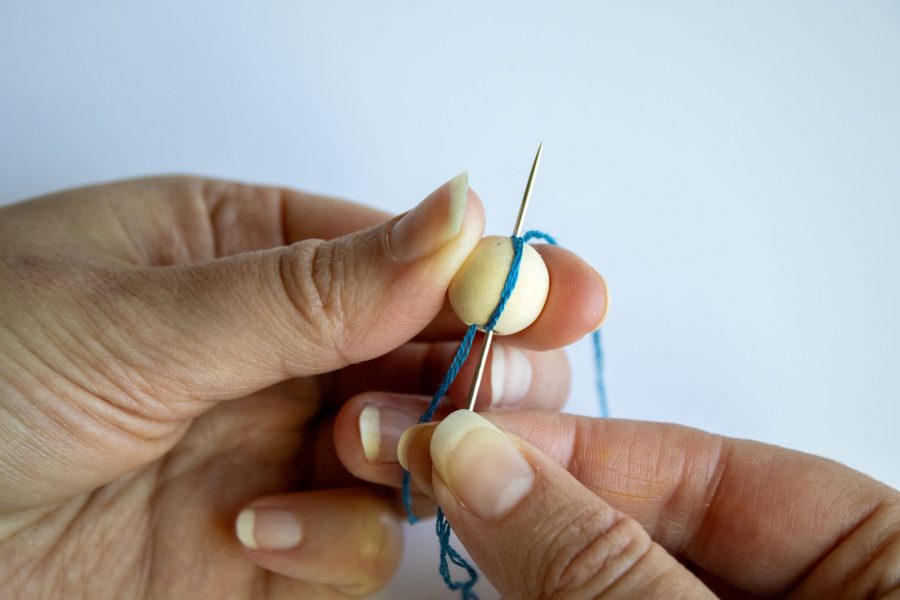
Another way that beads can be used as a sculptural element in an embroidery design is through a bead-wrapping technique. Bead-wrapping involves covering the bead (or another similar bead-like form made from clay, paper, cotton, etc) with thread. Wrapped-beads can be used in innumerous ways. In nature motifs, they can serve as berries, insect eyes, flower buds, seeds, eggs, and more. Beads with larger holes make the best forms for this technique, as they can better accommodate the thread’s bulk as it is wrapped around the bead. Because the interior of the bead can become quite densely packed with thread, I recommend using a chenille needle for this technique. Its strong and sharp profile will prevent it from bending or breaking under pressure as you pass it through the densely packed bead.
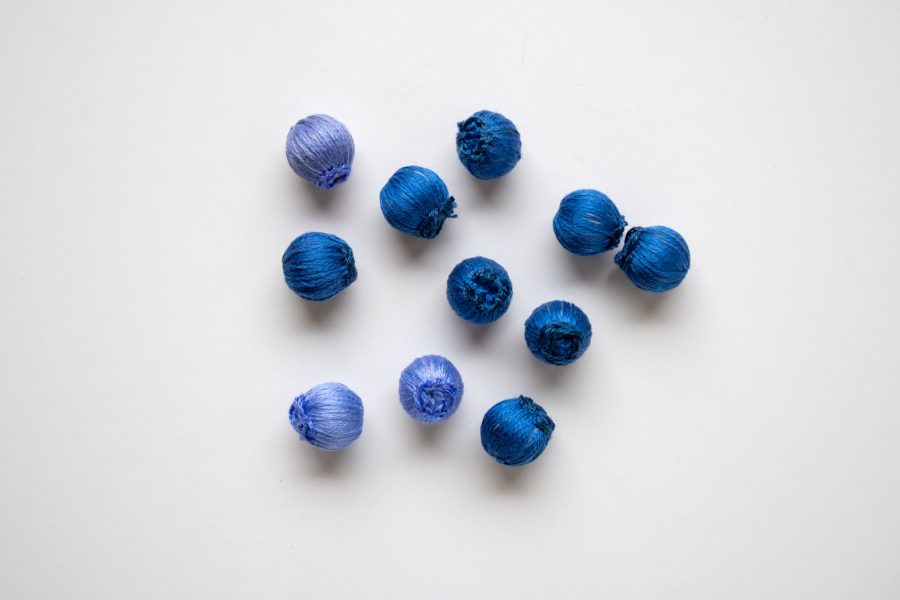
Wrapping a bead with cotton thread and a chenille needleBlueberries made from thread-wrapped beads
Needles for Raised Stitches
Raised stitches are a simple yet effective way to add texture and dimension to an embroidery design without additional materials or supplies. All you need is a needle and thread.
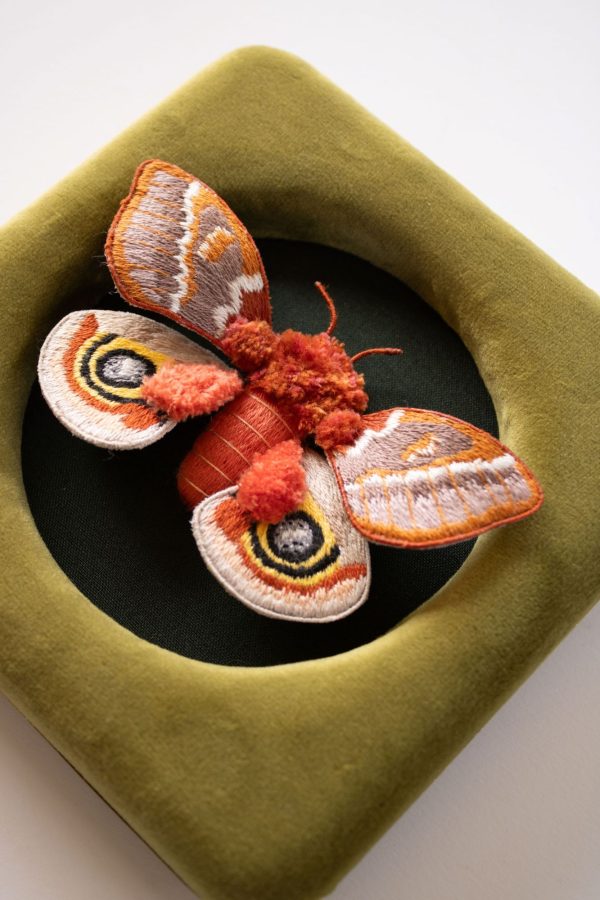
The type of needle you need will depend on the type of stitch and fiber you are working with. For many stitches worked in stranded cotton embroidery thread, a Sharp or Embroidery/Crewel needle is suitable. For example, Turkey Stitch, which produces a tufted rug-like effect that can be trimmed and shaped, can be worked with cotton thread and a crewel needle to add a fuzzy texture to a design.
Turkey stitch worked in stranded cotton onto the wings and body of an Io moth
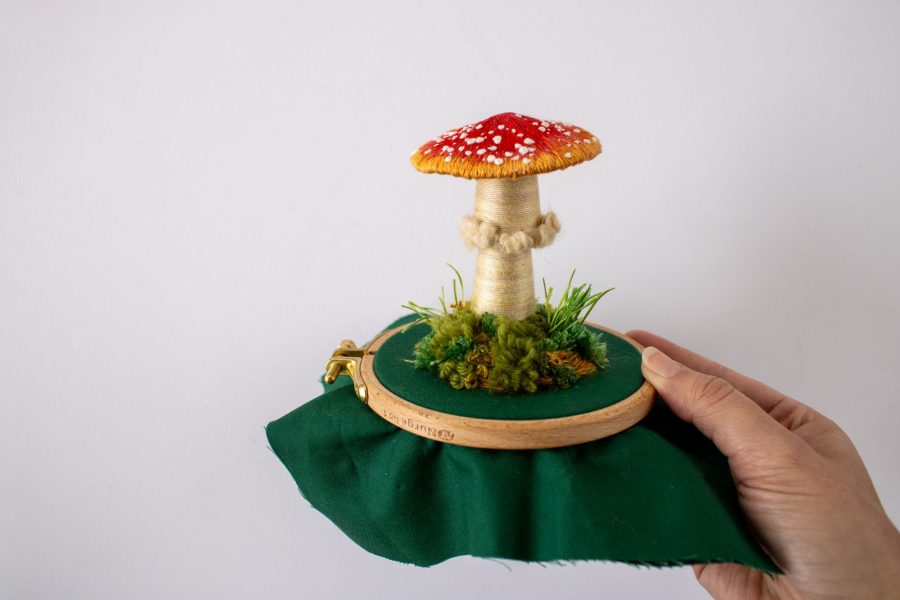
When working the same stitch with larger or more delicate fibers, such as silk or wool, I recommend using a chenille needle. The thicker profile will allow the threads to pass through the fabric more easily, preventing fraying or breakage.
Turkey Stitch moss and grass created with a variety of wool and silk threads and a chenille needle
If you find yourself struggling with some raised stitches, you may find that switching to a Milliner’s needle makes all the difference. For example, stitches that require you to wrap the thread around the needle multiple times before passing it through the fabric, such as French Knots and Bullion Knots, are best executed with a Milliner’s needle. Its long, straight shaft has an even diameter from tip to eye, allowing the wrapped threads to glide through more easily, preventing tangles and knots.
With other dimensional stitches that require you to weave or manipulate the thread in more complicated maneuvers (such as the Woven Picot or a Brussels Stitch), I suggest using a tapestry needle. Its blunt tip will help prevent you from piercing the thread as you weave the stitches.
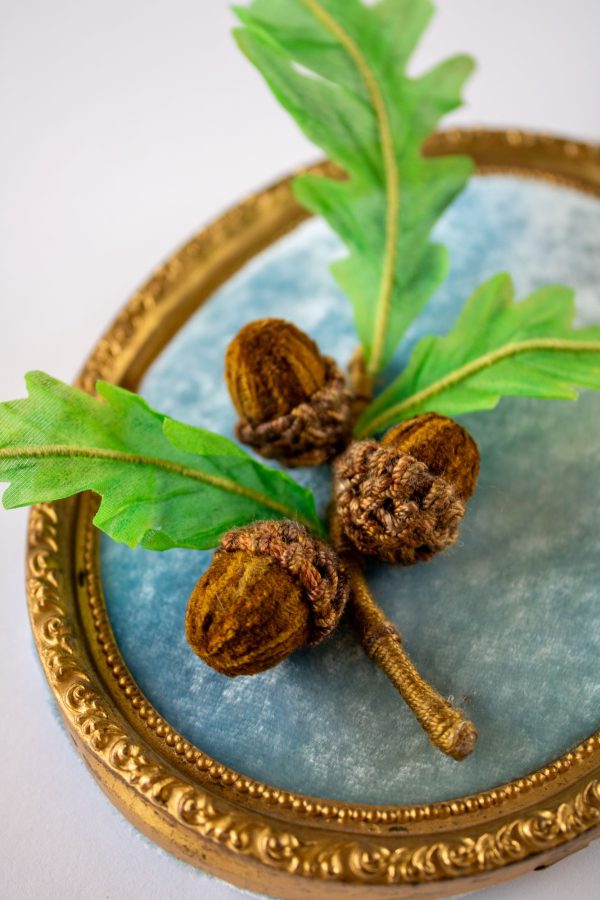
An acorn cap stitched with a woven Brussels Stitch, using a wool-silk blend thread and tapestry needle
These are just a few examples of the many ways that stitches can be used in stumpwork designs, giving your embroidery a 3-dimensional effect. If you are trying out a new-to-you stitch and are unsure of what needle to use, as a general rule, consider the characteristics of the thread you are working with (ex. stranded cotton vs a more delicate fiber) and how the stitch is executed (ex. surface, woven, wrapped, etc). These factors can help guide you.
TIP: For stitch tutorials and inspiration, I highly recommend checking out the Stitch Bank by the Royal School of Needlework, a free and comprehensive resource that includes over 500 stitches with information about their history, applications, and full step-by-step video and photo instructions.
Needles for Wirework
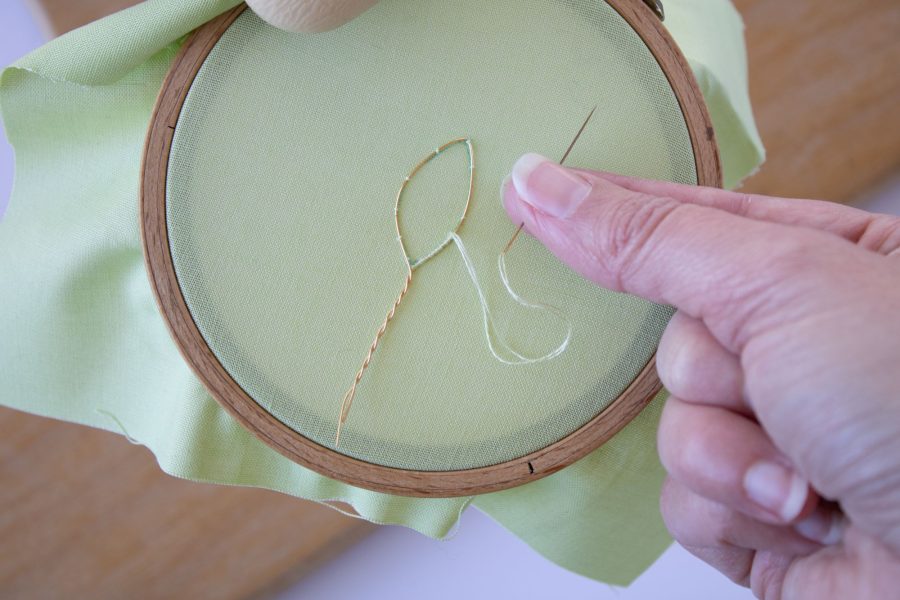
Wires can be used in a variety of different ways to add dimension to an embroidery design. One popular and easy-to-learn technique is called a wireslip, where wire is embroidered along the edge of a design. This framework allows you to cut out the embroidery and either display it alone or attach it to a base as a 3-dimensional feature. When embroidering over the wire, it is important to keep your stitches as neat and precise as possible and work with a fine yet strong cotton or silk thread. For this reason, I always recommend using a Sharp or Embroidery/Crewel needle when working a wireslip (a size #10 is ideal when working with 1 strand). The thin point and profile of these needles allow you to stitch as closely to the wire as possible, resulting in a clean and tidy edge to your design.
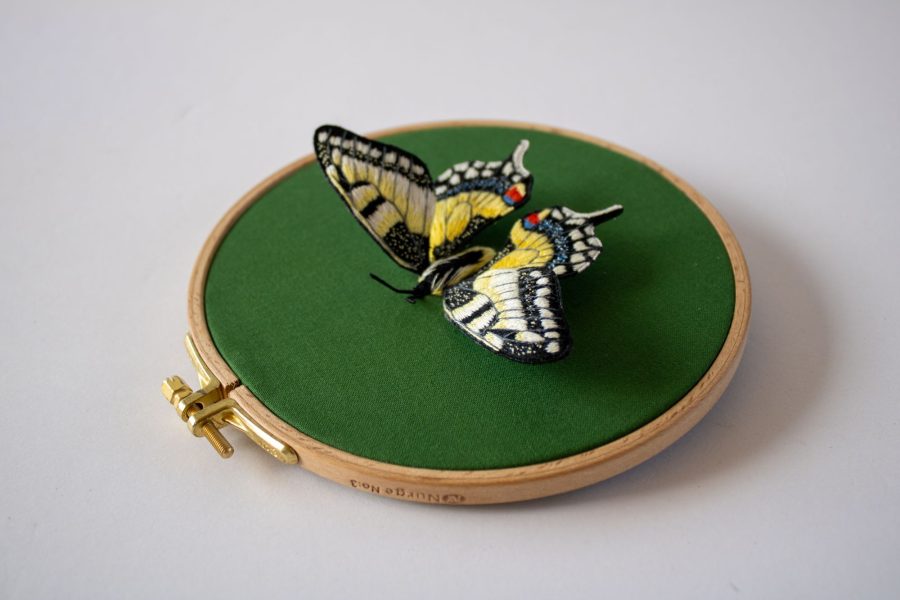
Embroidering over a wireslip leaf with a single strand of cotton thread and a size 10 embroidery needleWings worked with the wireslip technique give this Old World Swallowtail butterfly a 3-dimensional, life-like look
Needles for Padding and Applique
Fabrics can serve as more than just a base for your embroidery. With a couple of applique techniques, fabrics can add height and texture to your embroidery design.
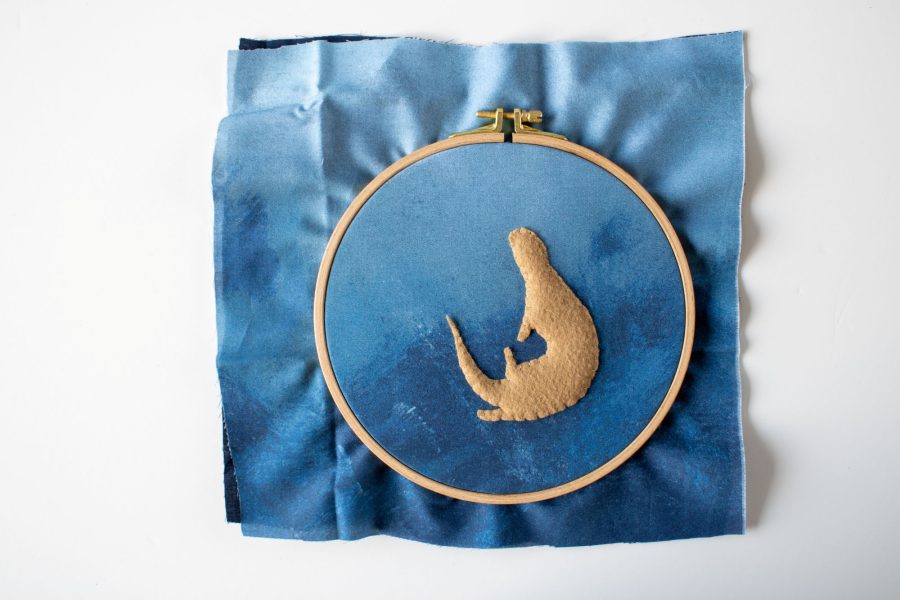
Felt padding is a beginner-friendly technique that creates a raised shape to embroider over. In this technique, layers of wool felt are stitched to your fabric base in increasing size, resulting in a firmly padded form that rises above the fabric background. These wool felt pieces are appliqued in place with a single strand of cotton thread. To ensure that you are creating neat stitches as close to the edge of the felt as possible, I recommend using a size 10 Sharp or Embroidery/Crewel needle.
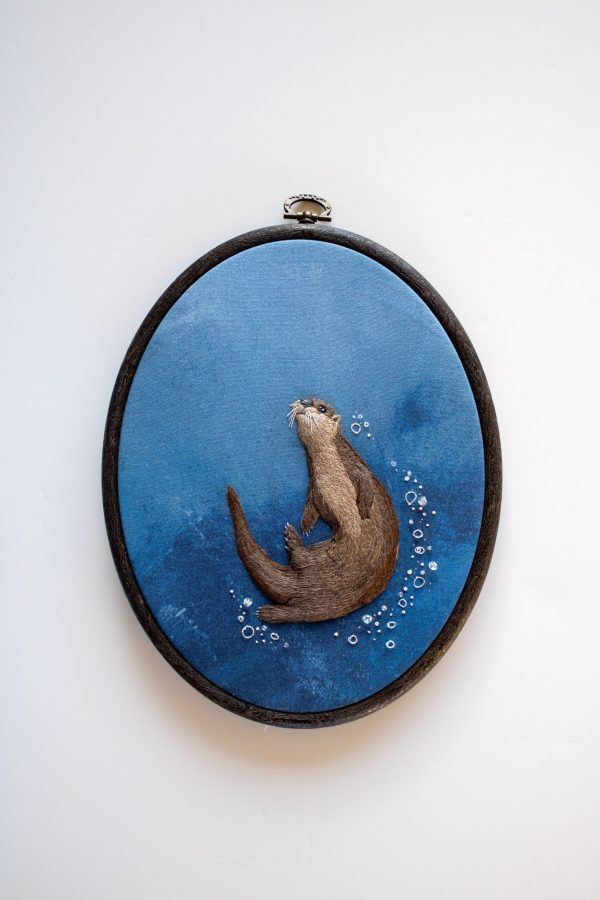
Felt padding stitched to a fabric base, ready to be embroideredThe finished stumpwork river otter embroidered over the padded base
Fabrics can also be used to add visual interest to a design with padded applique. Textured fabrics, such as fleece, velvet, faux fur, leather, and vinyl are ideal for this technique as they offer interesting textures and do not fray when cut. The cut fabrics can either be sewn directly to the base or padded with a layer of stuffing between it and the base for extra height. This technique is also worked with a single strand of cotton thread near the edge of the fabric. So to keep your stitches precise and well-disguised, I again recommend using a size 10 Sharp or Embroidery/Crewel needle.
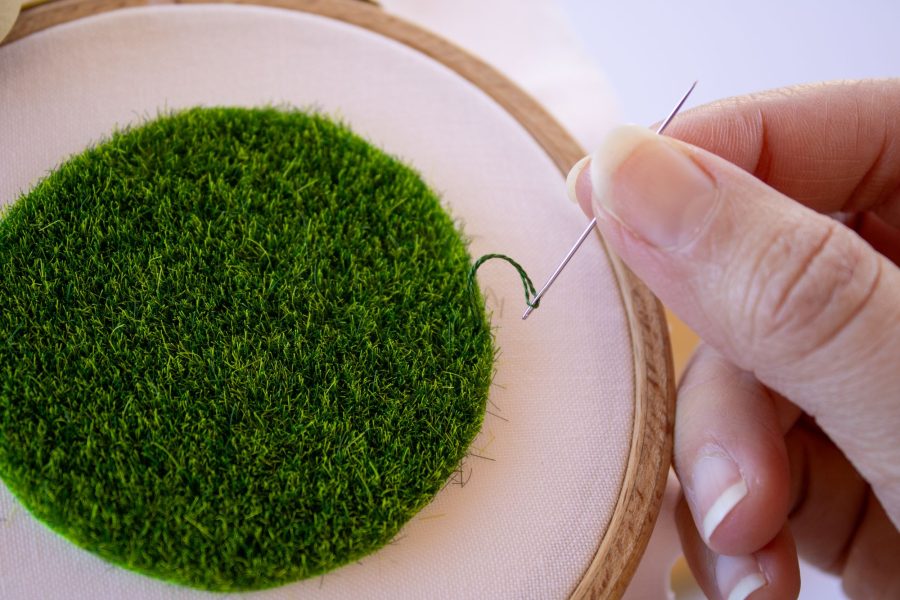
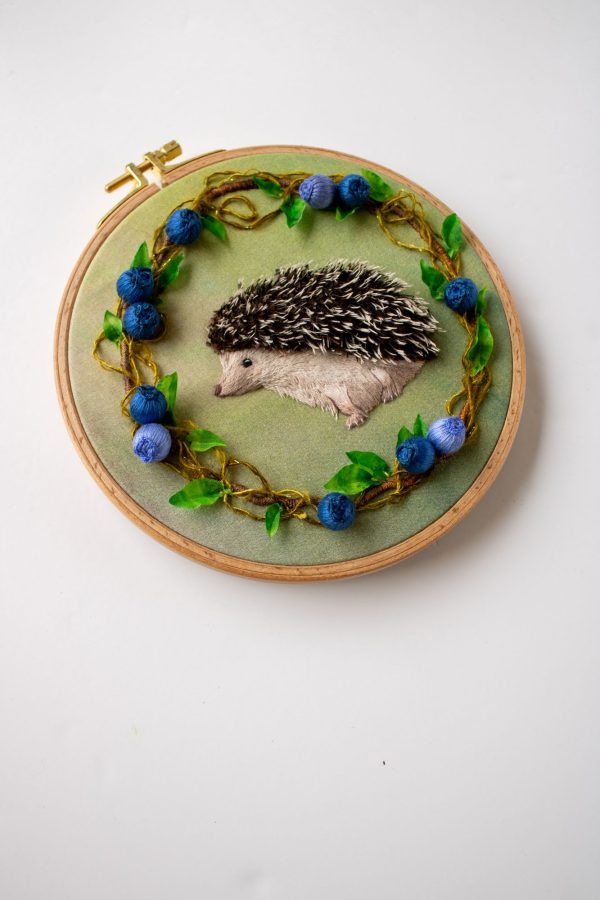
Appliqueing grass on a fabric base with a single strand of cotton thread and an embroidery needleA hedgehog stitched with the padded applique technique
These are just a few of the ways you can explore stitch, fiber, and technique to create 3-dimensional embroidery designs. For more ideas and in-depth step-by-step tutorials, please check out my book, Stumpwork Studio: Mastering 3-D Embroidery. I hope that this needle selection guide helps take some of the guesswork out of choosing the right needle for your projects, especially if you are exploring stumpwork embroidery for the first time. While this guide can help you make an informed choice between your needle options, please remember there are no rules when it comes to embroidery. Above all else, stitching should be comfortable and fun. So, I encourage you to experiment with different needle types to get a feel for what works best for you.
As spring projects become more creative and expressive, it’s the perfect time to introduce a stitch that goes beyond basic threadwork.
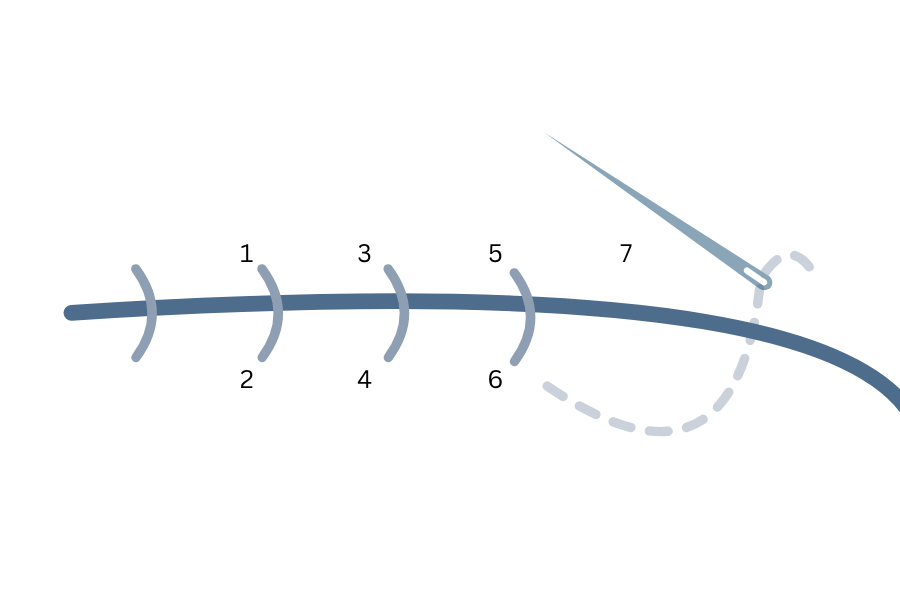
The couching stitch allows you to work with thicker threads, yarns, and even ribbons by securing them to the fabric surface with small stitches. The result? Bold texture, striking lines, and endless creative possibilities.
If you’re looking to add dimension and personality to your stitching, couching is a technique worth exploring.
What Is a Couching Stitch?
The couching stitch is a technique where a thicker thread (or material) is laid on top of the fabric and secured in place with smaller stitches using a separate thread.
Instead of passing the main thread through the fabric, it “rests” on the surface — while the smaller stitches anchor it down.
This makes couching ideal for materials that are too thick, delicate, or decorative to stitch through the fabric directly.
When & How It’s Used
Couching is incredibly versatile and works well in both traditional and modern stitching.
It’s best for:
Decorative outlines and bold lines
Working with thick threads, yarn, or ribbon
Adding texture to embroidery designs
Highlighting shapes or lettering
Mixed-media or creative textile projects
It’s especially popular in contemporary embroidery and fiber art, where texture and layering play a big role.
As winter begins to soften and spring projects start to take shape, many stitchers reach for wool appliqué. The soft texture, rich color, and forgiving nature of wool make it ideal for decorative stitching, layered designs, and heirloom-style projects.
But wool appliqué behaves differently than cotton or linen. Its loft, thickness, and layered construction mean the needle you choose can make a noticeable difference in how easily your stitches form—and how polished the finished piece looks.
If your needle feels difficult to pull through layers, or your stitches look larger than you’d like, it may simply be time to switch tools.
Let’s explore how the right needle supports smooth, consistent wool appliqué stitching.
The Stitching Scenario
Hand wool appliqué
Common projects include:
Appliqué quilts
Penny rugs
Decorative pillows or wall hangings
Seasonal table toppers
Folk art stitching projects
These designs typically involve stitching wool shapes onto a background fabric using small, often decorative stitches.
Because wool is thicker than most fabrics—and often layered—the needle must be strong enough to pass through both materials without distorting the stitches.
The Common Challenges
When working with wool appliqué, stitchers often notice:
Difficulty pulling the needle through layered fabrics
Large or visible stitch holes
Uneven stitch size
Hand fatigue during longer sessions
Threads wearing down from friction
The density and loft of wool require a needle that balances strength with finesse.
Why the Right Tool Matters
Several needle characteristics influence how easily you can stitch wool appliqué:
Needle Length Shorter needles allow for better control when making tiny appliqué stitches.
Shaft Strength A slightly stronger needle prevents bending when passing through thicker layers.
Eye Size Your thread should glide smoothly through the eye without shredding—especially when using cotton thread or embroidery floss.
Point Style A sharp point helps the needle pass cleanly through wool and the background fabric without excessive resistance.
When these elements are balanced, stitches become smaller, smoother, and more consistent.
Our Recommendation: Needles for Embroidery on Linen
Appliqué Needles – Sizes 9–11 These short, fine needles are favorites among appliqué stitchers because they allow for tiny, nearly invisible stitches. Their length provides excellent control when stitching close to edges.
Sharps Needles – Sizes 8–10 A versatile option that works well when stitching through slightly thicker wool or layered fabrics.
Embroidery (Crewel) Needles – Sizes 7–9 If you’re using embroidery floss or decorative stitching, a crewel needle’s longer eye accommodates thicker threads comfortably.
Choosing the right size depends on:
Wool thickness
Background fabric
Thread type
Desired stitch visibility
Testing on a scrap piece before beginning is always helpful.
When in doubt, test on a scrap. Or use our handy Needle Wheel!
Pro Tip: Keep Your Stitches Small
For polished appliqué, aim for stitches that disappear into the edge of the wool shape.
Try this simple technique:
Angle your needle slightly under the edge of the appliqué shape
Catch only a few threads of the background fabric
Keep stitches evenly spaced
A fine needle makes this much easier.
Special Considerations for Layered Projects
Many wool appliqué designs include multiple layers of fabric. When stitching through wool and cotton together:
Use a slightly stronger needle if you feel resistance
Avoid forcing the needle through thick spots
Replace needles that begin to bend or feel rough
A smooth, sharp needle protects both your fabric and your hands.
Reader Takeaway: Quick Checklist
When stitching wool appliqué:
✔ Choose a short needle for better stitch control ✔ Use a sharp point to pass through wool cleanly ✔ Match eye size to your thread ✔ Test your needle on layered fabric before starting
Small adjustments help create beautifully neat appliqué stitches.
Looking Ahead
Next month in The Right Tool for the Stitch, we’ll explore needle choices for hand quilting and big stitch quilting—two techniques where needle flexibility and length make a surprising difference.
Until then, enjoy the rhythm of slow stitching and the satisfying texture of wool appliqué.
January is the season of fresh starts—and in the sewing room, that often means returning to the basics. Whether you’re mending a favorite garment, repairing household linens, or trying visible mending for the first time, hand sewing is where many stitchers reconnect with the simple satisfaction of needle and thread.
Yet even the simplest stitch can feel frustrating if the tool in your hand isn’t quite right. Choosing the right needle for hand sewing and mending can make stitches smoother, neater, and more enjoyable—and can even extend the life of the fabric you’re repairing.
Let’s take a closer look at how the right needle supports better hand sewing and mending.
The Stitching Scenario
Everyday hand sewing & mending
This category includes:
Closing seams or hems
Repairing small tears or worn spots
Attaching buttons
Darning socks or sweaters
Visible mending on garments or textiles
These projects often involve a mix of fabrics and threads, which means flexibility matters.
The Common Challenges
Many stitchers struggle with:
Thread fraying or knotting while stitching
Difficulty pulling the needle through fabric
Uneven or bulky stitches
Hand fatigue during longer mending sessions
These issues are often blamed on technique—but just as often, the needle itself is the culprit.
Why the Right Needle Matters
A hand sewing needle may look simple, but small differences make a big impact:
Eye size: Too small, and your thread frays or won’t pass through smoothly. Too large, and stitches can look sloppy.
Shaft thickness: A needle that’s too thick can damage fabric fibers; too thin, and it may bend or break.
Point style: The point determines how the needle enters fabric—cleanly or with resistance.
Length: Longer needles are helpful for basting or running stitches, while shorter needles offer more control for fine repairs.
Matching these qualities to your project improves both stitch quality and comfort.
Our Recommendation: Needles for Hand Sewing & Mending
For most general hand sewing and mending, look for:
Sharps (Sizes 7–9) These are the workhorses of hand sewing. They have:
A sharp point for easy fabric penetration
A medium eye suitable for most sewing threads
Enough strength for woven fabrics and light repairs
Sharps are ideal for hems, seam repairs, and general garment mending.
When in doubt, test your needle on a scrap of the fabric you’re repairing. If the needle glides smoothly without resistance—and the thread passes through without fraying—you’ve found a good match. If you hear fabric “popping” or feel drag, try a finer needle.
Special Considerations for Visible Mending
Visible mending is as much about expression as repair, and needle choice supports that creativity.
Use a larger eye when working with thicker threads or embroidery floss
Choose a slightly longer needle for rhythmic, even stitches
Avoid forcing thick threads through tiny eyes—it weakens both thread and fabric
The goal is durability and beauty.
Reader Takeaway: A Simple Needle Checklist
If you’re hand sewing or mending:
✔ Match needle size to fabric weight
✔ Match eye size to thread thickness
✔ Keep a small assortment on hand
✔ Replace needles that feel rough or bent
A fresh needle truly makes a difference.
Looking Ahead
Hand sewing and mending are foundational skills—and mastering them sets you up for more advanced techniques throughout the year. In our next installment of The Right Tool for the Stitch, we’ll explore needle choices for embroidery on linen and other specialty fabrics.
Until then, may your stitches be smooth, your repairs satisfying, and your sewing basket well-stocked.
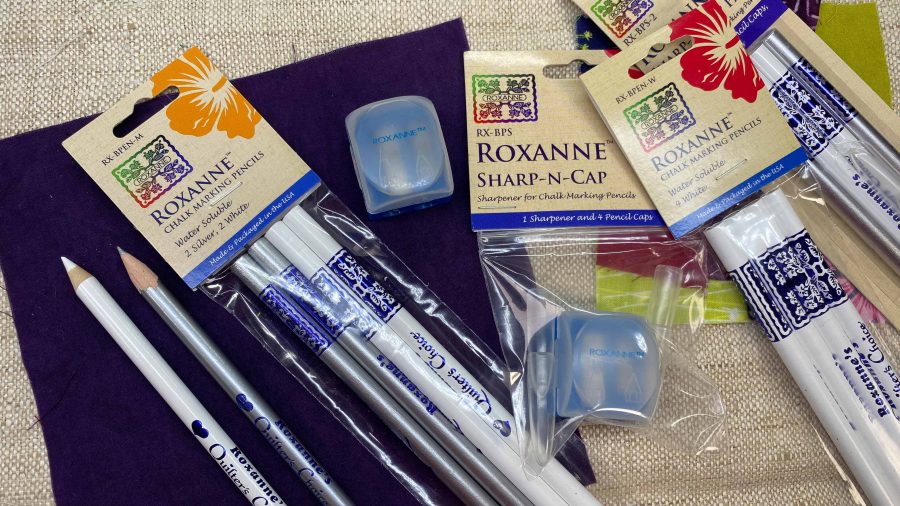
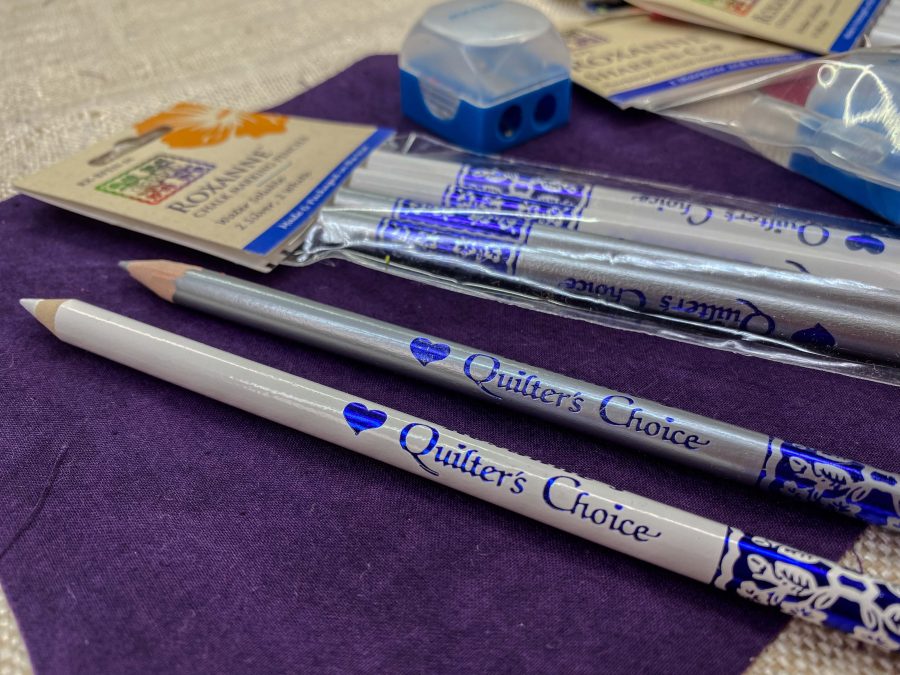
For years, the Roxanne Chalk Marking Pencils sat in our tool kit like wallflowers at a dance—present, but not particularly noticed. We assumed they were just another marking pencil, nothing special, nothing different from the dozens of other chalks and markers cluttering our workspace.
We were so wrong.
It wasn’t until we really dug into what these pencils are made of and why they behave the way they do that we had our revelation. These aren’t just marking tools—they’re problem-solvers, game-changers, and (in the case of that silver pencil) actual unicorns.
Let us explain.
The Problem With Most Marking Tools
If you’ve been making for any length of time, you’ve probably been betrayed by a marking tool. Maybe it was the wax chalk that melted into your quilt when you accidentally hit it with an iron. Or the “disappearing” pen that left a permanent yellow ghost after washing. Or the heat-erasable marker that reappeared the moment your finished project hit cold storage.
We’ve all been there. It’s heartbreaking to spend hours—sometimes days—on a piece, only to have your marking tool leave a permanent scar.
The truth is, most marking tools involve a trade-off:
Wax-based chalks are durable and don’t rub off easily, but they can become permanent if heat is applied, and they’re notoriously difficult to remove completely.
Heat-erasable pens give you fine lines that vanish with an iron, but they often leave white “ghost” shadows or reappear in cold temperatures.
Water-erasable pens are easy to see and precise, but their chemicals can react with detergents to leave permanent yellow or brown stains if not thoroughly rinsed.
It’s a minefield. And for those of us working with precious fabrics, heirloom projects, or pieces destined for exhibition, the stakes are high.
What Makes Roxanne Different: The Chemistry of Clean
Here’s where Roxanne Chalk Marking Pencils break the mold entirely.
Pure Chalk, Zero Wax Unlike most marking pencils, Roxanne pencils contain **no wax binders**. None. This means marks will never “set” into your fabric if you accidentally iron over them. The chalk stays on the surface of the fibers rather than melting into them.
Chemically Inert These pencils are mineral-based, not dye-based. There are no chemicals to react with your detergent, no dyes to oxidize over time, no “chemical roulette” that might leave rust-colored stains months after you thought your project was finished. The marks are just chalk—pure, simple, inert.
100% Water Soluble Because there’s no wax or chemical binder holding the chalk in place, Roxanne marks brush off easily or disappear completely with a damp cloth. When you’re done stitching, the roadmap vanishes—no ghosts, no shadows, no evidence it was ever there.
Archival Quality For textile artists concerned about the longevity of their work, Roxanne pencils are acid-free. Your marks won’t degrade or discolor the fabric over time, making them safe for heirloom quilts, museum-quality pieces, and everything in between.
The “Silver Unicorn” & Why It Changed Everything
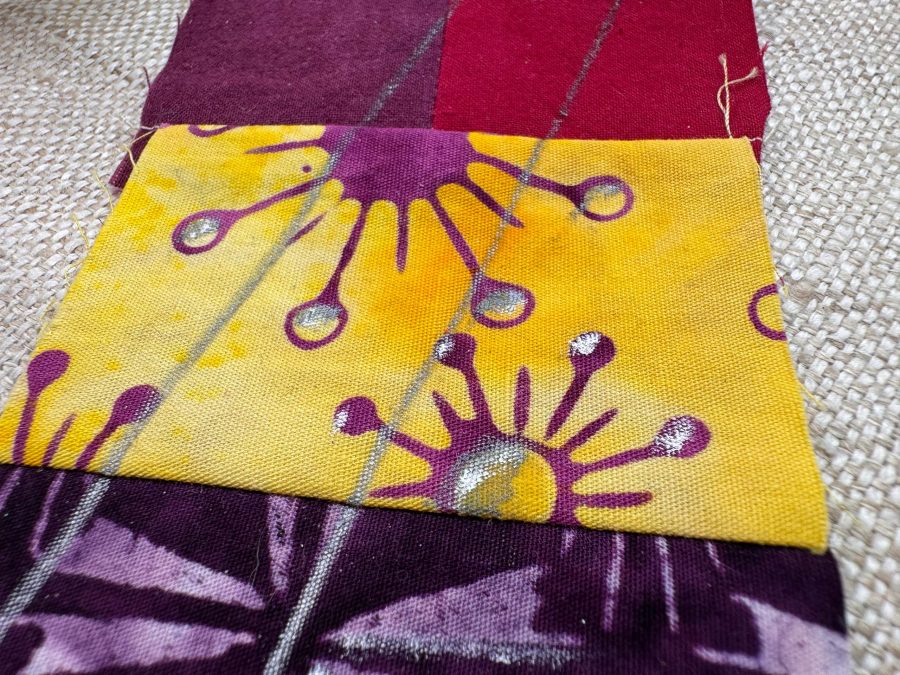
If you work with dark fabrics—indigo for sashiko, black cottons, navy solids—you know the struggle. Most marking tools are either invisible on dark fabric or rub off the moment your hand touches the surface.
Enter the **Roxanne Silver Pencil**, which we now affectionately call “the unicorn.”
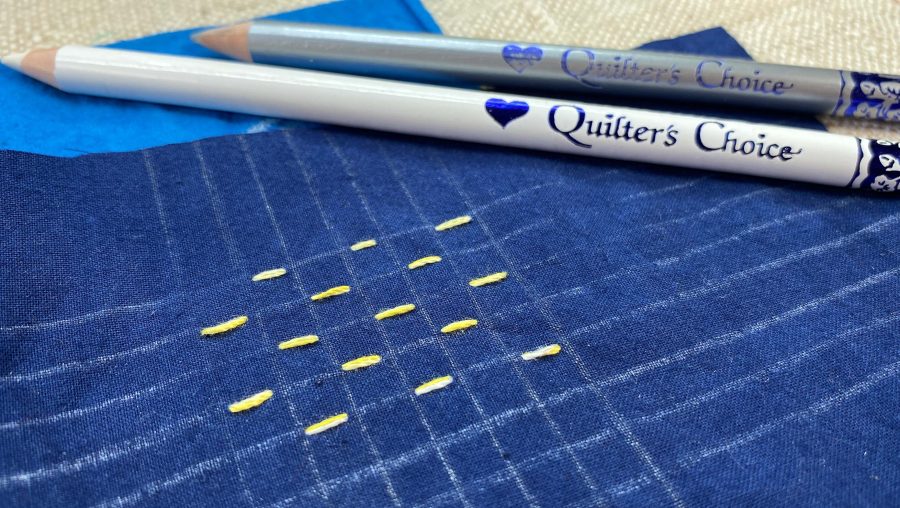
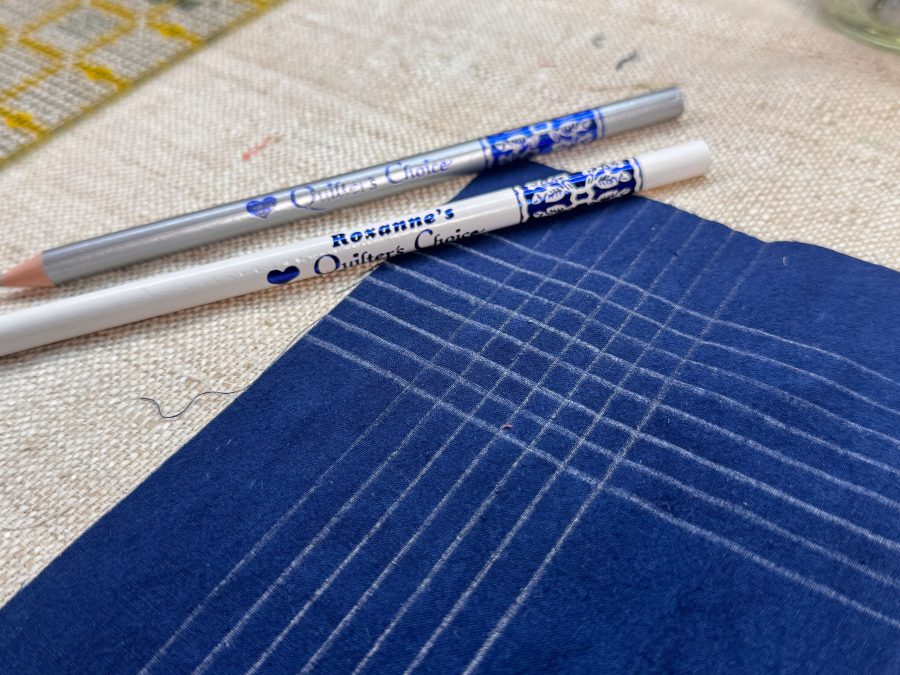
It Works on Everything The silver pencil uses a light-reflective mineral that creates a metallic sheen on fabric. On dark indigo or black, it glows like a beacon. On light cream or white, it shows as a soft grey. This means you can work across high-contrast patchwork—going from a dark navy sashiko block to bright white cotton—without ever switching tools.
Let that sink in for a moment. One pencil. All your fabrics.
It Survives the Handling For sashiko artists and hand quilters, this is critical. The metallic mineral base “grips” the fiber better than standard chalk, staying crisp and visible through the heavy handling that complex stitching requires. We tested this by aggressively rubbing our hand across marked fabric—the Roxanne line stayed sharp while a standard white chalk line nearby smeared into oblivion.
It Still Disappears Completely Despite its tenacious hold during the stitching process, the moment you’re done, a damp cloth or a quick wash makes it vanish. In the video, you can see the mark literally pop off the fabric with zero effort and zero residue.
It’s magic. Truly.
The Artistic Revelation: Permanent When You Want It
Here’s where things get really exciting for mixed media artists, embroiderers, and textile artists who work freehand.
Because these pencils are water-soluble, you can use them wet—dipping the tip in water and painting directly onto fabric like you would with watercolor pencils or graphite. The effect is soft, blendable, and beautifully artistic.
Once the marks dry, you can heat-set them to make them permanent. Suddenly, these aren’t just marking tools—they’re design tools. You can sketch freehand, shade, blend, and create dimensional effects that become a permanent part of your textile work.
For artists who want to move beyond rigid patterns and embrace spontaneous, organic design, this opens up an entirely new way of working.
The Bottom Line: Confidence in Every Mark
We spent years thinking Roxanne Chalk Marking Pencils were just another option in an overcrowded market. We were wrong.
These pencils solve problems we didn’t even realize we’d been working around:
– The frustration of switching between light and dark fabrics
– The anxiety of wondering if marks will truly disappear
– The heartbreak of accidental permanence
– The limitation of working only from traced patterns
Whether you’re a quilter who needs marks that survive hours of hand-stitching, a sashiko artist working on dark indigo, or a textile artist who wants to sketch and paint directly on fabric, Roxanne Chalk Marking Pencils deliver precision, versatility, and—most importantly—peace of mind.
Mark with confidence. Create with joy. Let Roxanne take care of the rest.
📺Watch the full video demonstration on YouTube to see the silver pencil in action and learn how to use these tools for both temporary marking and permanent artistic effects.
Have you tried Roxanne Chalk Marking Pencils? We’d love to hear about your experience! Share your thoughts in the comments or tag us on social media with your projects.