My Nesting Place
By Judy Moore Pullen
We all need a place to relax, create, and play. My place is a pink wing-back chair, surrounded by things that make me comfortable and cozy. My pink chair is like a “learning set” which I encouraged parents to provide for their children during my years as a public-school educator. It is the place that my body and soul go to and get ready to hand sew.
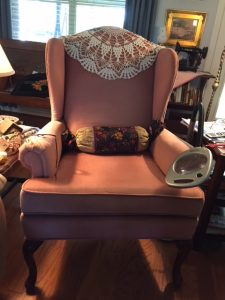
My Pink Nesting Place
I discovered my pink chair in a resale shop in San Angelo, Texas, years ago. My pink chair has accompanied me on several moving ventures and adventures. It has suffered some dings, which I cover with an old piece of lace across the wings. Try as I might to connect with my pincushion on the table next to my pink chair, it continues to endure punctures of needles and pins in the upholstered arm on the right. A handmade rolled pillow, a gift from friends years ago, fits across the back to better conform to my back.
On the right side of my nest is a once discarded small end table that my dear husband, Don, picked up at a garage sale before we met. I have adopted it, placed a lovely vintage lamp on top, and scatter balls and spools of thread, pretty little bowls for scraps, a funny coaster for refreshment, and an array of pencils, scissors, note pads, and flat out stuff.
Adjacent to my table, I have extended my nest to include the arm of a big leather sofa. I admit to having more than one hand stitching project going at a time…I have a problem. The arm of the sofa is large enough to hold an old jewelry box encrusted with black beads, also a great find from a resale shop. On the inside of the box, my jewels of choice are needles, straight pins, needle threaders, small scissors, a Roxanne Thimble, Needle Grip-its, and bits and pieces of needful things. There is still room on the arm of the sofa to hold a stack of on-going projects.
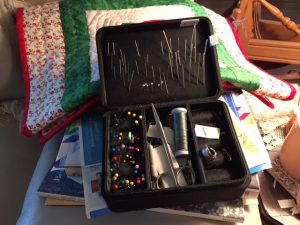
Box for all my “jewels”!
Since I am AARP age, I have bonded to a lighted magnifier with a flexible arm that sits on the floor on the left of my pink chair. Early in the evening, if the stitching I am doing is not too small, I bend the flexible arm and place the light right over my work. As the evening progresses and my eyes tire, or if my work is small and detailed, I lower my light and peer through the magnified glass.
There is another small table to the left of my pink chair that belongs to Don as he joins me in the evening, paws up in his recliner. I have been reminded, a few times, that I have my own table…but he is still willing to share if I need to spread out.
Sometimes during the day, I place things on my pink chair: mending, a new quilt magazine to share with Don for ideas for the barn quilt blocks he paints, a bag of chocolates for munching in the evening.
My nest is a pink chair, a place where I am comfortable and my mind and spirit get set to sew. I jot down ideas as they bubble up in my mind during the evening. My nest gets messy, but so do I when I am in the throes of making something by hand. It is my place. I have ownership. I was once offered a brand-new recliner, which I promptly turned down. Only now is my pink chair perfectly broken in.
I believe we all need a place where we can go, do those things we enjoy, and just be. I hope that my pink chair lasts as long as I do. It is a gift that I gave myself years ago that keeps on giving, and giving, and giving. A thought just bubbled up into my mind: I need to put my old pink princess phone on the table next to my pink chair!
Wishing you a nest place of your own.
Happy Stitching,
Judy Moore Pullen