
Some of the most important stitches in sewing are the ones you’ll never see.
The pad stitch is one of those hidden heroes. Used primarily in tailoring, this hand-sewing technique adds structure, support, and shape to collars, lapels, facings, and other garment details. While it isn’t decorative like a French knot or practical like a buttonhole stitch, it plays an essential role in creating garments that look polished and professional.
If you’ve ever admired a beautifully tailored blazer or coat, chances are the pad stitch was working behind the scenes.
What Is a Pad Stitch?
A pad stitch is a series of small diagonal stitches used to join two layers of fabric—typically an outer fabric and an interfacing. Rather than simply holding the layers together, the stitches help shape the fabric, allowing collars and lapels to naturally roll and hold their form.
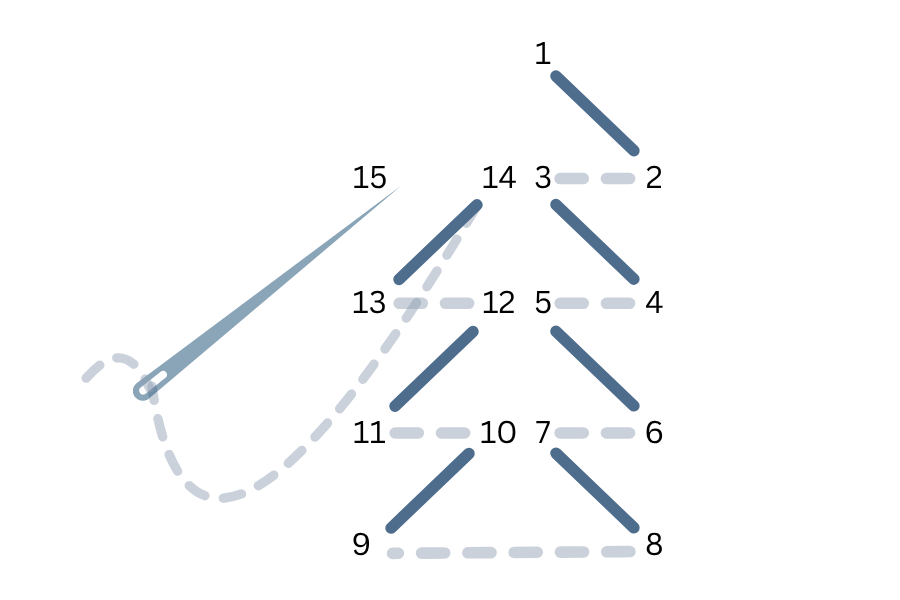
The stitches are worked in offset rows, creating flexibility while securely anchoring the layers.
When & How It’s Used
Pad stitch is most commonly used in garment construction and tailoring. It is ideal for:
- Jacket and blazer lapels
- Coat collars
- Shirt collars
- Tailored facings
- Structured hats
- Couture sewing techniques
While most home sewists won’t use pad stitch every day, it’s an invaluable technique to learn if you’re interested in garment making or improving the quality of handmade clothing.
What You’ll Need
- Sharp hand-sewing needle (milliners or sharps work well)
- Fine hand-sewing thread, like Presencia 60 weight
- Wool, cotton, or hair canvas interfacing
- Fashion fabric
- Tailor’s ham (optional)
- Fabric clips or pins
- Scissors
Pro Tip: Fine, sharp needles allow you to catch just a few fibers of the outer fabric, keeping the stitches virtually invisible from the front.
How to Sew a Pad Stitch
- Step 1: Layer Your Fabrics – Place the interfacing against the wrong side of your fabric and pin or baste in place.
- Step 2: Pick Up a Few Fibers – Bring the needle through the interfacing and catch only a tiny amount of the fashion fabric. The stitch should barely show on the right side.
- Step 3: Stitch Diagonally – Make a small diagonal stitch through the interfacing and repeat, working in evenly spaced rows.
- Step 4: Shape as You Sew – As you work, gently curve the fabric over your hand or a tailor’s ham. The pad stitches will help “train” the fabric to hold that shape.
- Step 5: Continue Across the Area – Repeat until the entire collar or lapel is stitched, maintaining even spacing and tension.
Tips for Successful Pad Stitching
- Catch only a few fibers of the outer fabric.
- Keep stitches evenly spaced.
- Maintain gentle, even tension.
- Work over a curved surface when shaping collars and lapels.
- Practice on scrap fabric before working on a finished garment.
Common Projects Using Pad Stitch
Pad stitch is commonly found in:
- Tailored jackets
- Wool coats
- Dress collars
- Suit lapels
- Couture garments
- Structured costume pieces
Although hidden inside the garment, pad stitch is one of the techniques that separates handmade clothing from professionally tailored pieces.
Next Month: We’ll revisit the Split Stitch, a classic embroidery stitch perfect for smooth outlines, lettering, and delicate detail work.