If April was all about texture and dimension, May is about softness, shading, and color blending.
The Long & Short Stitch is a classic embroidery technique used to create smooth transitions between colors and realistic, painterly effects in thread. From flower petals to animal fur, this stitch helps embroidery designs come to life with depth and movement.
While it may look advanced, learning the basics of long & short stitch opens the door to a whole new style of embroidery.
What Is Long & Short Stitch?
The long & short stitch is a filling stitch made by alternating stitches of different lengths. By layering rows of slightly uneven stitches and blending thread colors together, embroiderers can create gradual shading and soft transitions.
Rather than creating a perfectly uniform fill, the irregular stitch lengths help colors merge naturally — much like brushstrokes in painting.
When & How It’s Used
This stitch is ideal whenever you want embroidery to feel soft, dimensional, or realistic.
It’s best for:
Floral petals and leaves
Realistic embroidery designs
Shading and color blending
Animal fur or feathers
Filled embroidery motifs
It’s one of the foundational stitches used in thread painting and advanced embroidery techniques.
Reflecting on years past, when I was preschool age, my parents and I lived in an old three-story schoolhouse in Venice, Ohio. It sat quietly in the country, across the road from a cemetery, and was partitioned down the middle—our family on one side, a family of six on the other. I remember tagging along with my mother to the feed store, carefully choosing three printed chicken feed sacks that matched just right. She hand-stitched them into a new dress for me—clothing made from what is now considered a collector’s item.
Perhaps living in a schoolhouse and wearing feed-sack dresses was an early hint of what was down the road for me: a lifelong love of stitching, teaching, and encouraging others to create with their hands.
Over the years, I’ve taught countless “newbies” and not-so-newbies alike. My goal has always been the same—to help students feel confident, capable, and excited enough to keep sewing long after the class ends. The Hearts to You Mug Rug project is a perfect vehicle for that mission. It’s approachable, adaptable, and full of opportunities for learning and creativity.
This simple wool appliqué project is designed to build confidence while introducing or reinforcing basic hand-stitching skills. Encourage students to work at their own pace and remember: progress matters more than perfection.
Step 1: Prepare the Base Circles
Using the 5” felted white wool square and the 5” felted red wool square, cut one circle from each.
The white circle will be your top/background.
The red circle will be the base layer.
Tip: If students struggle with cutting smooth curves, provide a paper template or encourage slow, small scissor movements rather than long cuts.
Step 2: Layer and Secure
Place the white circle on top of the red circle, centering it carefully.
Use pins, clips, Roxanne Basting Glue, or a few temporary basting stitches to hold the layers together.
Check that the red shows evenly around the edges for a neat border.
Teaching moment: This is a great time to discuss alignment, balance, and how layering adds visual interest.
Step 3: Cut the Heart Appliqués
From the 2 ¼” x 7” piece of felted red wool, cut two small hearts.
Hearts do not need to be identical—slight variations add charm.
Encourage students to draw heart shapes lightly with pencil if helpful.
Ask: How could you change the shape or size of the hearts to make this project your own?
Step 4: Position the Hearts
Arrange the hearts on the white circle until you’re happy with the placement.
Overlapping hearts create depth and interest.
Once positioned, secure with pins, glue, or a few basting stitches.
Visual learners benefit from seeing multiple layout examples before stitching.
Use visuals and drawings. Sometimes a sketch explains more than words.
Demonstrate for large groups and again for smaller groups when needed.
Provide time for guided practice. Stitch alongside students.
Allow independent practice while monitoring and encouraging.
Vary group sizes and group members. Learning from peers is powerful.
Use pull-out groups for extra help or advanced exploration.
Show and share as you go. Celebrate progress, not just finished pieces.
Use Clues and Encouragement
Word clues: “Just like me, the older I get, the finer I am. The same is true for thread and hand sewing needles. Sewing machine needles are the opposite.”
Visual clues: Place a sticker in the top right-hand corner of a square-up ruler to indicate step one.
Reduce frustration: Encourage breaks, mark with tape, and avoid Sharpie markers on fabric.
Engage Creativity and Reflection
Engage students with questions:
How could you change the design?
Which color do you prefer?
How did you get that corner so sharp?
What would you do differently next time?
Transfer learning: Where else could you use this technique?
Check back: What did you learn today?
Reflect together: What would you keep, eliminate, or change?
Appoint “maestras.” Peer leaders build confidence and community.
Keep it FUN! Joy is the best teacher of all.
Sewing Beyond the Project
The Hearts to You Mug Rug may be a small piece, but it carries big lessons—about patience, flexibility, creativity, and community. When students leave class feeling successful and eager to stitch again, we’ve done our job.
After all, sewing isn’t just about thread and fabric. It’s about stories passed down, skills shared, and hearts stitched into every piece.
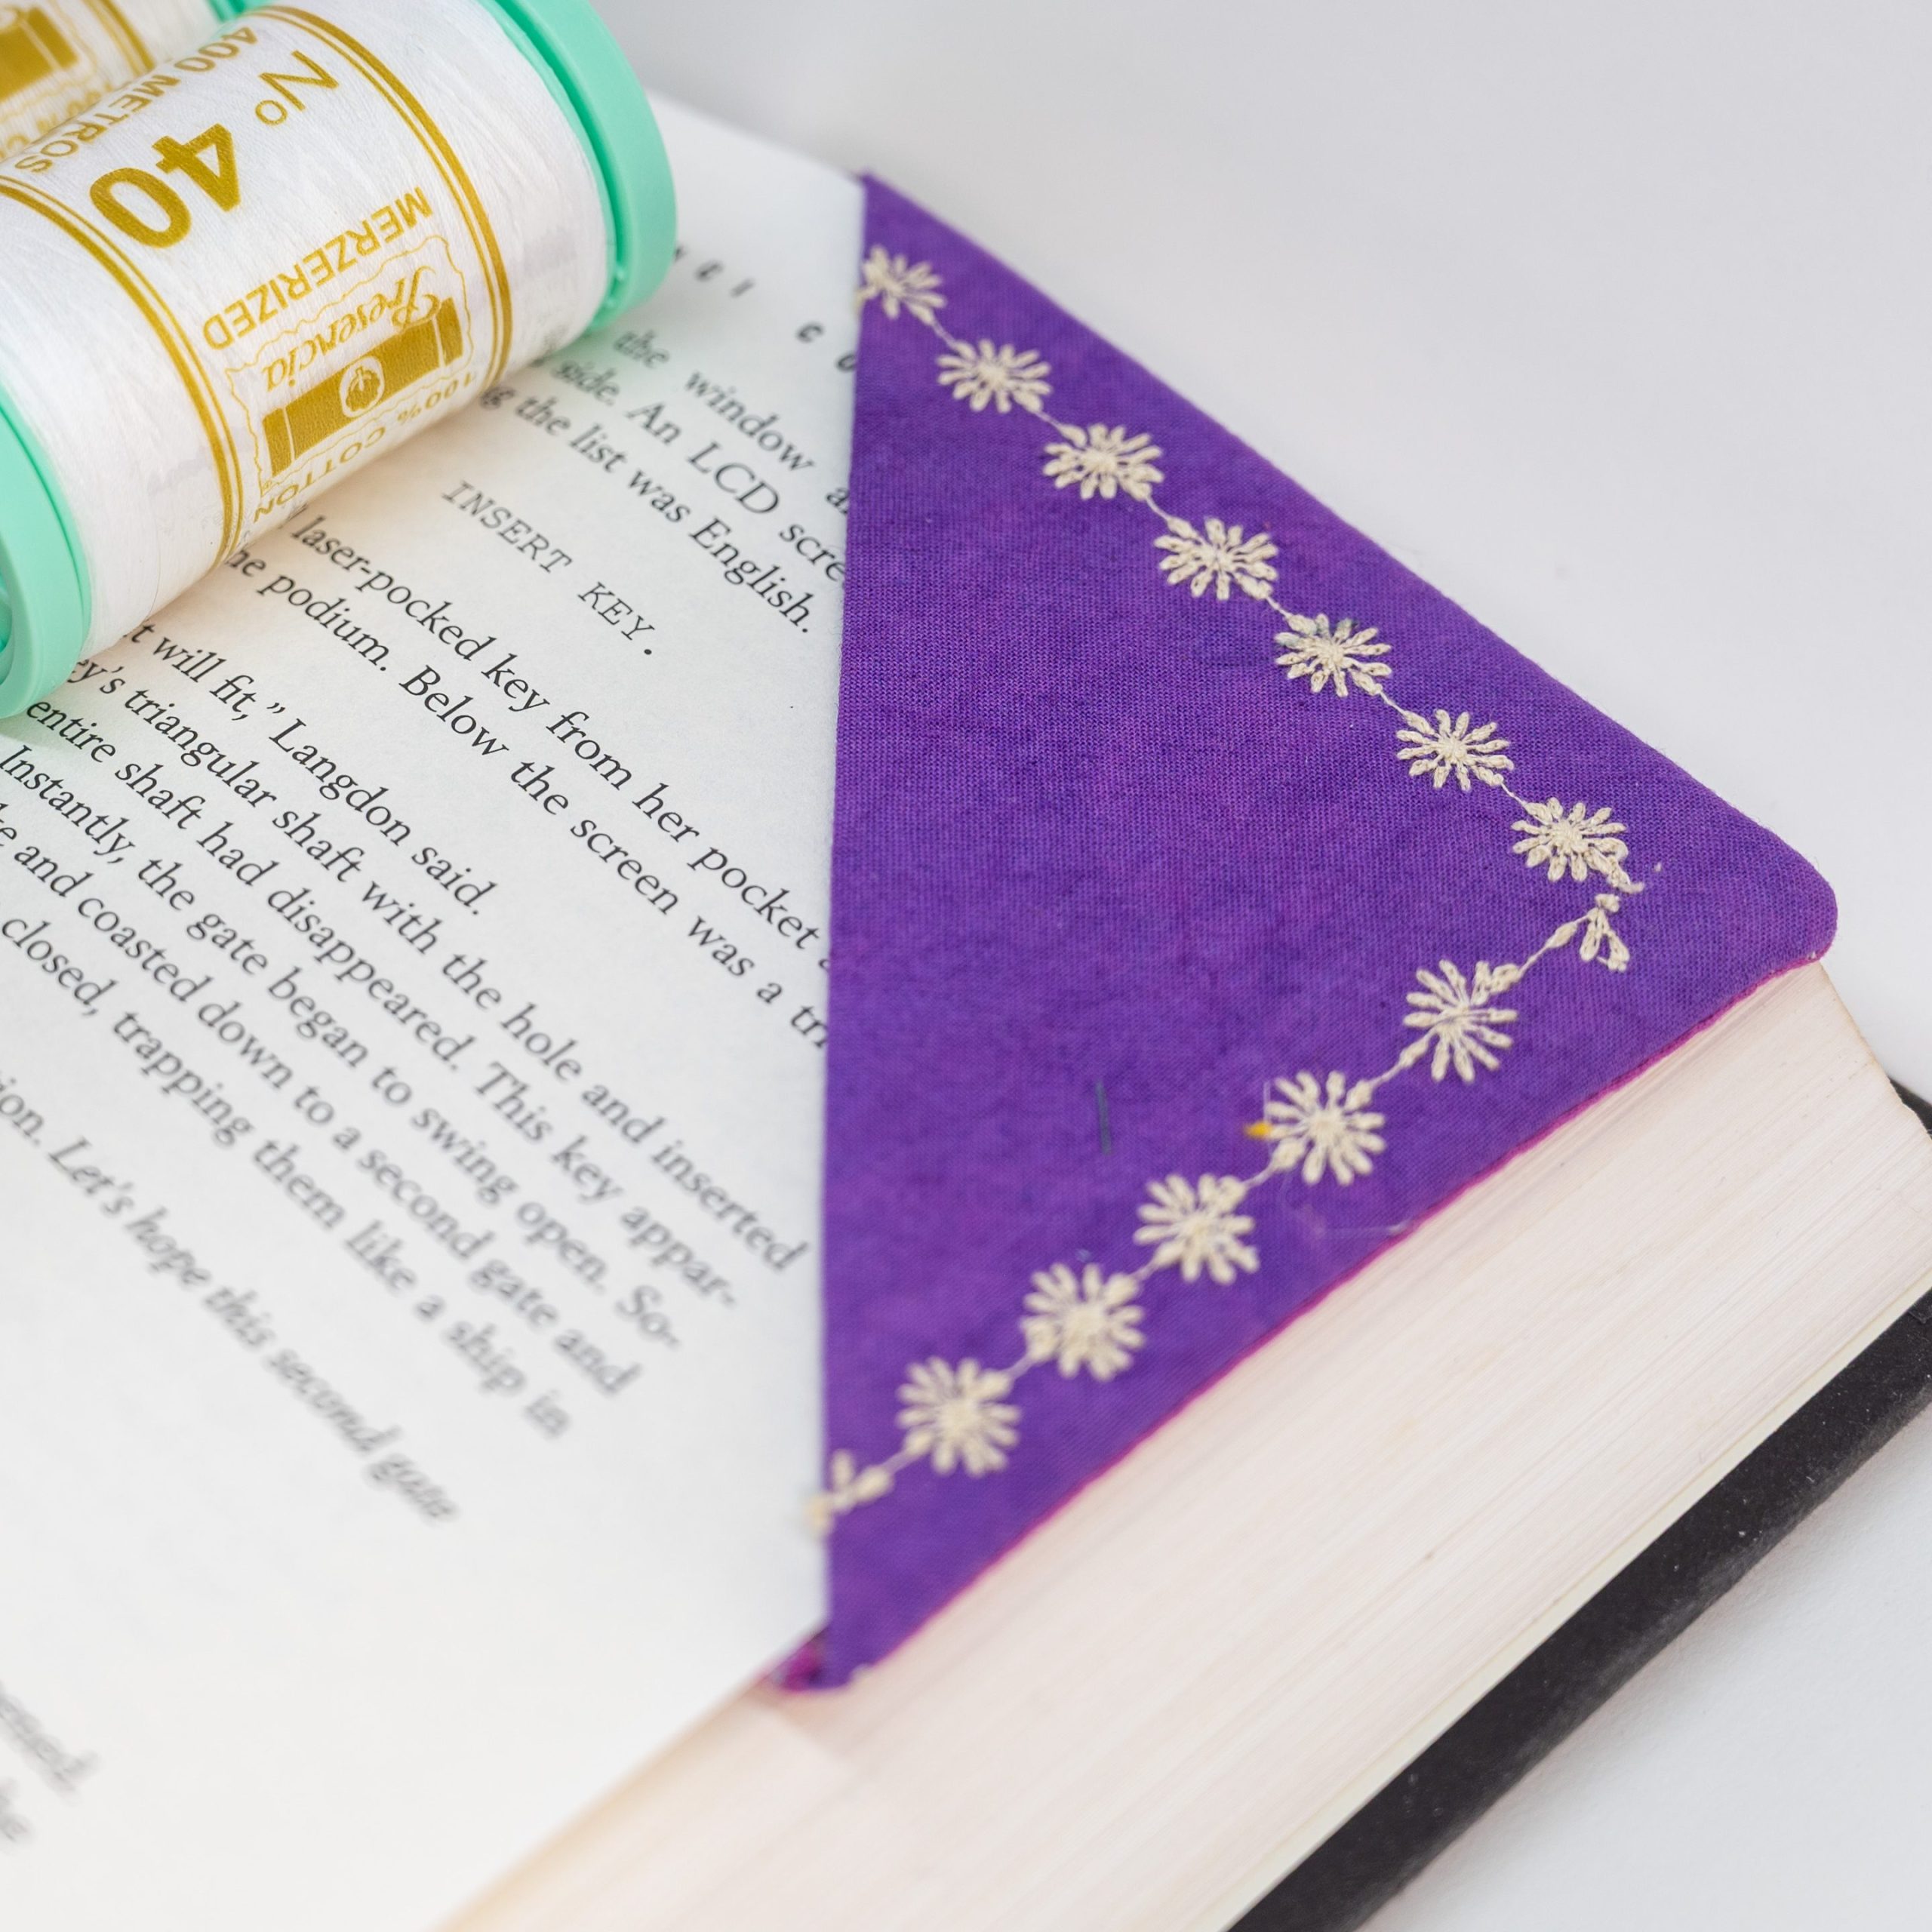
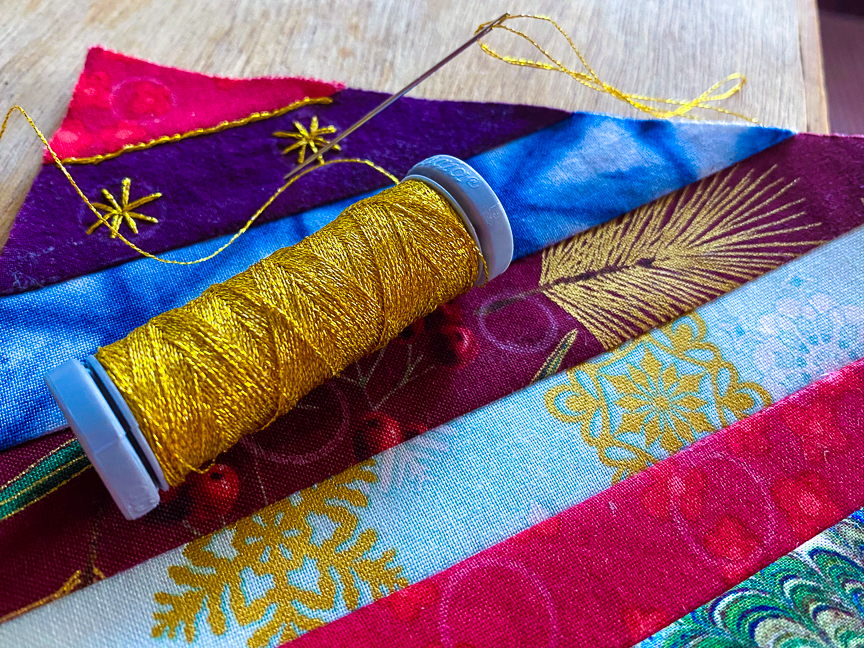
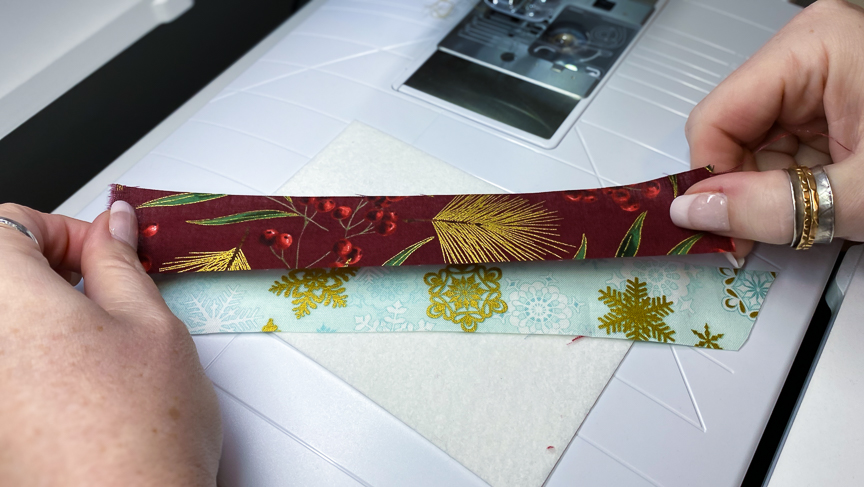
September is here, which means the light shifts, the air cools (a little), and suddenly every book on the shelf starts whispering, *pick me up*. For makers, there’s a special magic in pairing fabric and thread with the quiet rhythm of turning pages. That’s where this month’s project comes in: the fabric corner bookmark.
It’s quick, it’s clever, and it’s stitched with Presencia thread — so it’s not just any bookmark, it’s a handmade one that will stay strong through chapter after chapter. Think of it as a tiny quilt block that holds your place between paragraphs.
The beauty of this project is how well it speaks to two parts of our community:
The makers – You already have fabric scraps begging for a purpose and Presencia 40 wt and 12 wt ready to shine.
The readers – Every book lover you know (including you!) could use a few of these tucked into novels, cookbooks, or pattern books.
They’re small enough to batch-make, personal enough to feel like a gift, and durable enough to actually be used. Which makes them just about perfect, right?
And here’s the twist we didn’t see coming until we tried it ourselves: these little bookmarks moonlight as coasters. Slip it off your book page, set it under your coffee mug or tea cup, and you’ve got a soft landing spot for your drink while you read. From page corner to tabletop — multifunctional stitching at its finest.
Presencia’s 40 wt Sewing Thread gives your machine-stitched edges that neat, polished look, while the chunkier 12 wt Perle Cotton brings personality when you hand-embroider a design or initial. However you finish them, they’re proof that thread isn’t just what holds projects together — it’s what makes them shine.
So gather your scraps, grab your Presencia, and make a little stack of bookmarks for yourself and your fellow book lovers. After all, stories are better when they’re shared — and so are stitches.
📄 Download the project handout below. ▶️ Watch the full tutorial on YouTube here. 🧵 Shop all Presencia threads here.
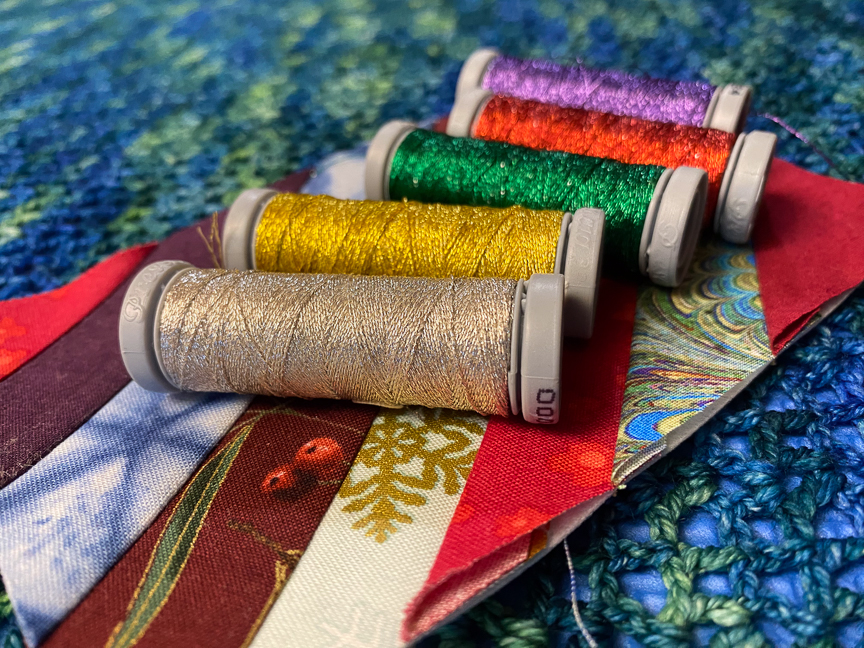
Fabric cards are the perfect way to add a little OMPH to your gift giving and they show that you really do care enough to send something handmade…even if you don’t have a lot of spare time or the extra brain capacity for a larger project. Easy to customize to any size for any occasion (maybe a certain winter holiday that is coming up?), fabric cards show you went that extra mile and put thought and effort into the gift-giving experience. They make that special person receiving the card feel seen and appreciated. Fabric cards have a distinctive handmade quality that is hard to replicate with mass-produced, store-bought cards and it is this uniqueness that adds charm and character to your gift.
They are super easy to make! Fabric scraps are pretty inexpensive and if you are already a sewist or know someone who is, you might already have the materials you need to create your own mini textile masterpiece. Add some quilting or embroidery and your creation really goes to the next level. You can hand stitch, applique, or machine embroider each one for a one-of-a-kind product. We used Finca Metallic Thread to hand embroider our fabric cards. Send yours as postcards, framed miniature textile art, gift tags, or leave one side open to insert a gift card. However you use them, if you are like us, you will end up making several *ahem* extra which is a good thing because you never know when you will need a little piece of handmade excellence to add to your gifting.
Here is how we make ours.
Supplies:
Fusible interfacing or stabilizer
Fabric scraps (1–2”wide and long enough to cover your card)
Cover Stock Paper or similar for backing (we like Kraft-Tex for sturdy projects) Note: You can use cotton fabric for the backing too. The end result is not as“cardlike”.
Scissors or rotary cutter
Cuts:
Cut stabilizer/interfacing to your desired size – Standard post card size is 4”x6” but you can make your cards any size you like Cut paper backing to the same size as stabilizer
Instructions:
Place strips of fabric on the stabilizer deciding on placement, color, texture, ect.
Remove your chosen strips and place the center strip face up on the stabilizer. We like using diagonal lines, so our first strip covers from the top left corner to the bottom right. You do you though…
Place an adjacent strip on top of the first one with Right sides facing. Sew the seam using a 1/4’’ to 3/8’’ seam allowance. Make sure the fabric covers past the edge.
Press the seam open being careful to watch if your stabilizer has a fusible backing (you can also finger press the seam open as well).
Continue in this manner sewing strips on one at a time moving in one direction.
Once you have covered the first half, turn your card and repeat the process goingf rom the center to the opposite corner.
Once the stabilizer is completely covered turn Right side down and trim off the excessfabric.
Secure the last 2 corners using a glue stick or Roxanne Dip & Dab XL Tube
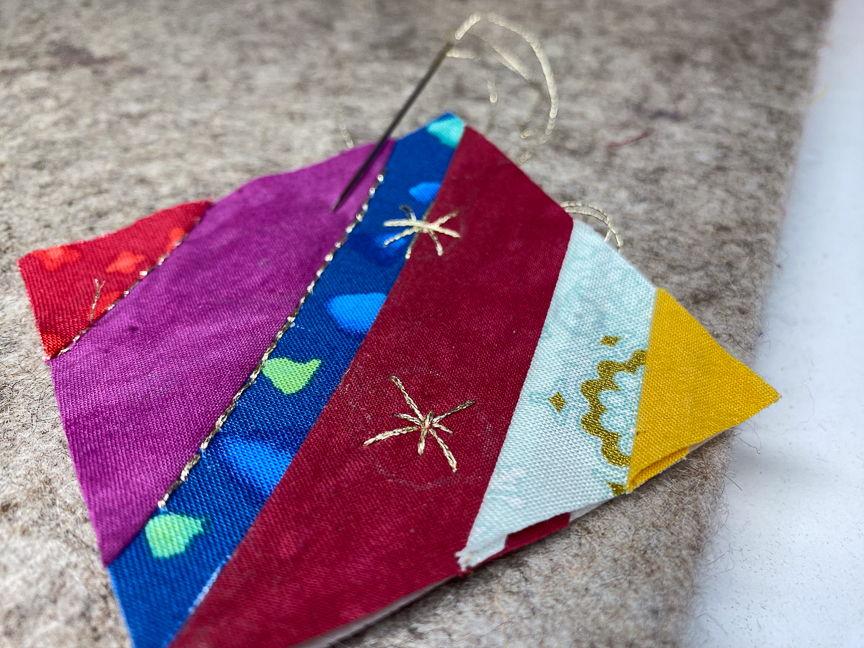
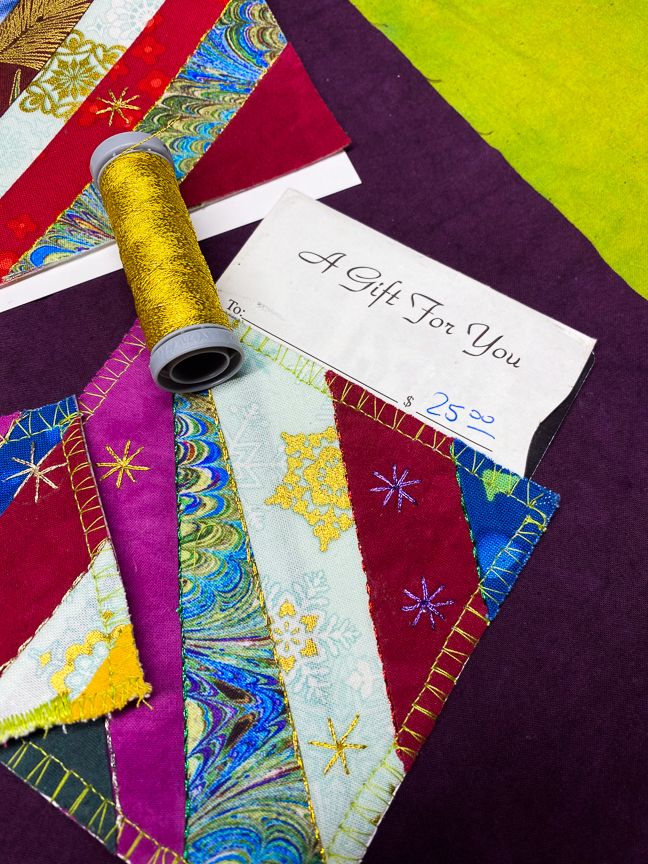
Add embroidery to your card by hand or machine. a. If embroidering by hand use Finca 2-Ply Metallic Thread held double. b. If machine embroidering use Finca 1-Ply Metallic Thread as your top thread and all-purpose thread in the bobbin.
Once embroidery is complete apply the paper back to the card. a. If your stabilizer has a fusible back you can use an iron to secure otherwise glue the card to the back b. If you are using the fabric card as a gift card holder skip this step.
Machine or hand sew a zig-zag or edging stitch around the card to secure the edge. a. We specifically like using fabric cards as holders for gift cards…just leave one side open so you can slide the card inside the pocket b. If you want to use a satin stitch along the edge, use a fabric backing instead of paper. The punching of the needle that many times will perforate the backing causing it to tear off easily.
Optional: Use a hole punch in one corner of the finished card and thread it with sparkly thread oryarn as a beautiful gift tag.
Gift cards like this can be mailed using standard postage…you’ll need to weigh the item to ensure you have enough postage attached to it. They do tend to get dirty in the mail so we opt for mailing them in an envelope.
We love finding new ways to use crafting tools, techniques, and materials outside of their original, intended use. When the folx at Colonial Needle Company asked us to check out Presencia thread and do a project, we immediately went to embroidery since that is what we have always had a supply of Presencia around for. To be specific, we have a supply of Presencia Perle #5 and #3 on hand because we like to use it for general embroidery, but also for mending projects where we need a beautifully chunky thread to really pop off the surface of our fabric. So, yeah, we could have done some sashiko or boro or some freeform embroidery. We considered that. We also considered using it as part of a floral embroidery piece we are doing on a pair of jeans a la your auntie who hung out at Woodstock. We could have done any or all of those things because that is exactly what we have Presencia’s Perle thread for. But, as we said, we love finding new ways to use materials that are a bit outside of their original intent.
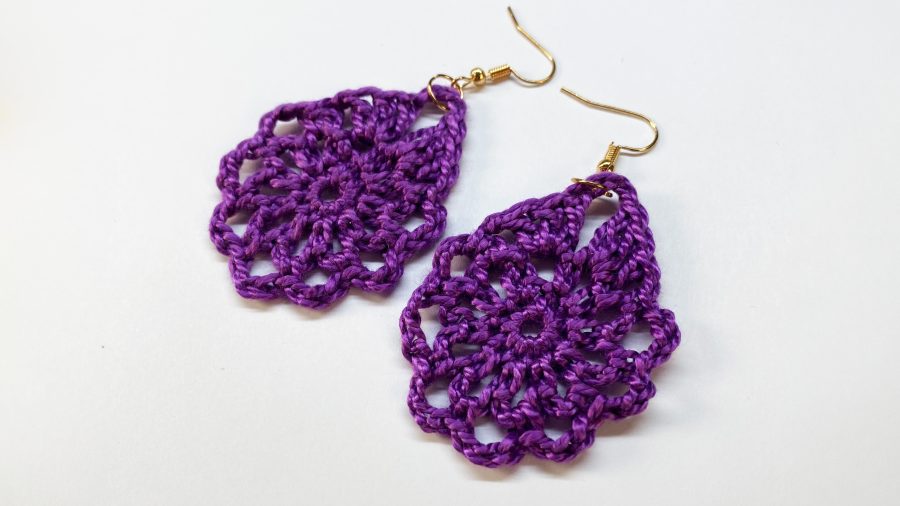
Soooo…Out came the crochet hooks!
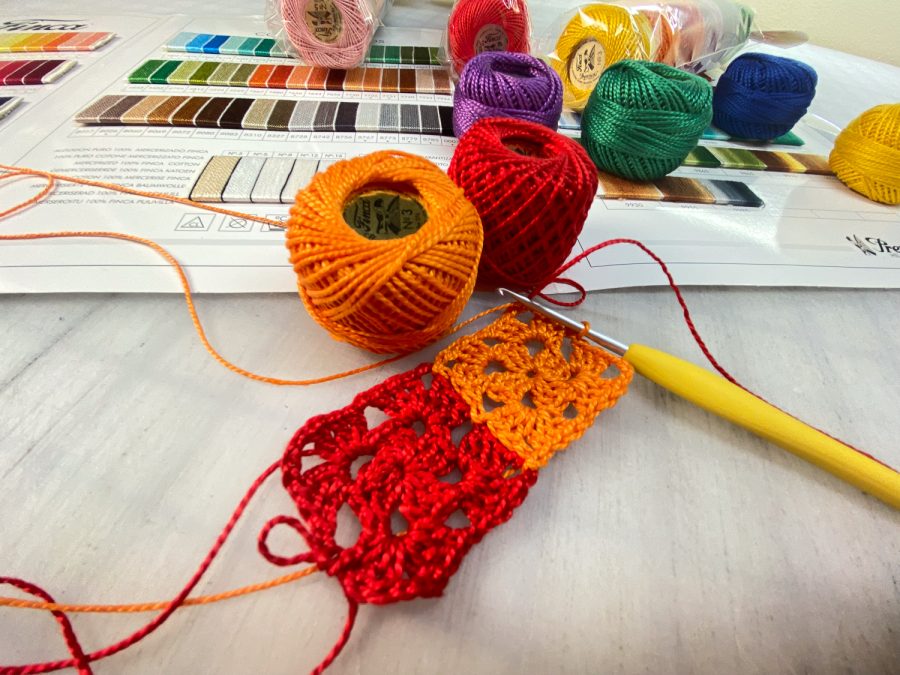
Now, this isn’t the first time we have made crochet pieces using sewing and embroidery threads and we have patterns for skirts and tops using crochet threads. We just knew the Presencia Perle #3 weight thread was going to work beautifully for crochet. And the fact that it comes in those cute little balls/spools and sets of color combos (the sets we have are the Crayon Sampler, Scarlet Sampler, and Yuletide Sampler) makes them prime for some delicious little projects with crochet motifs. With that in mind, we set to swatching.
First were granny squares which turned out FAB and got us thinking about a larger project using a set of samplers in the future…stay tuned for that. Then we did some round motifs and DING! A light went on: earrings!
Virtually any crochet motif made in thread can be made into earrings. One more test motif and that was it; our Boho Crochet Earrings were born. And we didn’t even have to break out the steel crochet hooks! We actually used a C–2.75mm hook from a standard crochet hook set and, once it was blocked into shape, the finished motif held up beautifully. Yes, Shannon tested them out by wearing them the rest of the day…they are so good!
The Presencia Perle #3 weight thread is very different from working with yarn because the twist of the 2-ply thread creates ridges along the finished surface of the thread. This gives it that sheen with light and shadow reflecting off the surface of the thread but it also means that the thread has some grip to it when it is used in crochet. The stitches almost lock into place when stitched into crochet stitches and blocking further locks the stitches in place. This means projects like these earrings need only a good steam blocking with no starch. The finished earrings have a gorgeous texture to them and are ready to wear immediately after finishing.
Ready to make your own?
Grab your favorite color of Presencia Perle #3 thread, a C–2.75mm crochet hook, and our pattern which can be found below. The pattern includes the instructions for making the earrings as well as the stitch chart and all of the special stitches, techniques, and finishing instructions. Stitch, block, attach your earring findings and you’re ready to wear!
Just be warned: get used to saying “Thanks! I made them!” a lot.
Have fun! And be sure to share your makes with us on Instagram and tag Colonial Needle Company(@colonialneedleco) and us, Shannon and Jason (@embracethecreativechaos) so we can see your creations.
To applique is to apply a piece of fabric on top of another piece of fabric background or on top of a pieced background. This can be done by hand and/or machine, using a variety of methods and techniques. An applique (n.) is the fabric stitched on top of a background, either by hand stitching or using a sewing machine.
What I love about applique:
I love applique for so many reasons! My passion for it is in both the process and the product. I find it awesome, while some find it awful to do. At one time, I belonged to a group of like-minded hand applique stitchers. We could multi-task: sit and stitch and enjoy each other’s company at the same time. I hope to sway some readers to try applique, so this subject probably will probably require more blog posts.
The Economics of applique:
There is actually a little economics history related to applique. Years ago, those who made quilts for function only were probably the first scrap quilt makers. If you had to raise the cotton or sheep, harvest the product, spin the fiber, weave the cloth, make the garment, all while struggling to put food on the table and survive, the most efficient and economical way to make quilts for your family was to join scraps of fabric side by side of whatever was left over from worn out clothing. Over time, when funds were more available, and a quiltmaker desired to make a quilt pretty, she could arrange bits and pieces of fabric together to perhaps design flowers for embellishment and applique them on top of the scrappy pieces. Quiltmakers with even more money and time on their hands added hand applique to their quilt tops. Think crazy quilts, broderie perse.
My journey with applique:
As I enjoy the process – the doing of something (except for dusting and vacuuming), hand applique is a joy for me to do! There are so many ways to hand applique, and my favorite way is needle turn. I remember the moment I saw someone demonstrating it at a local quilt show years ago. She looked so relaxed, so confident, and her work was beautiful. I picked her brain and observed for a while, then decided to try my hand at needle turn applique at home.
In the beginning, I was somewhat self-taught, ironing a freezer paper template on the right side of my applique fabric, tracing around the cut edge with a pencil, then cutting the fabric with a scant 1/4” seam allowance. I left the freezer paper in place as I hand stitched, using thread color that matched the background and tried to conceal my stitches. I quickly learned that matching the color of the thread to the color of the applique fabric was much better. While working and playing in a quilt shop at the time, I offered to teach a hand applique class. When a student asked what kind of needle I used, I promptly replied: “Whatever I can see to thread.” Let’s fast forward from that time, since I have learned so much more about tools and techniques, often times by trial and several errors.
There are a few things that make my needle turn applique look so much better, and much more relaxing and enjoyable to do:
Thread size
Thread kind
Thread Color
Choice of Needle
Needle Grip-Its from Colonial Needle Co.
Roxanne thimbles
The invisible stitch
A lighted magnifier
A pillow on my lap
Cookies and coffee…
Let’s break those down:
1. Thread
Presencia 60 weight thread is my thread of choice for needle turn applique. It is made from the finest quality long staple Egyptian cotton, is 3-ply for strength, and virtually lint free. The bigger the number, the finer the thread, which helps make my stitches virtually invisible. I want my hand stitching to last, so 3-ply (three strands of fiber wrapped together) makes this very fine thread so strong. Whenever possible, I unwind a strand of thread and lay it across my applique fabric to check for the best color. Sometimes I audition several colors. My first glance is my best clue to the color that will become one with my applique.
2. Choosing your needle
John James’ Signature Collection Needles are my needles of choice. They are made of the very finest precision engineered steel, making them so strong. With their proprietary finish, these needles glide easily through fabric rather than prodding it out of place. They are available in 4 different kinds: Embroidery – sizes 7, 8, 9; Milliners – sizes 9, 10, 11; Quilting – sizes 7, 8, 9, 10, 11; and Sharps – sizes 7, 8, 9, 10. As with thread sizes, the bigger the number, the finer the hand sewing needle. Machine sewing needles are the opposite.
My needle of choice with my knobby fingers, is a Milliners size 10. It is longer and allows me to sweep the seam allowance under as I go, concealing the drawn line of my applique. I now remove the freezer paper prior to stitching.
*TIP: in tight places like an acute “innie” point, I have a Quilting needle size 7 already threaded. I park my Milliners needle in the background, and make tiny stab stitches with my threaded Quilting needle to invisibly secure those tricky little “innie” points.
You may prefer to begin with a different John James Signature Collection needle or one of the many others offered by Colonial Needle Company. Just as some shoes are comfier than others, see what is the best fit for you and your hands.
3. Needle Grip-Its
Prior to stitching, I secure two little adhesive clear circles of Needle Grip-Its to my needle-holding hand on my forefinger and thumb where I will be gripping the needle. Faithfully using these little magic circles, I have no pain in my hands, and can stitch to my heart’s delight! These tiny adhesive circles stay securely in place during the repetitive motion of gripping and pulling a needle.
4. Roxanne Thimbles
I was happily gifted with a Roxanne Thimble several years ago, and it is the gift that keeps on giving, helping me to painlessly push the needle through fabric, regardless of what kind of hand stitching I am doing. The sideways motion of using Roxanne’s Thimble is better for one’s hands. Getting a correct fit is also important, and quilt shops who carry them are so helpful. Colonial Needle also has a handy info sheet on their website which can be found here.
*TIP: add a Roxanne's Thimble to your gift list, as well as matching Roxanne's Thimble earrings! They are so cute and readily identify you as a hand stitcher.
5. Lighted Magnifier
The lighted magnifier allows me to place light right over my work and more easily see where I am stitching, especially the tip of my needle as I insert it into the background fabric then upward through the underside of the fold.
6. Lap Pillow
The pillow on my lap helps bring my work to a more comfortable position so I can rest my arms and be at ease.
7. And last but not least…
The cookies and coffee, inspire me to take breaks to get up and stretch, walk into the kitchen, and let my little dogs out for a break for them, too.
In Conclusion:
Each of these tools will help your hand applique stitch become nearly invisible, strong, and secure. I think of the fold of the seam allowance of an applique as a cliff, and I am standing on the edge of the cliff. I bring my needle up from the inside of the applique to the back side of the fold, then “jump off the cliff” straight down with my needle into the background. Then travel with the point of my needle under the background a very few threads and come up with the needle just under the fold, the edge of the cliff. If you jump off the cliff/fold to the left or the right with your needle, your thread will show.
*TIP: Instead of scrunching the excess background fabric in my left hand while stitching with my right hand, I roll the excess fabric so that it fits neatly into the palm of my left hand. This keeps my fabric smoother, reduces stress on my hand, and helps prevent me from stitching my background to the wrong places as in my pillow or my clothing. I have learned a lot from my many mistakes.
Oh, the joy of needle turn applique! I feel like an artist, a sculptor, and I can “make the applique my own” by changing a shape as I go. Hand applique helps slow me down, listen to music or a recorded book, watch TV, talk with friends, or just sit quietly, breathe, and put a little love into every stitch. I can take a project with me on a walk along the river, sit down on a bench and stitch whenever and wherever I choose. I enjoy sitting outside in the cool mornings with my little girls, being serenaded by the birds’ songs and stitching by hand.
There are several ways to applique, and I look forward to sharing them with you as well. There is beauty in hand work, a human quality that is beneficial for the hand stitcher as well as for the person who admires or receives the work of one’s hands and heart. Be kind to yourself and savor every stitch. Just as my dad had a box full of hand tools that helped him with his work and play, there are tools that are helpful to those who enjoy hand applique and think of it as Awesome. There is joy and grace in simple things.