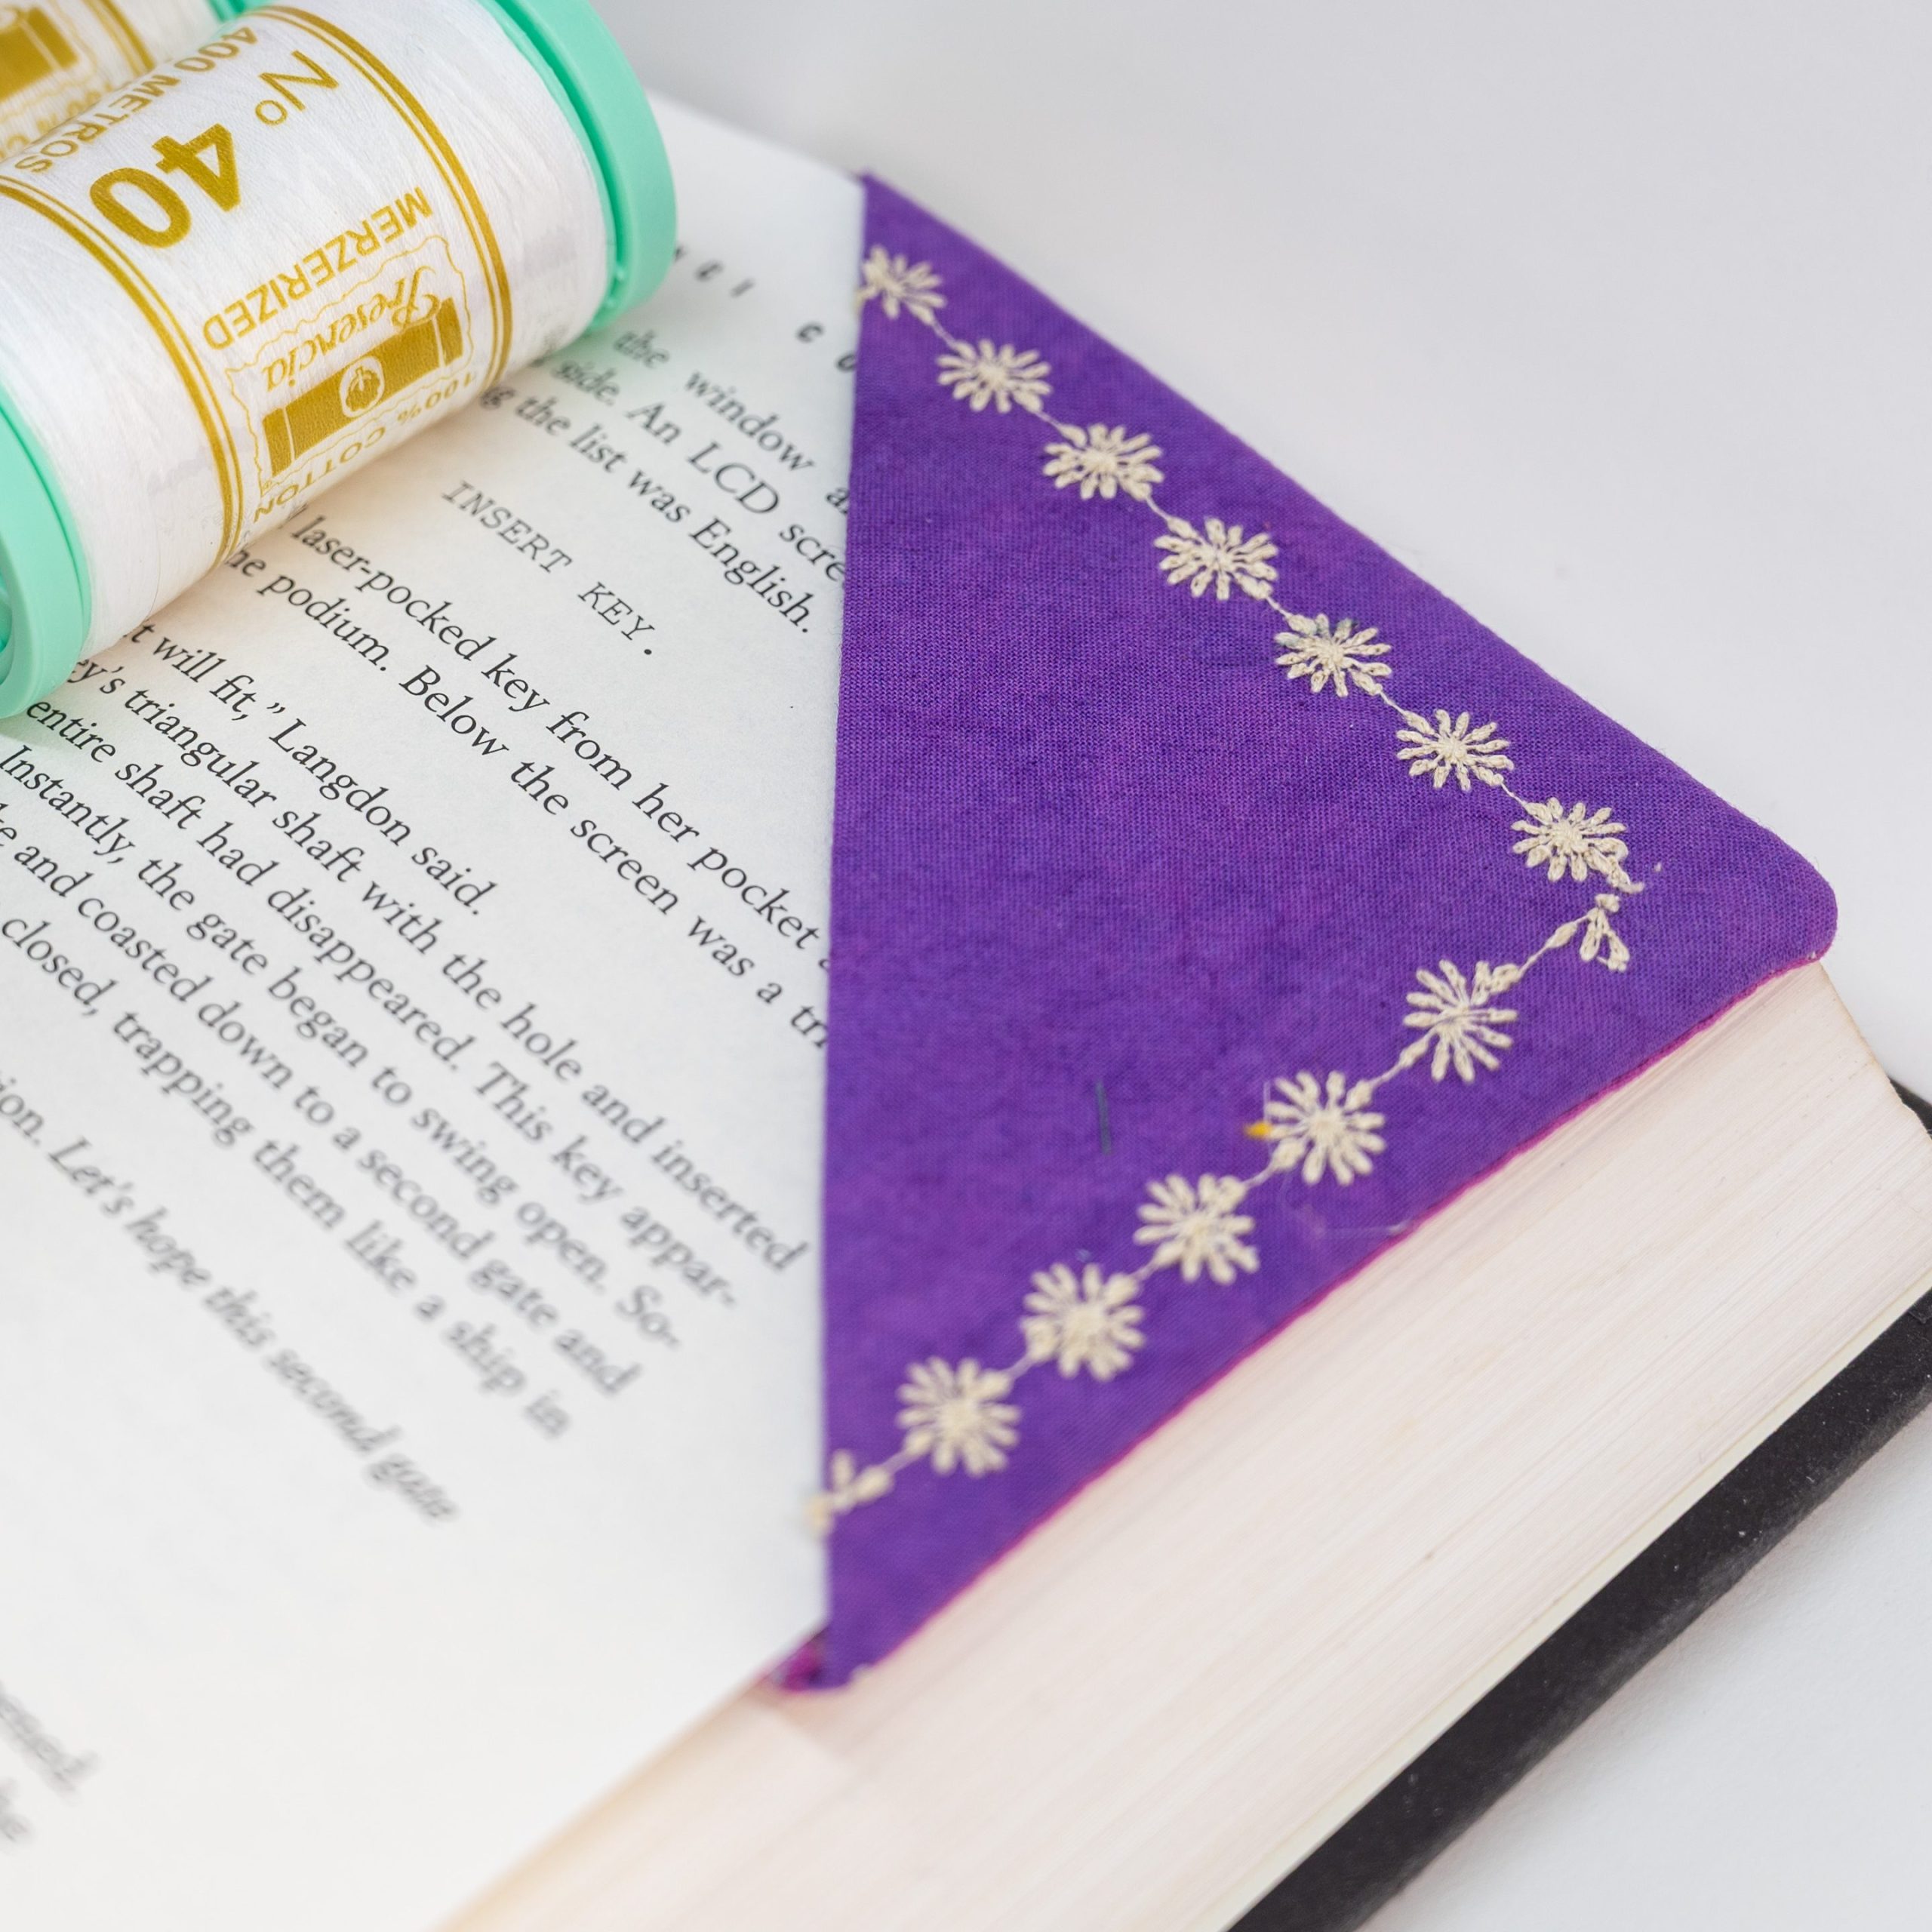
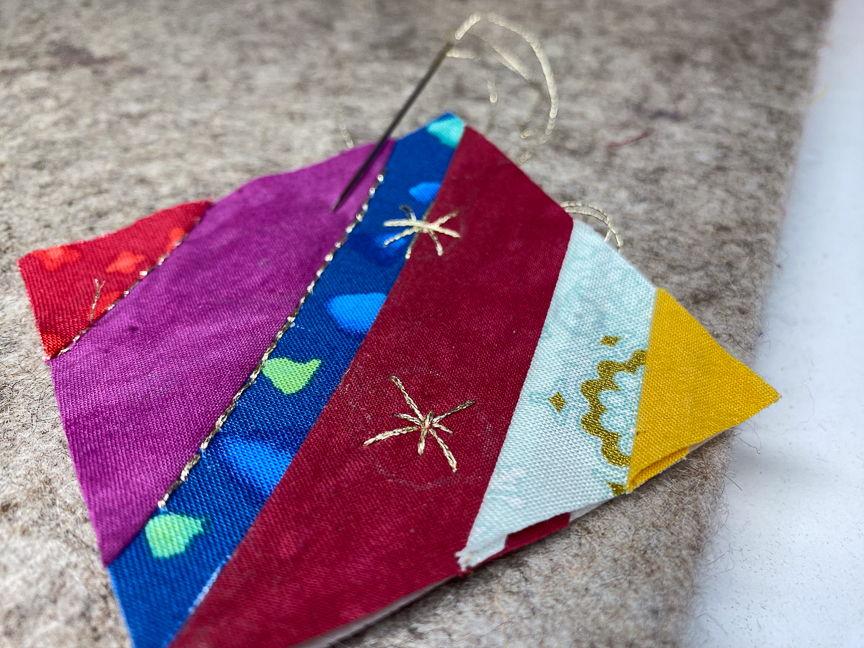
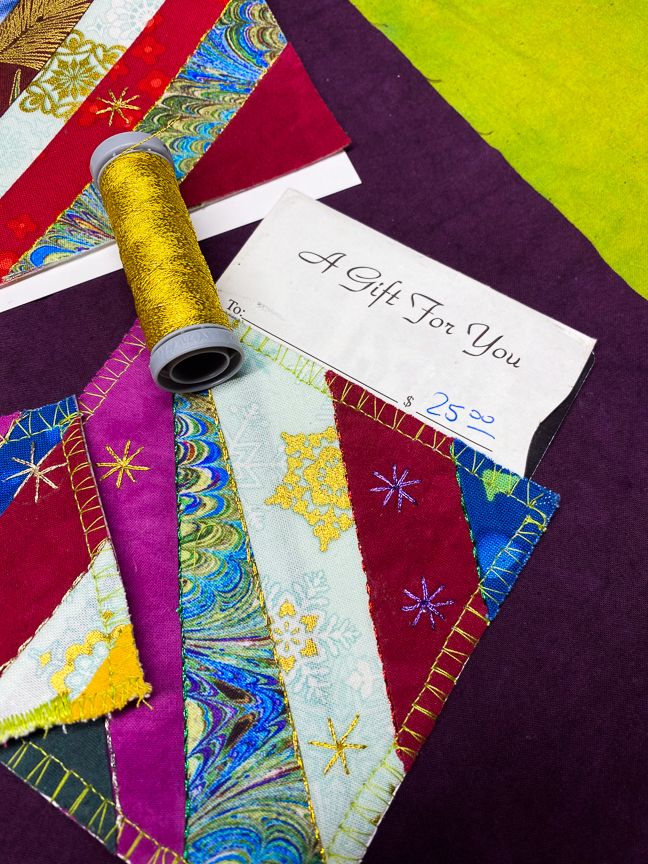
September is here, which means the light shifts, the air cools (a little), and suddenly every book on the shelf starts whispering, *pick me up*. For makers, there’s a special magic in pairing fabric and thread with the quiet rhythm of turning pages. That’s where this month’s project comes in: the fabric corner bookmark.
It’s quick, it’s clever, and it’s stitched with Presencia thread — so it’s not just any bookmark, it’s a handmade one that will stay strong through chapter after chapter. Think of it as a tiny quilt block that holds your place between paragraphs.
The beauty of this project is how well it speaks to two parts of our community:
The makers – You already have fabric scraps begging for a purpose and Presencia 40 wt and 12 wt ready to shine.
The readers – Every book lover you know (including you!) could use a few of these tucked into novels, cookbooks, or pattern books.
They’re small enough to batch-make, personal enough to feel like a gift, and durable enough to actually be used. Which makes them just about perfect, right?
And here’s the twist we didn’t see coming until we tried it ourselves: these little bookmarks moonlight as coasters. Slip it off your book page, set it under your coffee mug or tea cup, and you’ve got a soft landing spot for your drink while you read. From page corner to tabletop — multifunctional stitching at its finest.
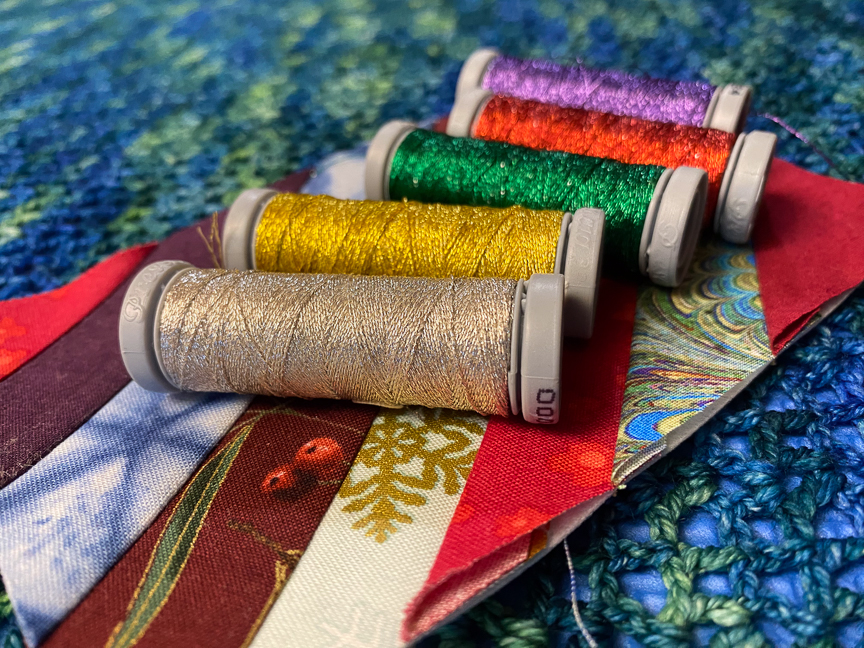
Presencia’s 40 wt Sewing Thread gives your machine-stitched edges that neat, polished look, while the chunkier 12 wt Perle Cotton brings personality when you hand-embroider a design or initial. However you finish them, they’re proof that thread isn’t just what holds projects together — it’s what makes them shine.
So gather your scraps, grab your Presencia, and make a little stack of bookmarks for yourself and your fellow book lovers. After all, stories are better when they’re shared — and so are stitches.
📄 Download the project handout below. ▶️ Watch the full tutorial on YouTube here. 🧵 Shop all Presencia threads here.
Odds are, if you’re reading this, you’re some kind of crafter—embroiderer, cross-stitcher, sewist, or a proud member of the multiple-projects-in-progress club. And let’s be honest, while tote bags are great for carrying project, books, and patterns, they’re like the Bermuda Triangle—things just disappear and we end up digging around and invariably find that one loose sashiko needle. You know…
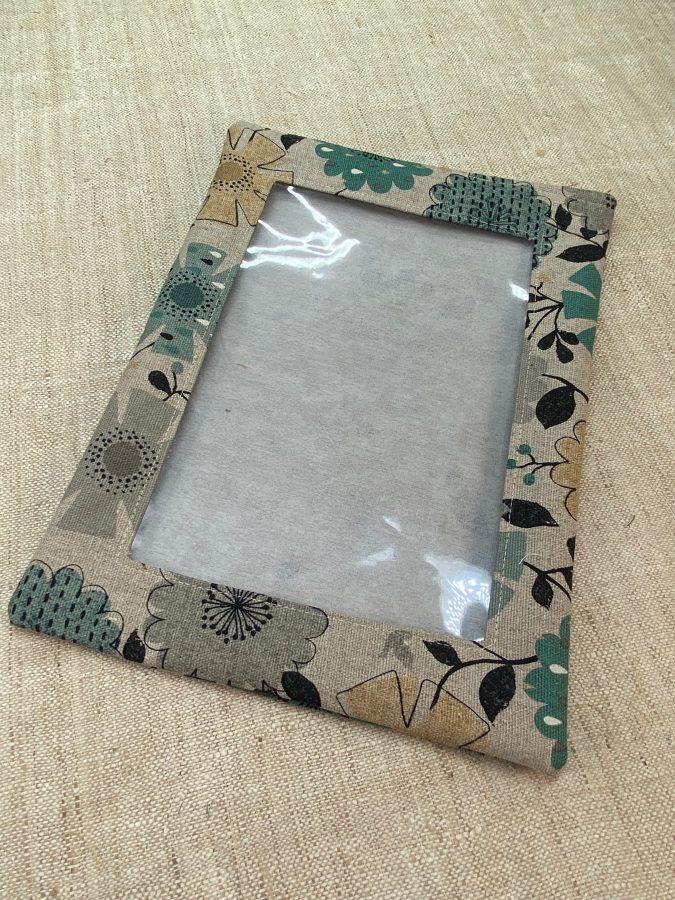
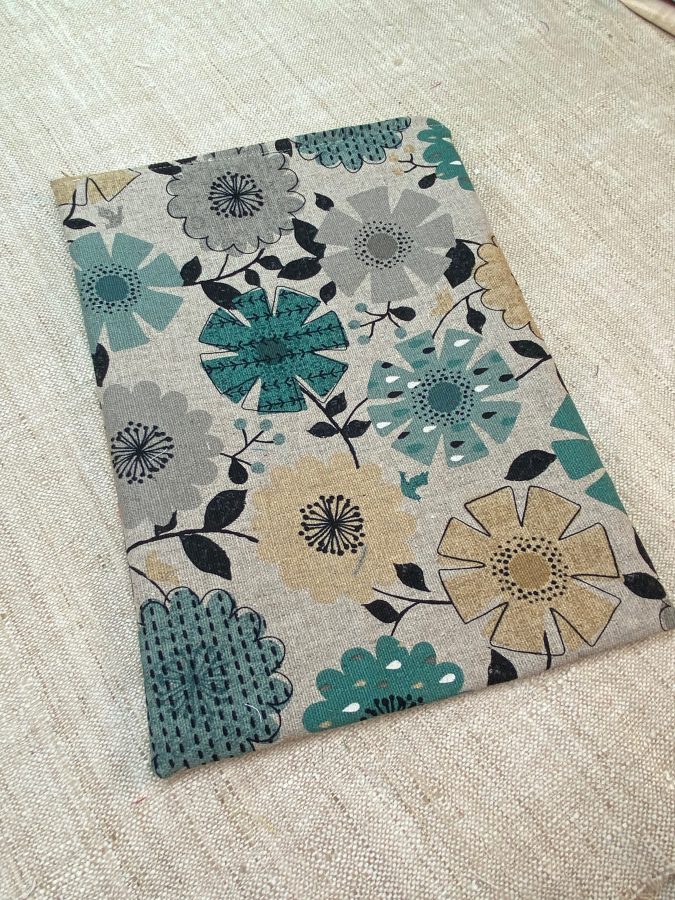
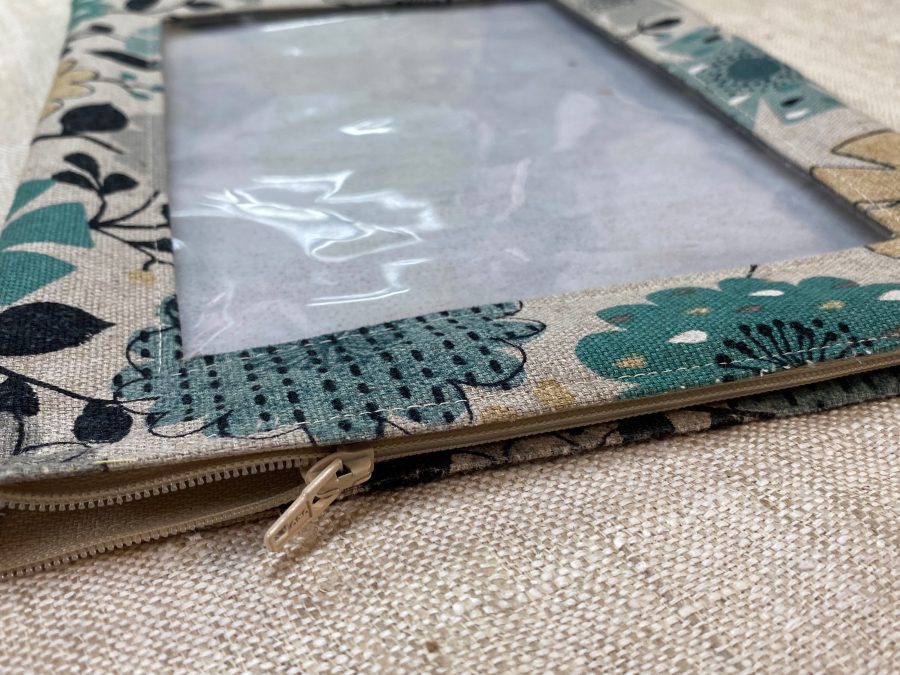
Enter project pouches: These handy, customizable companions keep your tools, materials, and sanity intact. And seriously, who doesn’t love a good pouch with a zipper and a clear window to show off that chaos we call creativity? Sadly, the perfect pouch is as hard to find as your favorite thimble in a couch cushion. So, we decided to make our own!
Armed with Colonial Needle Company supplies, leftover fabric, a stray zipper, and a quick trip to the second-hand art store (a.k.a. crafter’s paradise), voilà! The Windowed Project Pouch with Zipper was born—stylish, secure, and ready to save your supplies from tote bag purgatory. We designed our pouch to keep books and individual patterns safe while still being able to see which book and which pattern are in there. This way, we can chuck it in that tote bag we mentioned earlier and it won’t get all ripped up, bumped, and mashed.
We’re sharing a free pattern and a full video walk through on the Colonial Needle Blog so you can dive in and make your own. The video includes a FAB technique for setting in the zipper as well as how to add a window to just about any bag you make. T rust us, after your first pouch, you’ll be hooked. By the second, you’ll be customizing sizes and making mini versions for makeup or snacks—or let’s be real, more craft supplies. So far, we have used the fabric leftovers to make two other smaller pouches that are being used for carrying such things securely in our totes and other bags. There’s more of those on our website if you are interested in following us down that rabbit hole.
Be sure to tag Colonial Needle Company in your makes so we can brag on you all… we like doing that.
Happy crafting, and may your pouches always be findable and full (of the right stuff)!
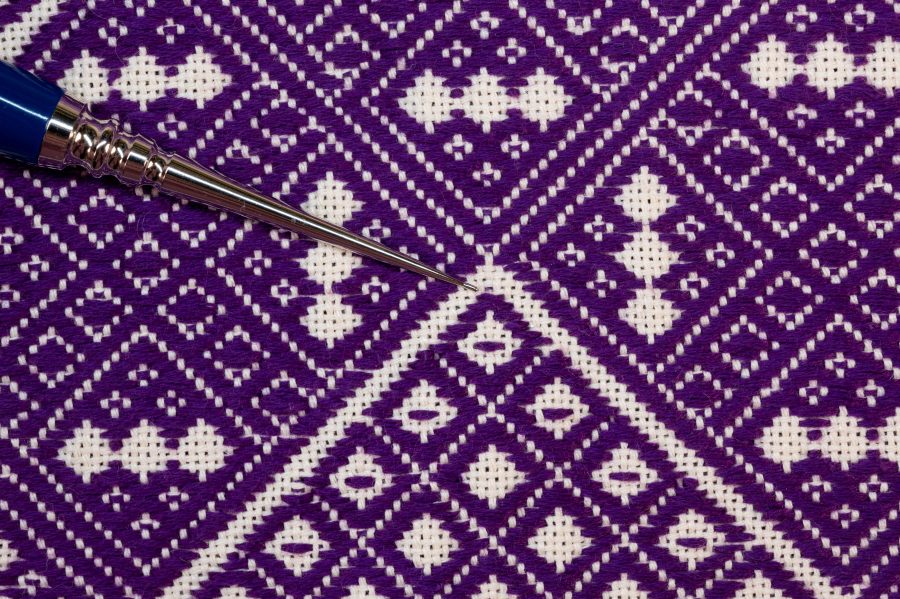
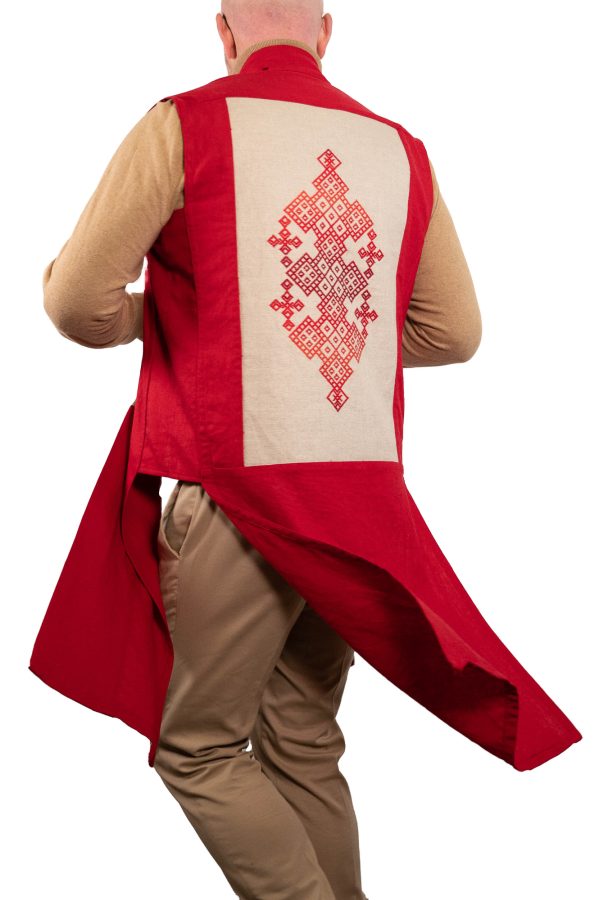
Kogin is completely different than anything else we have ever done before. We love learning and exploring new-to-us techniques and styles of making all the things and kogin-zashi was ticking all the boxes. Creating these gorgeous stitch patterns with such a mindful practice is exciting for us and keeps us motivated to create and explore further. We particularly loved applying kogin to some of our own garment designs and to projects that are common fair among sewists and crafters. Kogin adds a next level of richness to these projects and adds to our understanding of textile creation and use.
Kogin-zashi is a type of darned embroidery meaning the stitches lay closely against one another to reinforce and enhance the base fabric the stitches are worked onto. Kogin is a type of counted thread work with a shared DNA evident in other forms of darned embroidery, counted threadwork, pattern darning, and needle weaving from Norway, Yugoslavia, Ukraine, Medieval Middle Eastern counted thread embroidery, and Mamluk pattern darning found in the Middle East and Egypt.
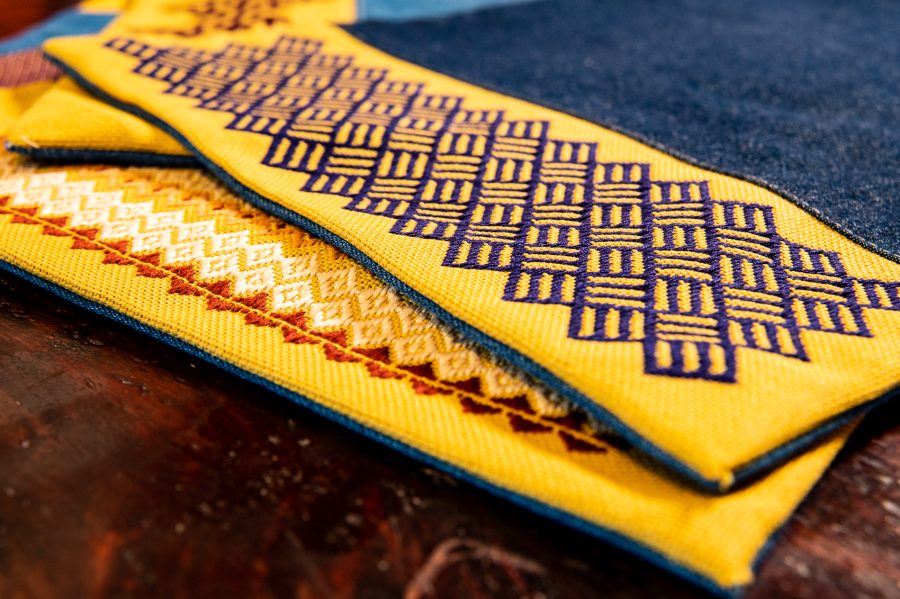
Like other forms of sashiko, kogin-zashi was created by Japanese folx living in cold climates with short growing seasons. Kogin needlework was originally done to reinforce and fortify fabric not as a leisure craft but as a necessity for survival. At the time kogin-zashi was developed (Edo Period, 1603-1867), cotton was a scarce commodity due to the short growing season and the overall cold climate of the Tsugaru region, Aomori, Japan – kogin-zashi’s area of origin. In addition to the scarcity of cotton, it was forbidden for use as a garment fabric by anyone but the ruling class in Japan. This meant folx used fibers derived from plants like ramie, hemp, and tree barks to weave their cloth. Unlike cotton fabric, such fabric does not offer optimal protection from the elements and layering did not provide the needed protection either. Being resourceful, and downright clever, they used kogin stitches made with cotton thread to fill in the gaps in the woven fabric. This created a denser fabric that provided protection and warmth while skirting the strict laws regarding cotton’s use in garment fabric. Fabrics with kogin stitching are complex and dense and contain patterns from geometric borders and lines to intricate key forms and tiled marvels of design. Kogin-zashi fabric is inherently practical but through the lens of time, this practical handwork task has become art and the craft we love today.
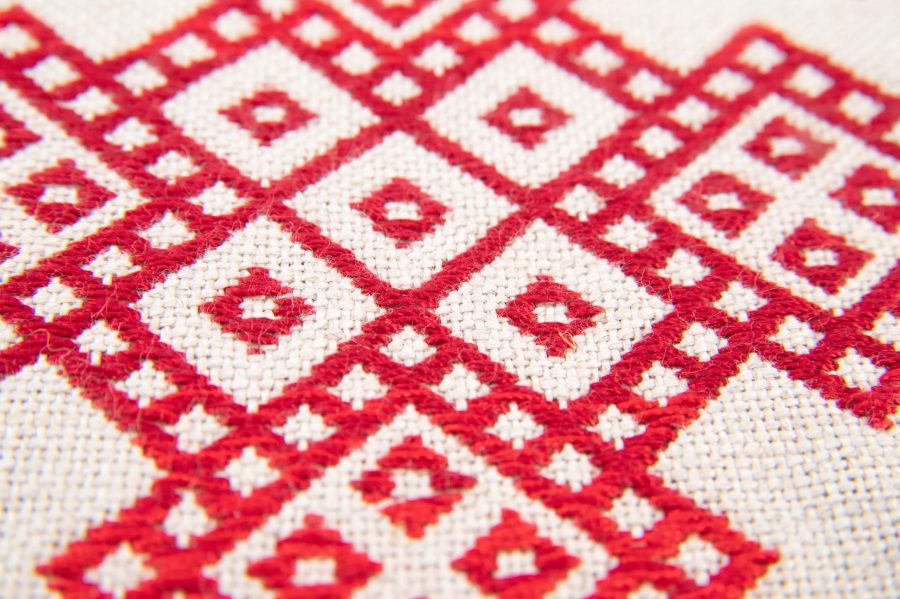
Kogin-zashi designs are created by counting the vertical threads of the base fabric and working the needle over and under those threads following the space between the horizontal threads (warp threads) of the base fabric. The stitches are worked into the spaces created by the intersection of the horizontal and vertical threads, filling in the gaps in the woven fabric.
Kogin-zashi was not used to reinforce fabrics by fastening down patches or binding together multiple layers of fabric. Instead, kogin reinforces fabric by weaving thread between the vertical and horizontal threads of loosely woven fabric. The result is a denser fabric that is stronger, more durable, offers greater protection from the elements and, without a doubt, is stunning to behold. Modern kogin-zashi, uses embroidery floss, thread or even fine weight yarns with evenweave fabric such as Congress Cloth, Davosa, or Lugana to create projects.
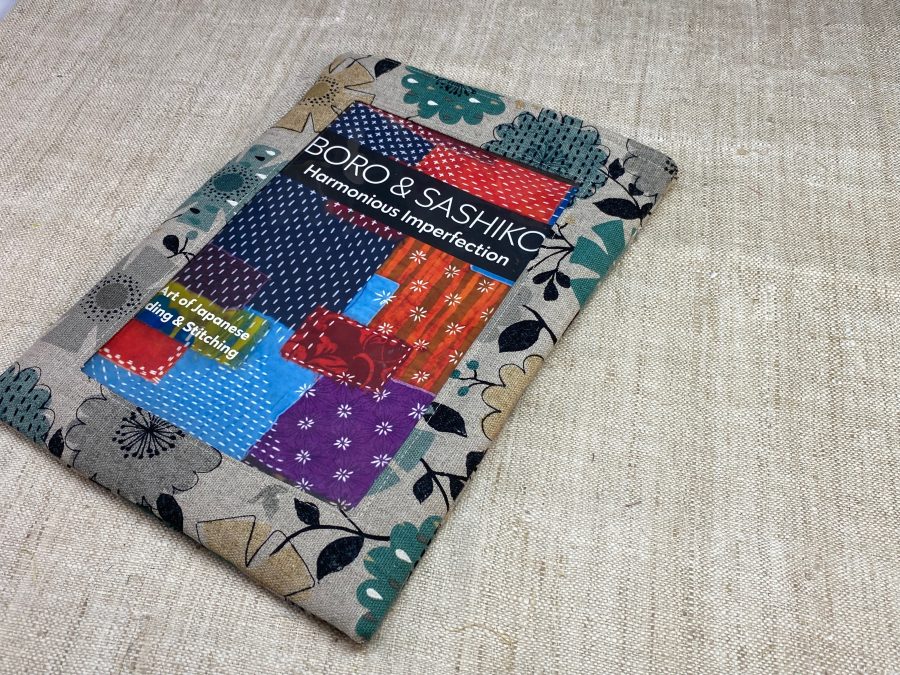
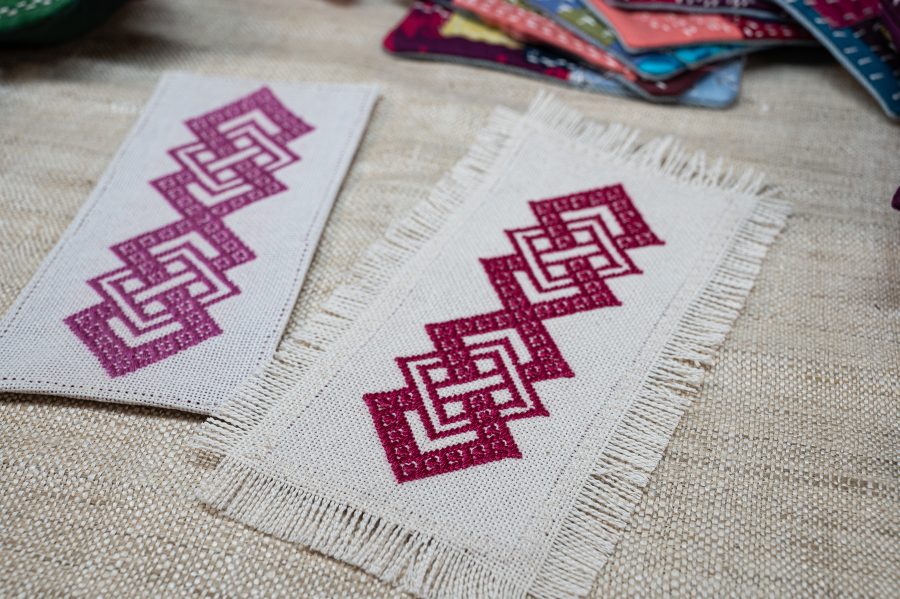
We discovered kogin-zashi as part of our research for our book Boro & Sashiko: Harmonious Imperfection. We were most excited by the intricate designs created by easy one line at a time stitching. For us, the most exciting part of kogin is how accessible it is as a skill. Regardless of their background as makers and creators, folx can learn the introductory parts of needle handling and pattern reading, almost immediately creating complex graphic designs on fabric. It’s exciting to see the results unfold one line at a time right before your eyes and it motivates you to keep stitching so see that happen. Even if folx have never done hand needlework before, they are going to be able to pick up kogin-zashi and make something right away. The instant gratification factor is big with this craft. For folx who are familiar with handwork and needlework, this is a refreshing change from the norm and we believe they are going to find the same exhilaration and satisfaction we have from this form that is juuuuuuust different enough to be exciting but not so different that is alienating.
For this project, we created a woven knot motif. The pattern was originally released as part of our Maker’s Moments series of workshops on our website at shannonandjason.com. To learn more about kogin-zashi and other forms of sashiko, checkout our books Boro & Sashiko – Harmonious Imperfection and Contemporary Kogin-zashi. Both titles are available on our website at shannonandjason.com or from your favorite local bookseller.
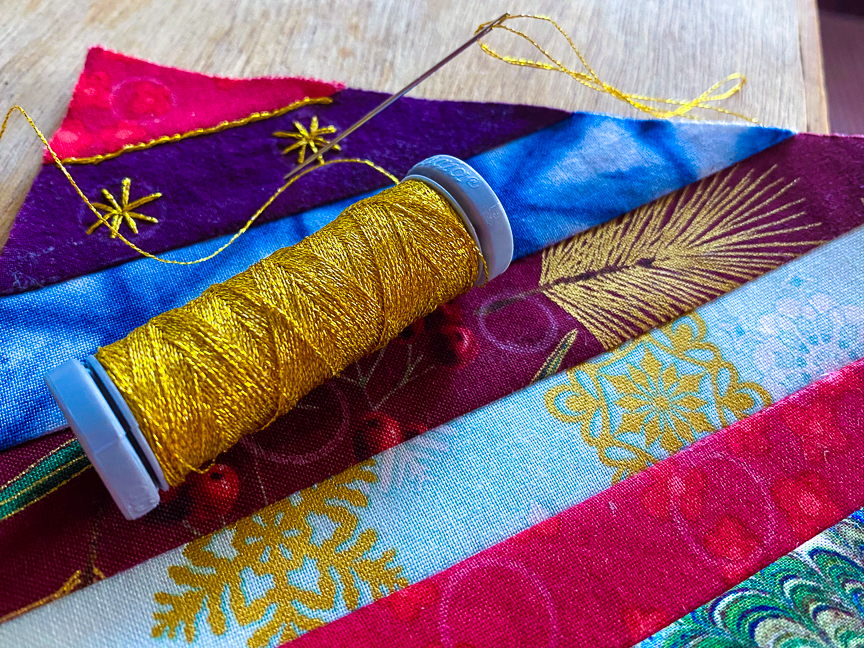
Fabric cards are the perfect way to add a little OMPH to your gift giving and they show that you really do care enough to send something handmade…even if you don’t have a lot of spare time or the extra brain capacity for a larger project. Easy to customize to any size for any occasion (maybe a certain winter holiday that is coming up?), fabric cards show you went that extra mile and put thought and effort into the gift-giving experience. They make that special person receiving the card feel seen and appreciated. Fabric cards have a distinctive handmade quality that is hard to replicate with mass-produced, store-bought cards and it is this uniqueness that adds charm and character to your gift.
They are super easy to make! Fabric scraps are pretty inexpensive and if you are already a sewist or know someone who is, you might already have the materials you need to create your own mini textile masterpiece. Add some quilting or embroidery and your creation really goes to the next level. You can hand stitch, applique, or machine embroider each one for a one-of-a-kind product. We used Finca Metallic Thread to hand embroider our fabric cards. Send yours as postcards, framed miniature textile art, gift tags, or leave one side open to insert a gift card. However you use them, if you are like us, you will end up making several *ahem* extra which is a good thing because you never know when you will need a little piece of handmade excellence to add to your gifting.
Here is how we make ours.
Supplies:
Fusible interfacing or stabilizer
Fabric scraps (1–2”wide and long enough to cover your card)
Cover Stock Paper or similar for backing (we like Kraft-Tex for sturdy projects) Note: You can use cotton fabric for the backing too. The end result is not as“cardlike”.
Scissors or rotary cutter
Cuts:
Cut stabilizer/interfacing to your desired size – Standard post card size is 4”x6” but you can make your cards any size you like Cut paper backing to the same size as stabilizer
Instructions:
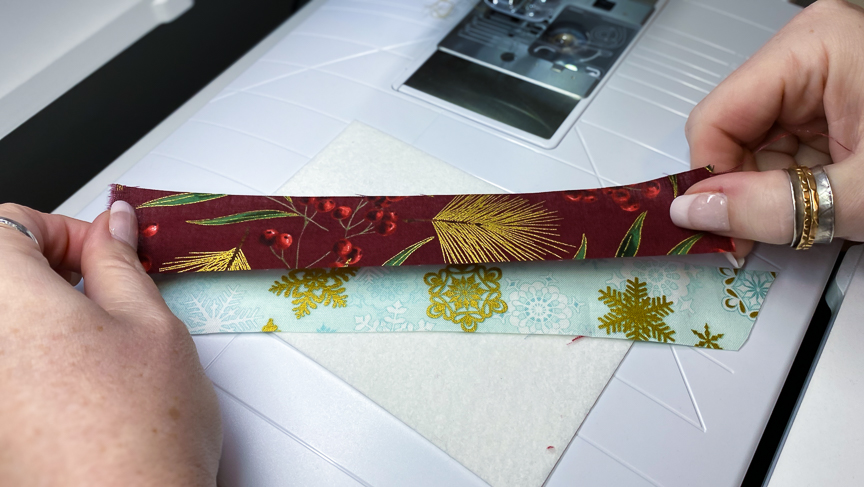
Place strips of fabric on the stabilizer deciding on placement, color, texture, ect.
Remove your chosen strips and place the center strip face up on the stabilizer. We like using diagonal lines, so our first strip covers from the top left corner to the bottom right. You do you though…
Place an adjacent strip on top of the first one with Right sides facing. Sew the seam using a 1/4’’ to 3/8’’ seam allowance. Make sure the fabric covers past the edge.
Press the seam open being careful to watch if your stabilizer has a fusible backing (you can also finger press the seam open as well).
Continue in this manner sewing strips on one at a time moving in one direction.
Once you have covered the first half, turn your card and repeat the process goingf rom the center to the opposite corner.
Once the stabilizer is completely covered turn Right side down and trim off the excessfabric.
Secure the last 2 corners using a glue stick or Roxanne Dip & Dab XL Tube
Add embroidery to your card by hand or machine. a. If embroidering by hand use Finca 2-Ply Metallic Thread held double. b. If machine embroidering use Finca 1-Ply Metallic Thread as your top thread and all-purpose thread in the bobbin.
Once embroidery is complete apply the paper back to the card. a. If your stabilizer has a fusible back you can use an iron to secure otherwise glue the card to the back b. If you are using the fabric card as a gift card holder skip this step.
Machine or hand sew a zig-zag or edging stitch around the card to secure the edge. a. We specifically like using fabric cards as holders for gift cards…just leave one side open so you can slide the card inside the pocket b. If you want to use a satin stitch along the edge, use a fabric backing instead of paper. The punching of the needle that many times will perforate the backing causing it to tear off easily.
Optional: Use a hole punch in one corner of the finished card and thread it with sparkly thread oryarn as a beautiful gift tag.
Gift cards like this can be mailed using standard postage…you’ll need to weigh the item to ensure you have enough postage attached to it. They do tend to get dirty in the mail so we opt for mailing them in an envelope.
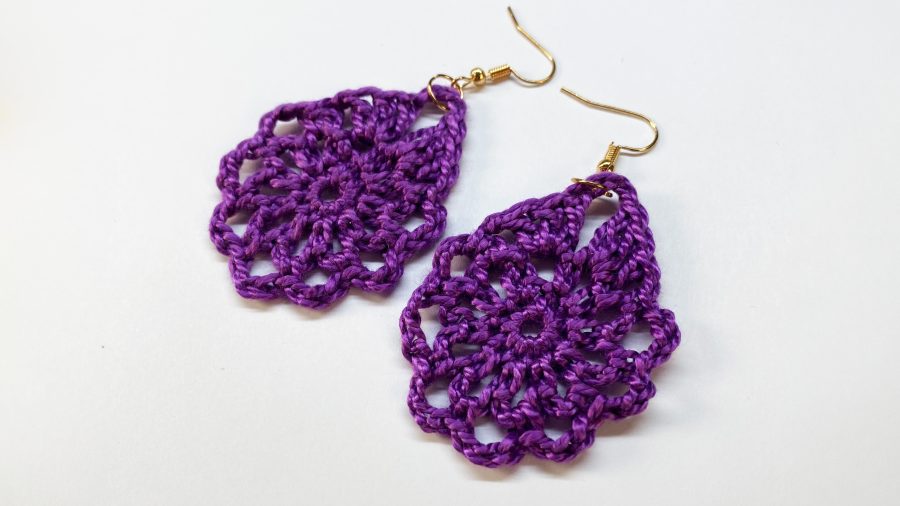
We love finding new ways to use crafting tools, techniques, and materials outside of their original, intended use. When the folx at Colonial Needle Company asked us to check out Presencia thread and do a project, we immediately went to embroidery since that is what we have always had a supply of Presencia around for. To be specific, we have a supply of Presencia Perle #5 and #3 on hand because we like to use it for general embroidery, but also for mending projects where we need a beautifully chunky thread to really pop off the surface of our fabric. So, yeah, we could have done some sashiko or boro or some freeform embroidery. We considered that. We also considered using it as part of a floral embroidery piece we are doing on a pair of jeans a la your auntie who hung out at Woodstock. We could have done any or all of those things because that is exactly what we have Presencia’s Perle thread for. But, as we said, we love finding new ways to use materials that are a bit outside of their original intent.
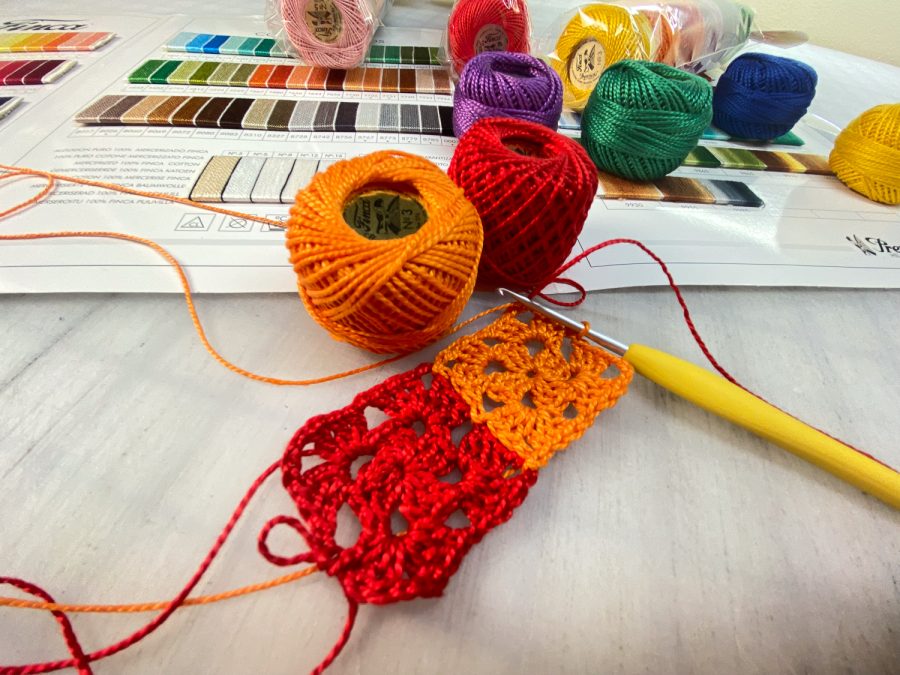
Soooo…Out came the crochet hooks!
Now, this isn’t the first time we have made crochet pieces using sewing and embroidery threads and we have patterns for skirts and tops using crochet threads. We just knew the Presencia Perle #3 weight thread was going to work beautifully for crochet. And the fact that it comes in those cute little balls/spools and sets of color combos (the sets we have are the Crayon Sampler, Scarlet Sampler, and Yuletide Sampler) makes them prime for some delicious little projects with crochet motifs. With that in mind, we set to swatching.
First were granny squares which turned out FAB and got us thinking about a larger project using a set of samplers in the future…stay tuned for that. Then we did some round motifs and DING! A light went on: earrings!
Virtually any crochet motif made in thread can be made into earrings. One more test motif and that was it; our Boho Crochet Earrings were born. And we didn’t even have to break out the steel crochet hooks! We actually used a C–2.75mm hook from a standard crochet hook set and, once it was blocked into shape, the finished motif held up beautifully. Yes, Shannon tested them out by wearing them the rest of the day…they are so good!
The Presencia Perle #3 weight thread is very different from working with yarn because the twist of the 2-ply thread creates ridges along the finished surface of the thread. This gives it that sheen with light and shadow reflecting off the surface of the thread but it also means that the thread has some grip to it when it is used in crochet. The stitches almost lock into place when stitched into crochet stitches and blocking further locks the stitches in place. This means projects like these earrings need only a good steam blocking with no starch. The finished earrings have a gorgeous texture to them and are ready to wear immediately after finishing.
Ready to make your own?
Grab your favorite color of Presencia Perle #3 thread, a C–2.75mm crochet hook, and our pattern which can be found below. The pattern includes the instructions for making the earrings as well as the stitch chart and all of the special stitches, techniques, and finishing instructions. Stitch, block, attach your earring findings and you’re ready to wear!
Just be warned: get used to saying “Thanks! I made them!” a lot.
Have fun! And be sure to share your makes with us on Instagram and tag Colonial Needle Company(@colonialneedleco) and us, Shannon and Jason (@embracethecreativechaos) so we can see your creations.