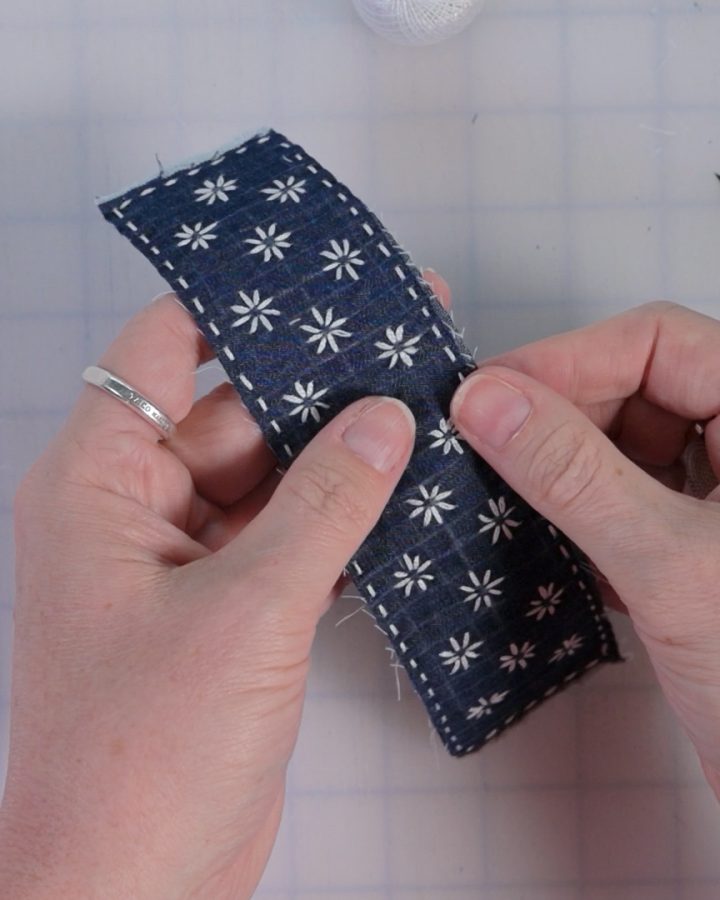
Summer is officially here, which means two things in for us: a growing stack of summer reading books and an absolute refusal to sit under a massive, heavy quilt top while the temperature climbs.
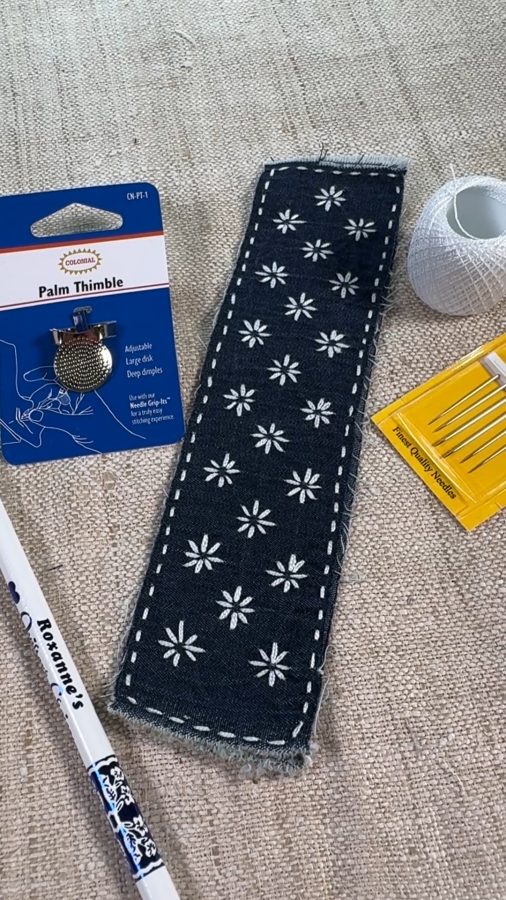
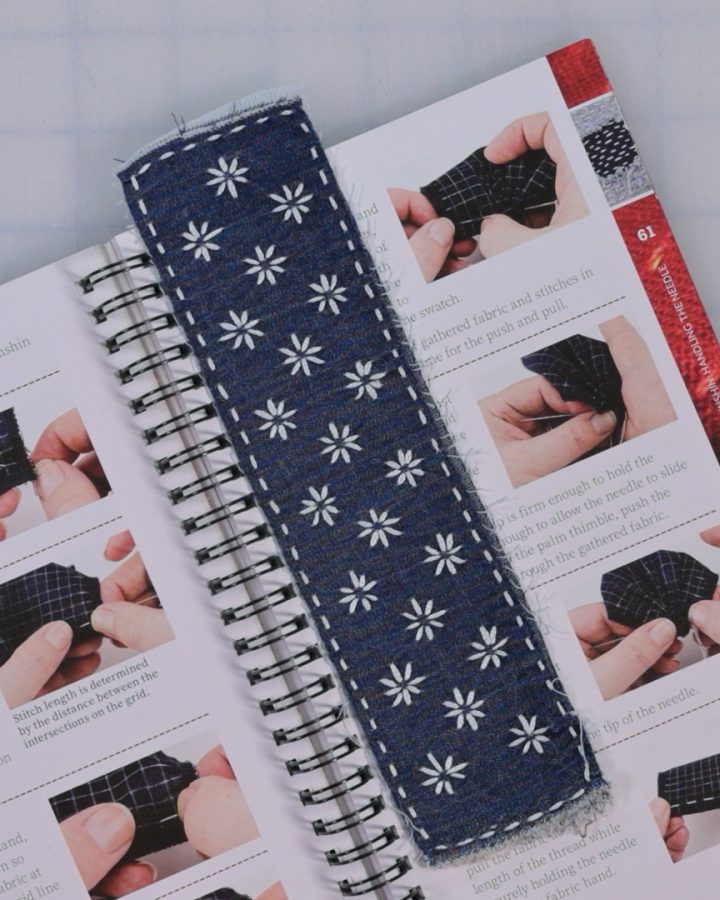
If you’re looking for a bite-sized, satisfying project that keeps your hands busy without overheating, we’ve got the perfect solution. Today, we’re upcycling some old denim scraps into a beautiful, durable sashiko-stitched bookmark. It’s light, portable, and a fantastic way to practice your stitching.
✂️ Free Download Alert! Want to print this out for your studio table? We’ve put together a free, step-by-step project sheet featuring the exact template and pattern grid used in this tutorial. Download your free project sheet below!
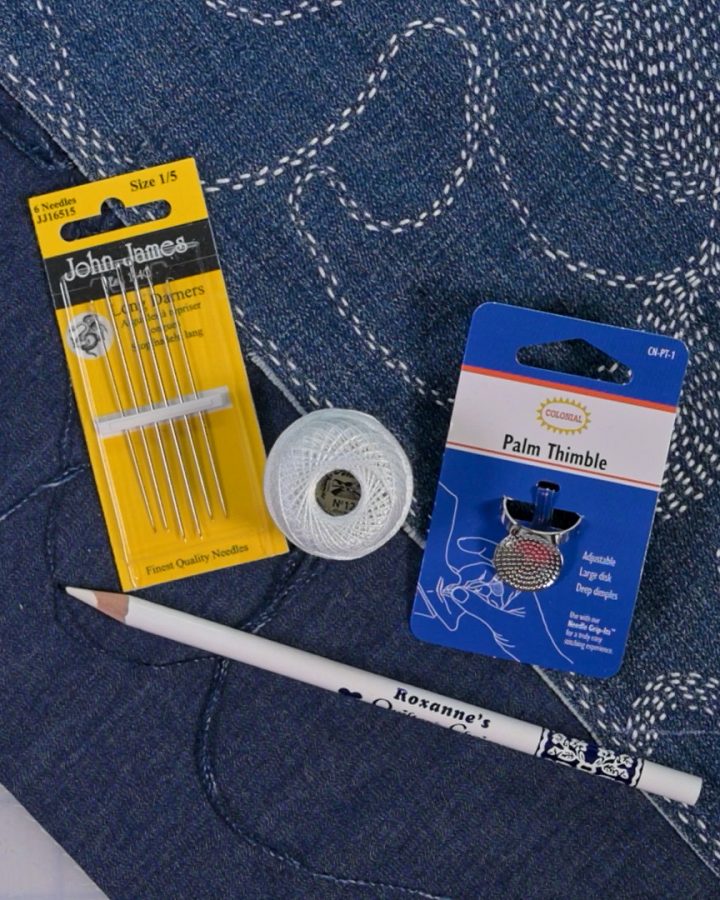
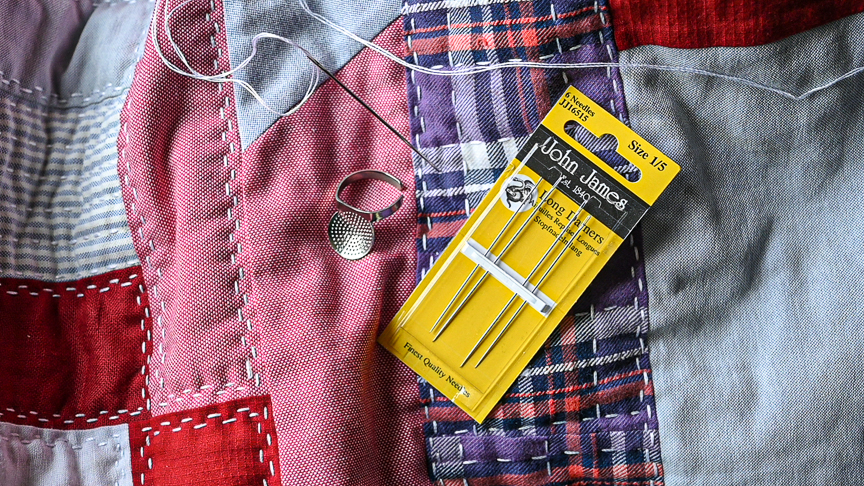
Stitching through heavy denim can sometimes feel like a workout for your fingers, but using the right notions changes everything. Here’s what’s on my studio tool tray for this project:
Roxanne’s Quilter’s Choice White Marking Pencil: Marking dark denim can be a nightmare. This pencil glides on smoothly, stays crisp while you work, and brushes or washes away easily without leaving a ghost line.
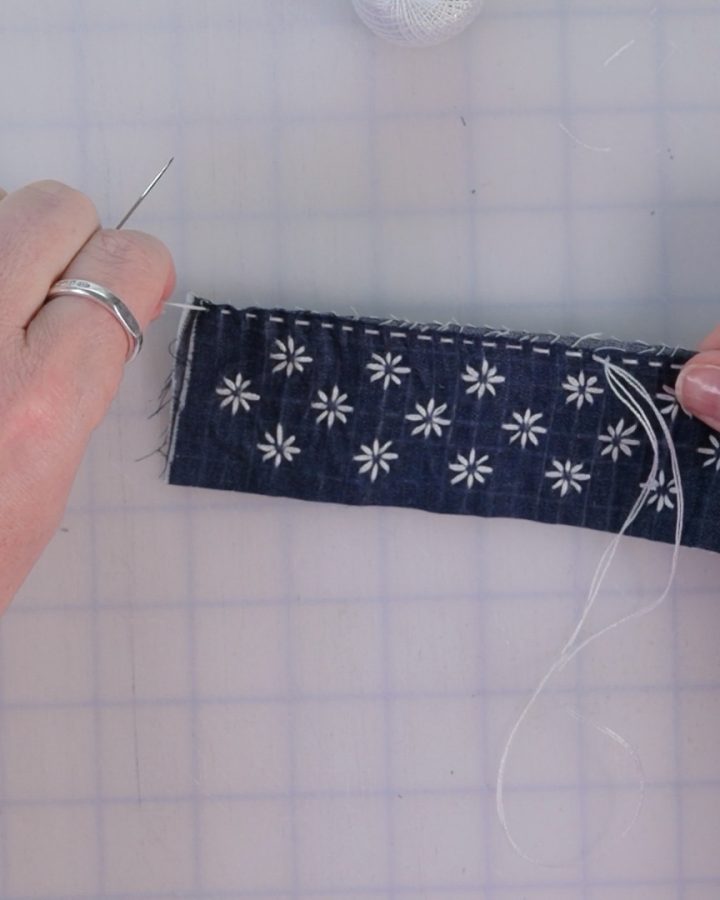
John James Long Darners: For Sashiko, you want a needle that allows you to load up multiple stitches at once. These long darners are strong enough to handle denim without bending, yet sharp enough to pierce the weave like butter.
Presencia 12-wt Thread: This 100% cotton thread provides the perfect weight and sheen for visible mending and Sashiko. It stands out beautifully against the blue denim.
Colonial Palm Thimble: If you haven’t tried a palm thimble yet, prepare to have your mind blown. Instead of pushing the needle with the tip of your finger, you use the power of your palm. It’s a total joint-saver when working with thick fabrics.
Step-by-Step to Summer Stitches
Ready to see this project in action? Sometimes it’s easier to catch the exact rhythm of the stitch on camera. Watch the full, step-by-step video over on our YouTube channel to see how it all comes together!
Join the Conversation
Are you tackling any small projects to beat the summer heat? What book is this bookmark going to live in first? Grab your free project sheet above, check out the video tutorial, and let me know your thoughts in the comments below!
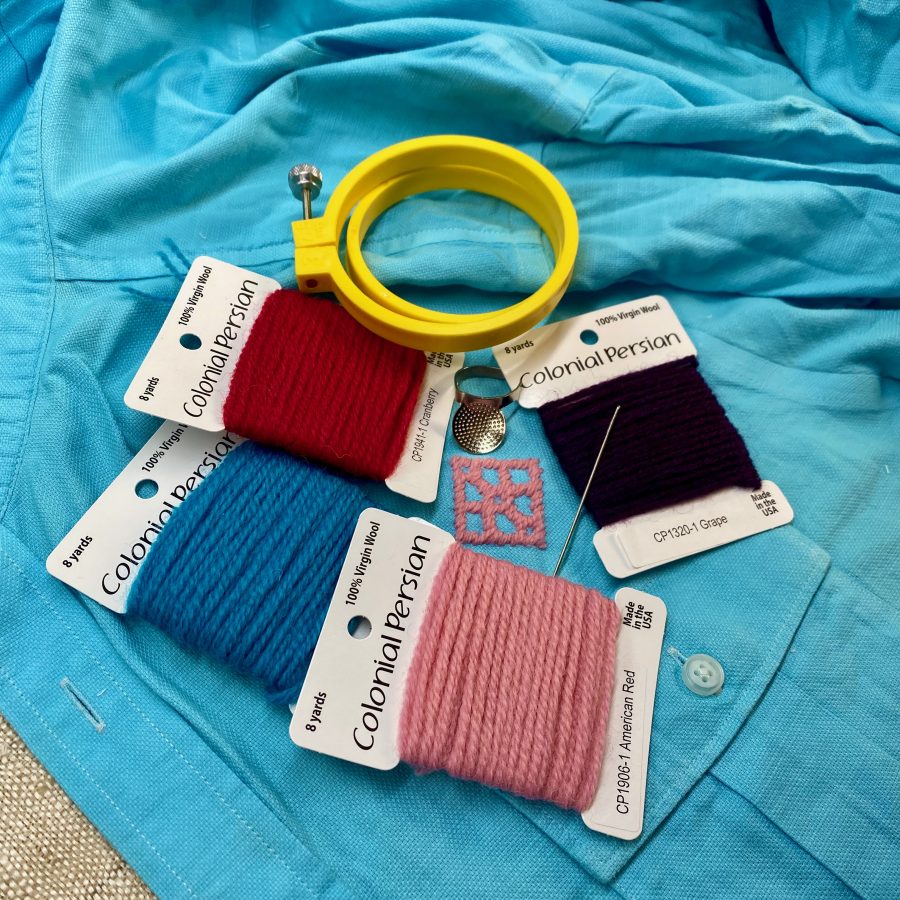
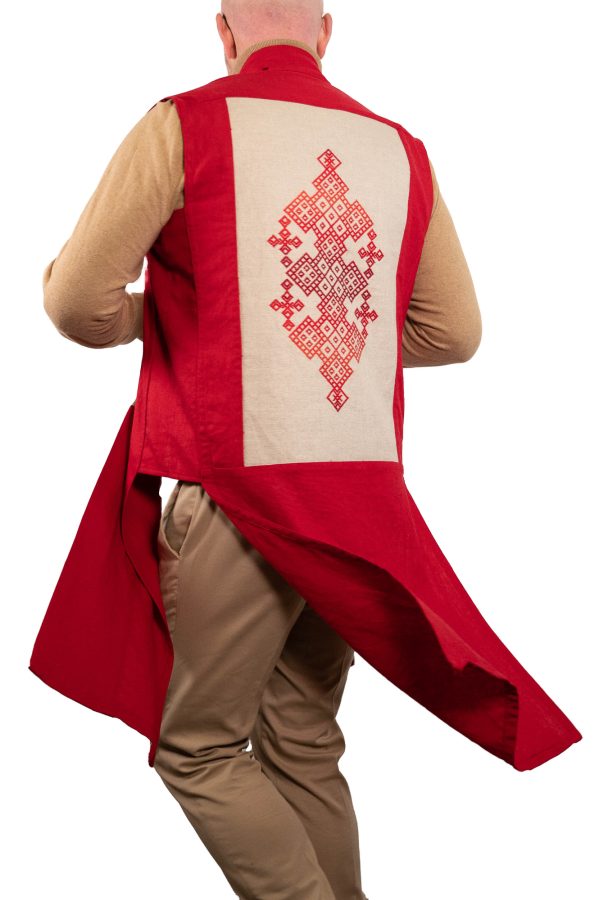
Got a shirt that’s seen better days (and maybe one too many spaghetti dinners)? Give it a new lease on life—just grab some Colonial Persian Wool yarn and a small piece of evenweave fabric for an embroidery makeover that screams creativity louder than any stain. With this easy project, your favorite shirt, skirt, or pants will be rocking sashiko-inspired style and a fresh story to tell.
The Canvas: Selecting and Preparing Evenweave Fabric
Evenweave fabric is just that… even. The warp and weft threads are evenly spaced, setting you up for precise, symmetrical stitching. Common types— Davosa, Lugana, Aida, Hardinger, ect—come in various thread counts. For this project we recommend a 16–18 count evenweave; it’s just the right size to stitch up crisp geometric patterns. Don’t go out and buy the most expensive you can find… it does not end up in the final product. This is a great way to use up small leftover pieces of evenweave!
Threads and Tools
Thread: Traditional kogin-zashi is all about thick cotton threads and floss, but hey, the modern crafter lives for something new—so we decided to give Colonial Persian Wool a shot. Wowzah, were we impressed with the results! It’s toothy and stands out beautifully in the final shirt!
Needle: Kogin needles tend to be longer and sturdier than a regular embroidery needle, suitable for thick threads and weaving through heavier fabric. We really like Colonial Needle’s Short Bullion Needles with Tapestry tips for this.
Thimble: Colonial Needle’s Palm Thimbleis the perfect tool for pushing the needle through both layers of fabric with ease.
Hoop: Embroidery hoops were not traditionally used in kogin stitching but are essential for this type of surface embroidery/visible mending. You’ll need a hoop at least 3’’ in diameter for a single motif or larger depending on the size of the spot you’re covering. Don’t worry… Colonial Needle Company has so many types and sizes of hoops, you’ll find what you need.
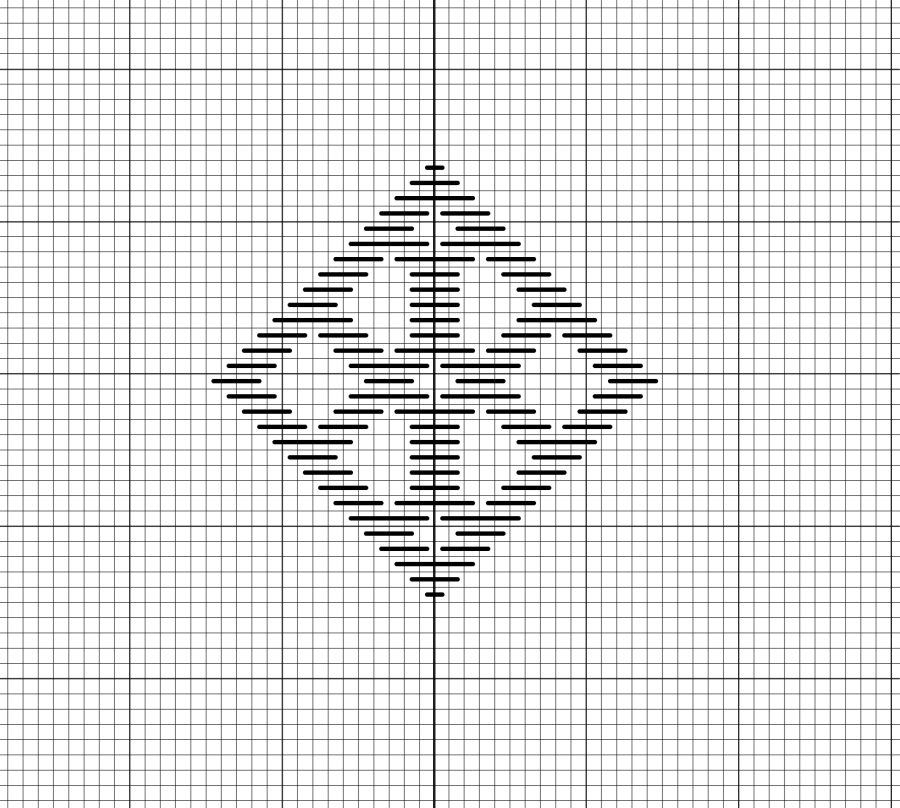
Modoko
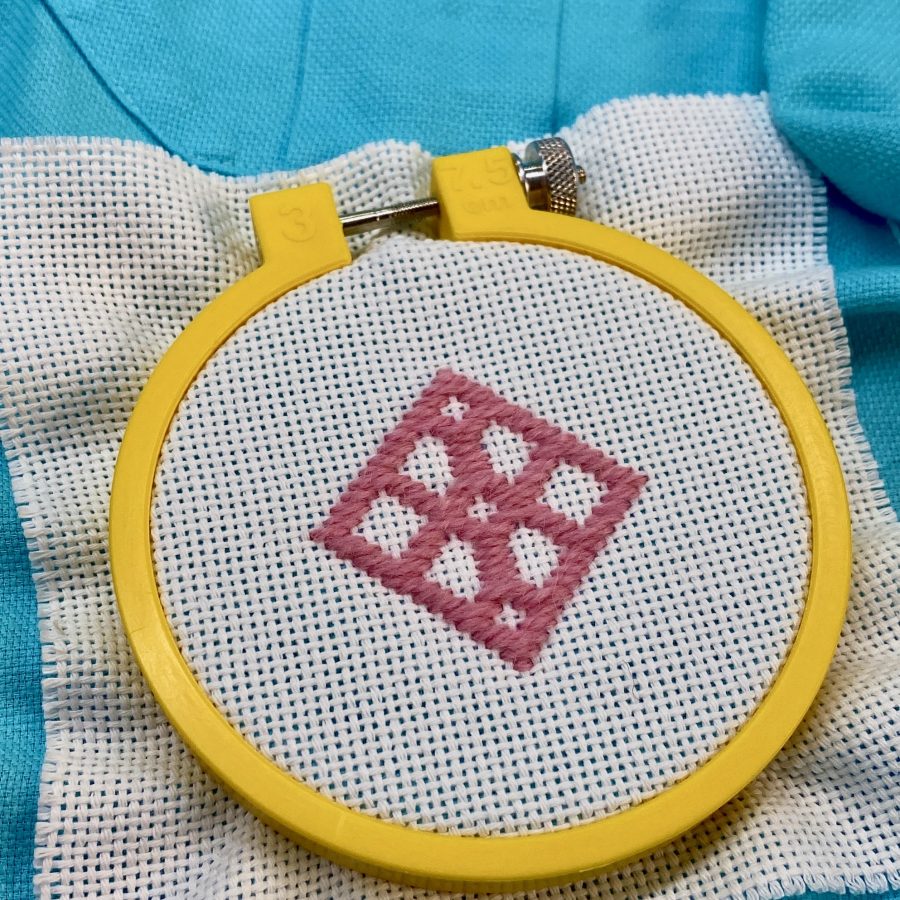
We have provided a simple kogin motif (called a modoko) for you to use below. For more examples of modoko (both small and complex) check out our book Contemporary Kogin-zashi.
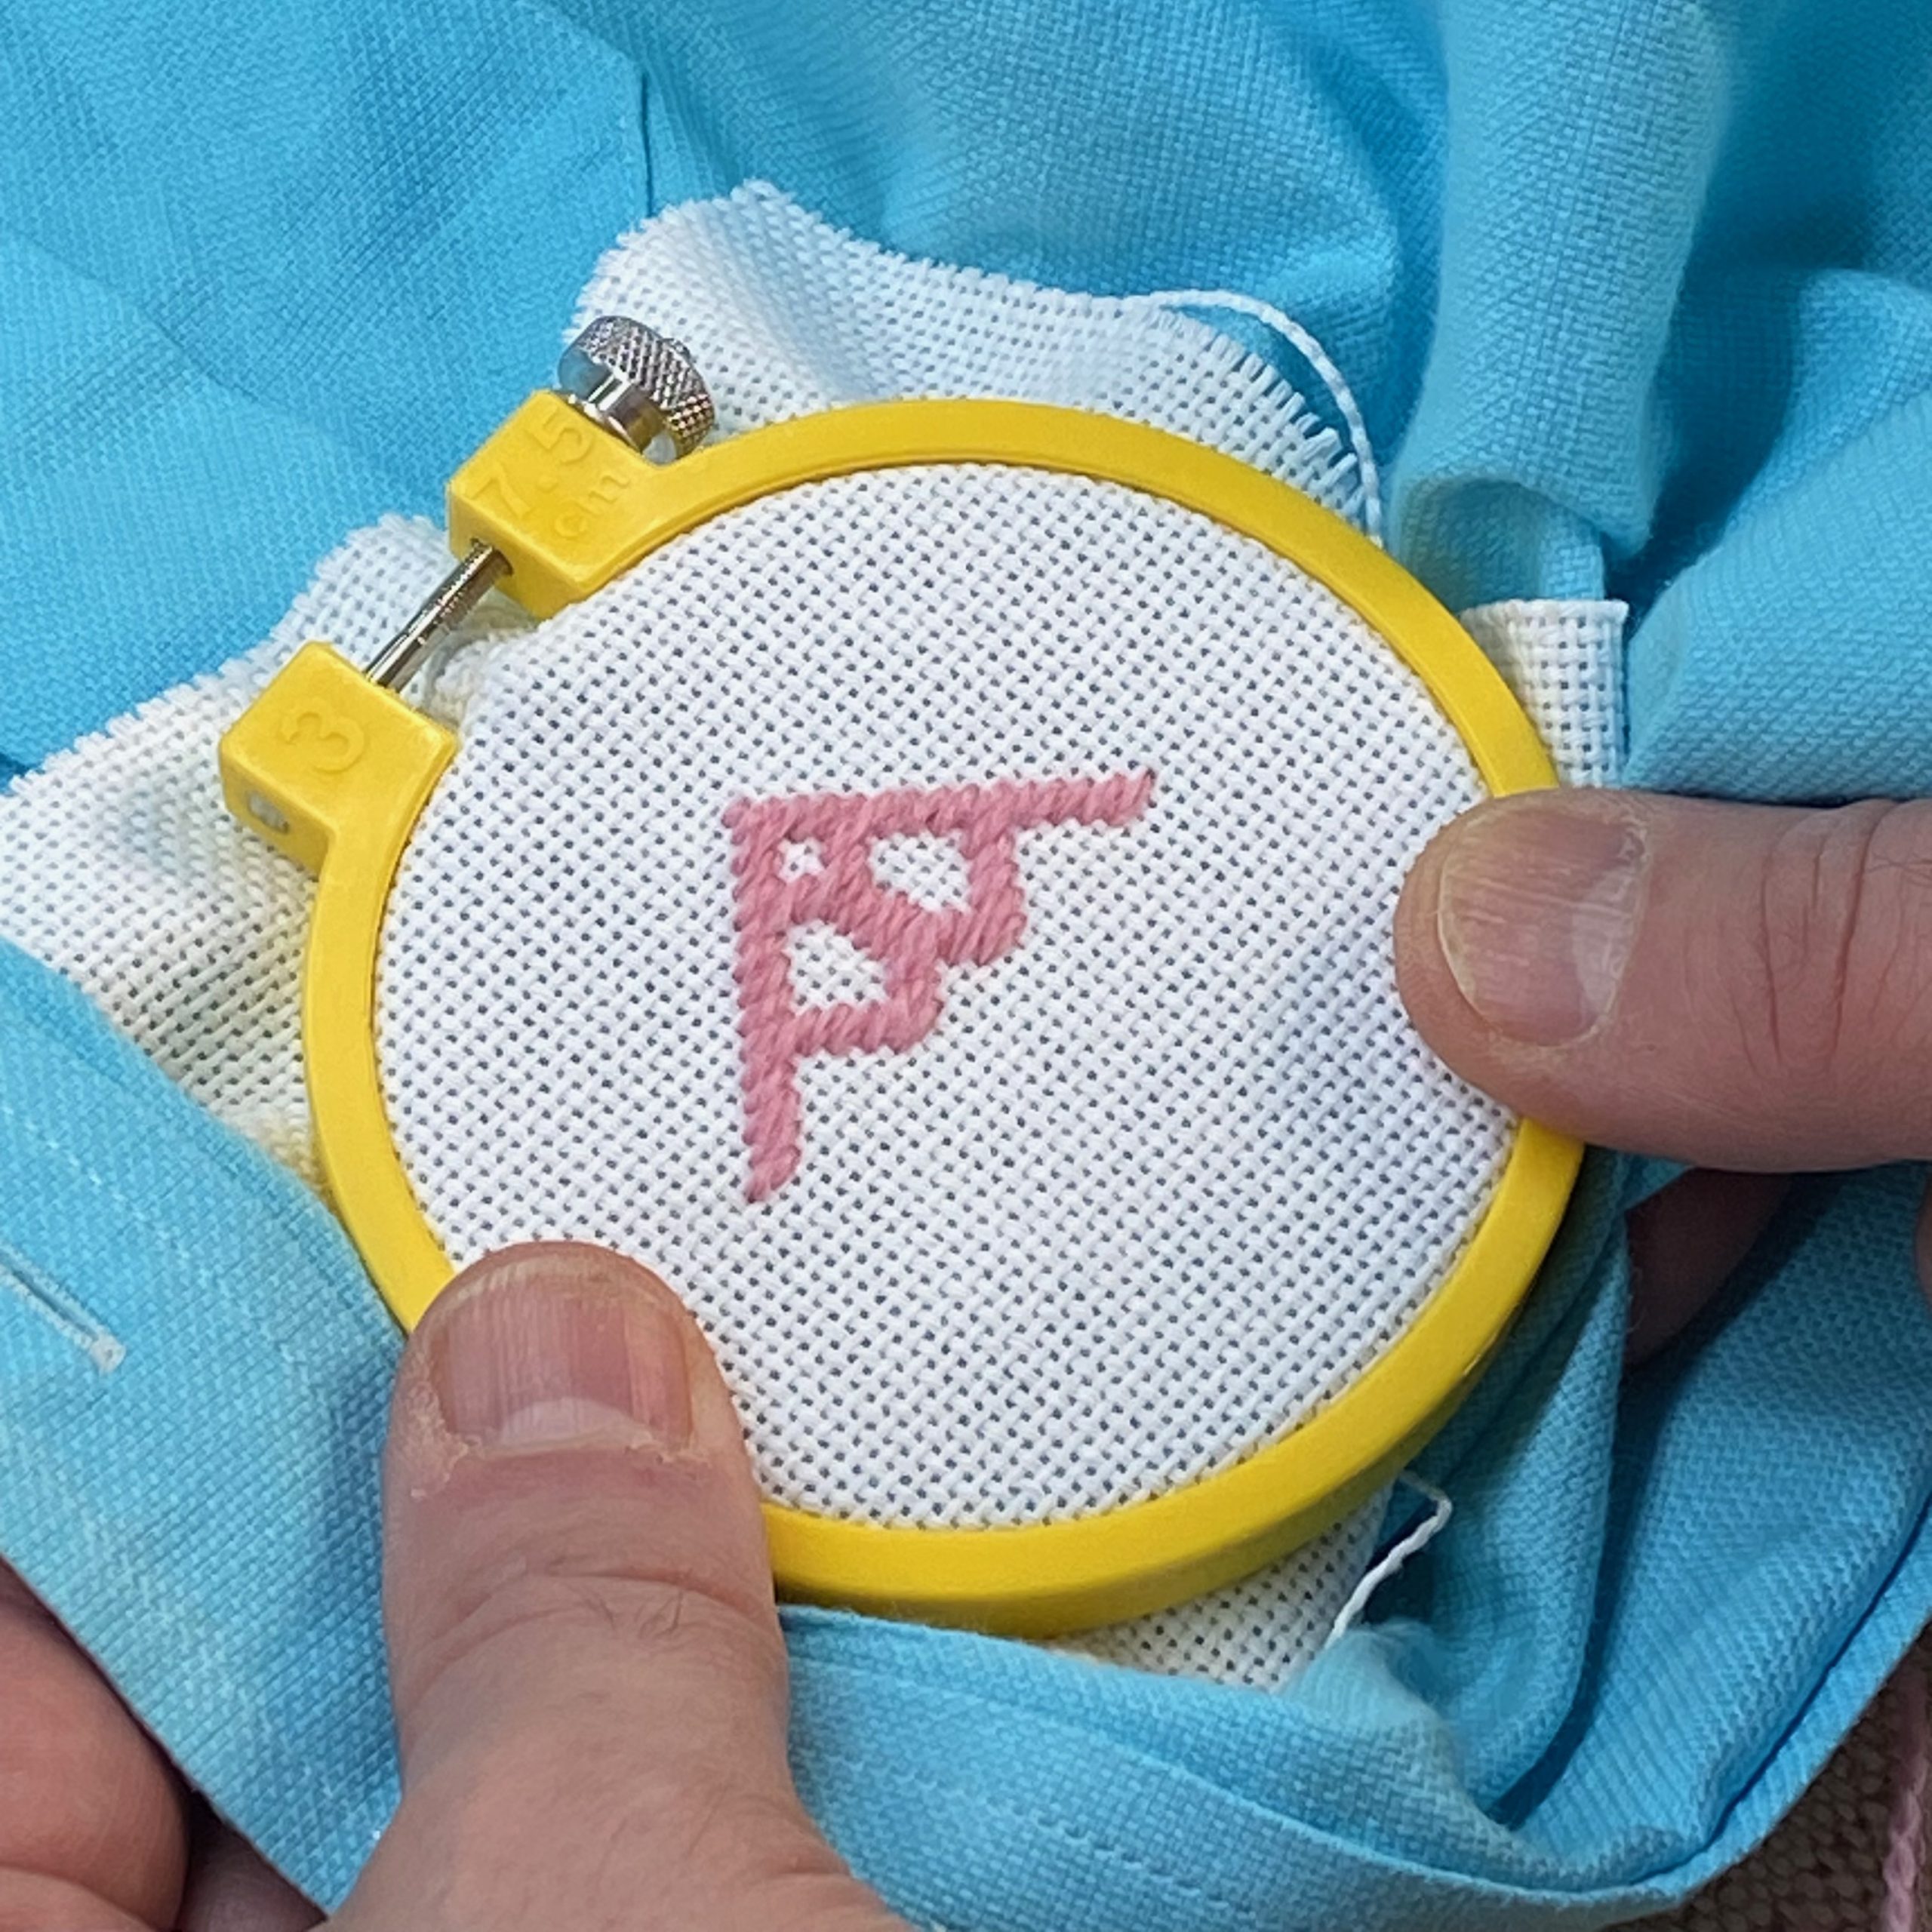
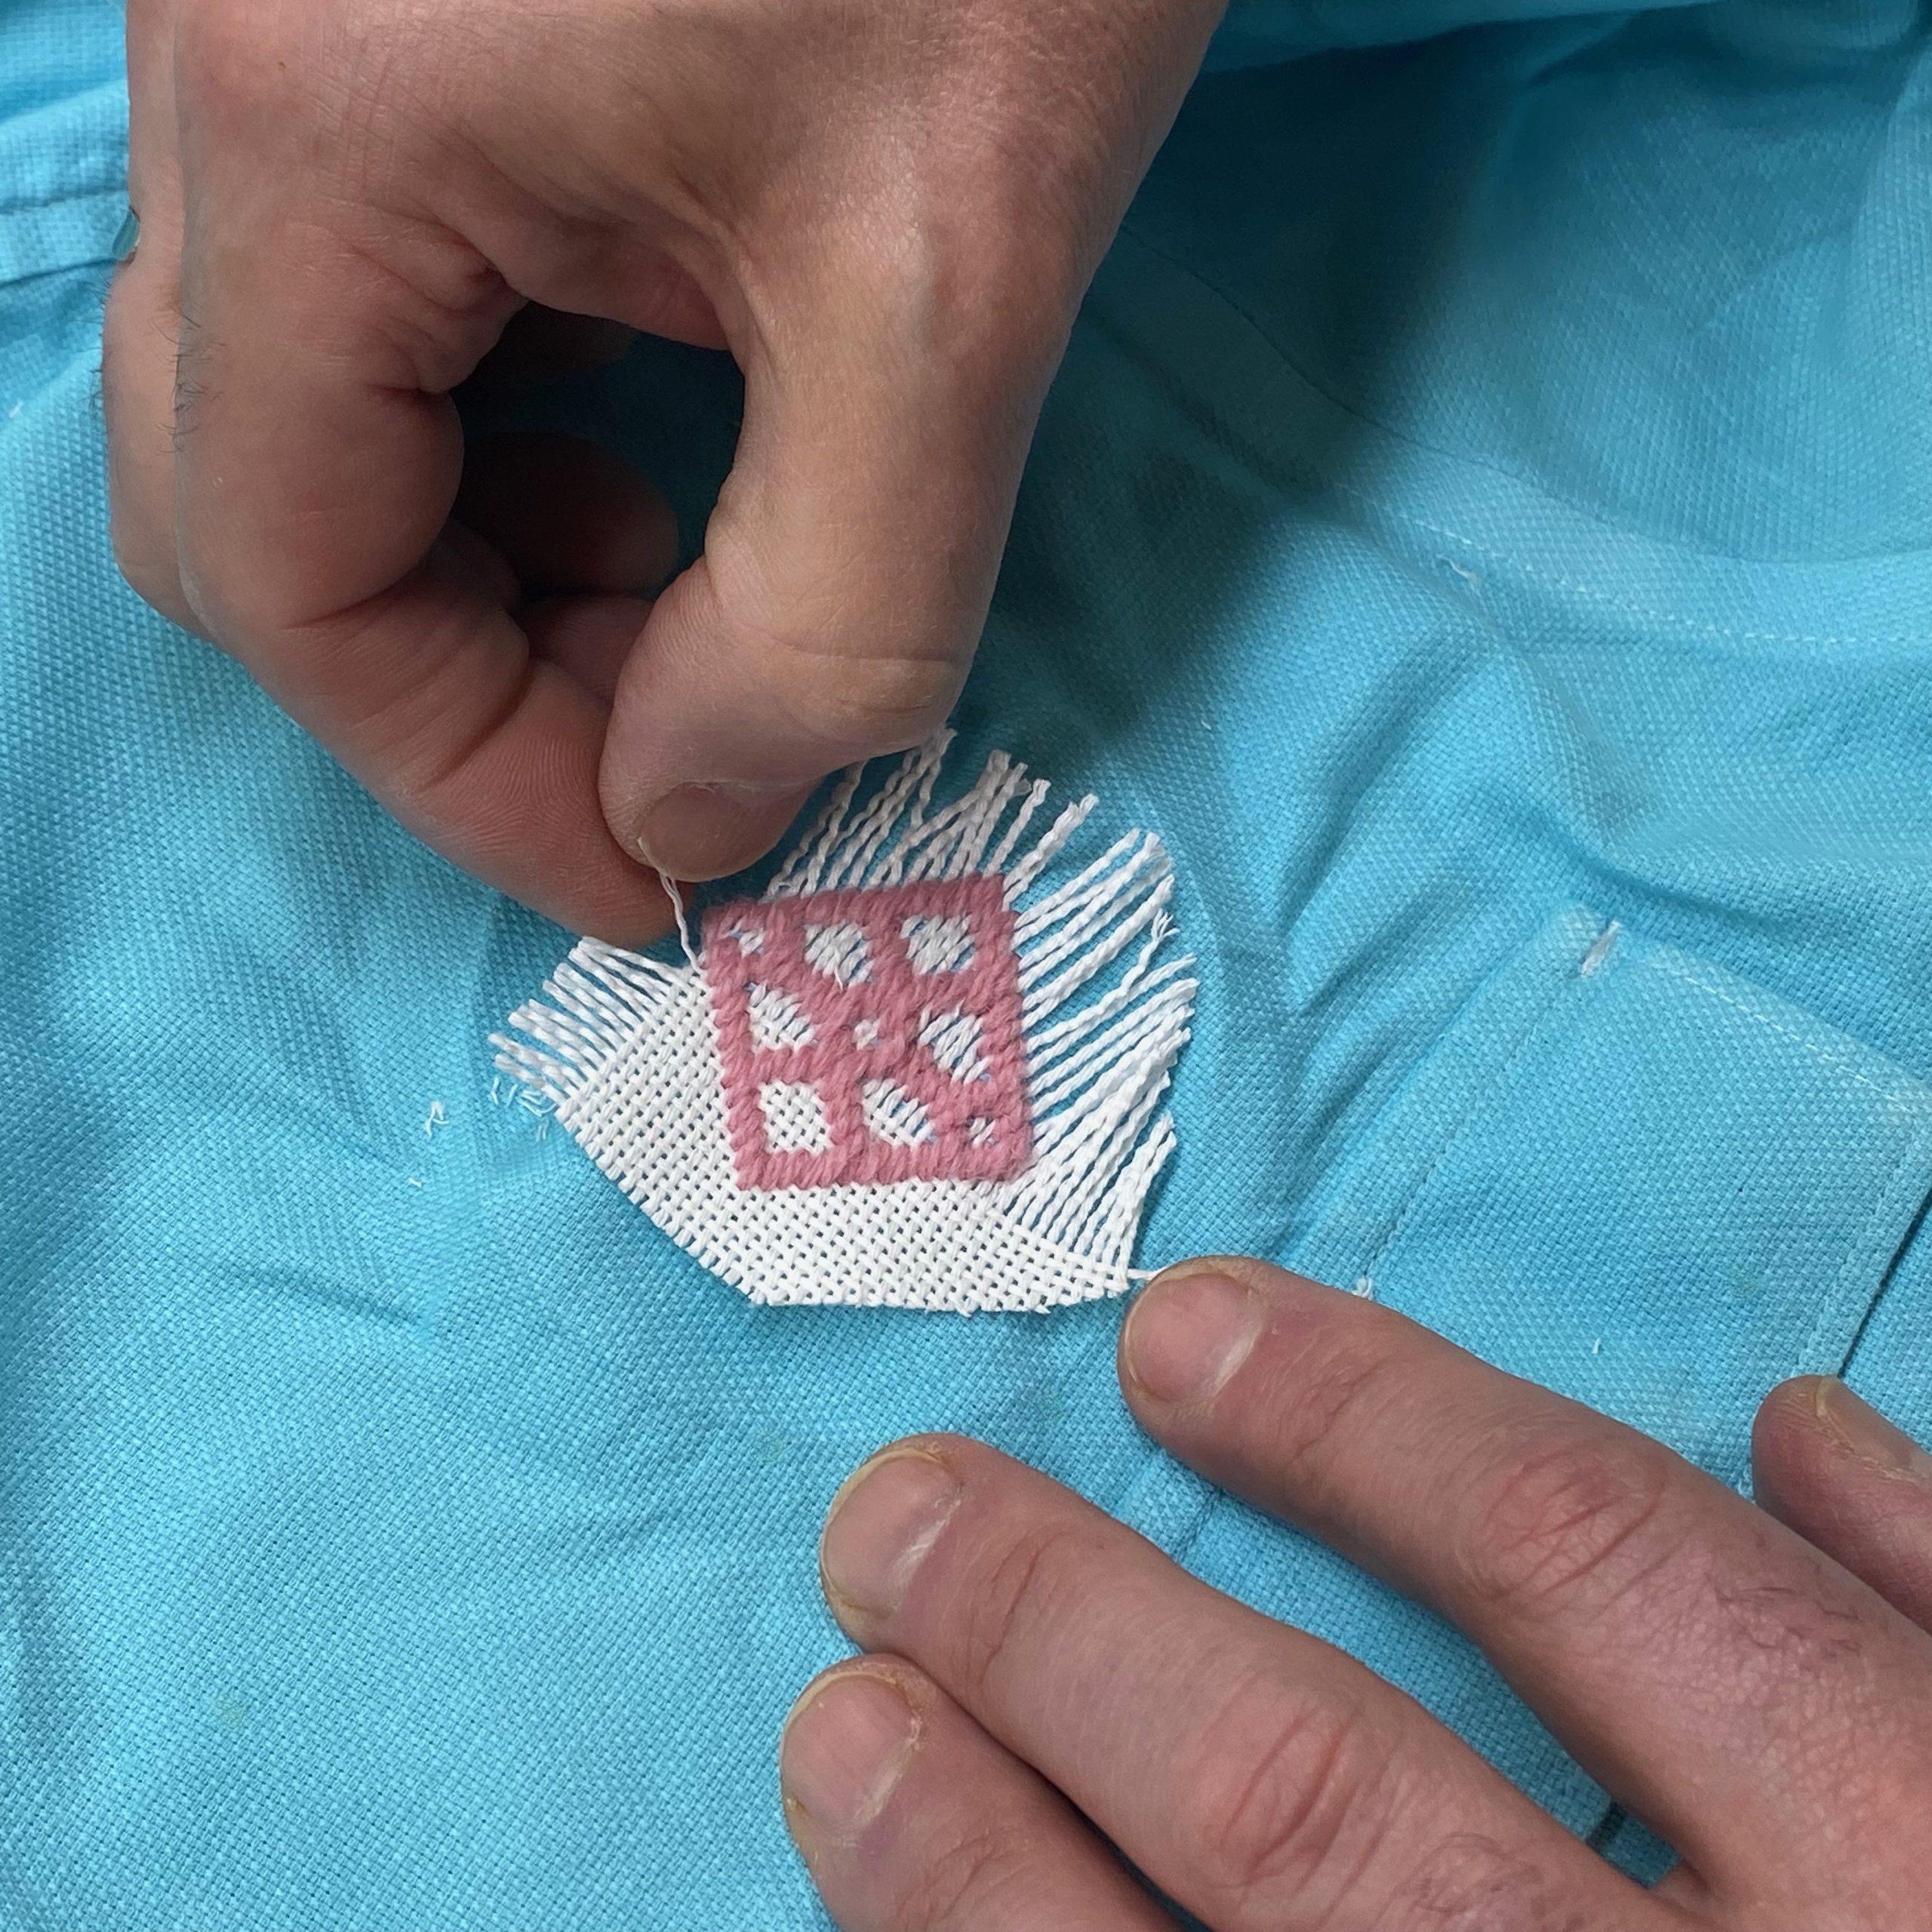
Center the evenweave fabric on the stain on the right side of the shirt. Next, place the embroidery hoop over both the shirt fabric and the evenweave.
Thread your needle. For this weight of fabric, we thread our needle with 2 strands of Colonial Persian Wool. You might prefer to use more or less depending on how dense or how puffy you like your stitches. Practice the motif of scrap fabric at least once to decide what you best like.
Mark the center of the evenweave fabric to ensure your motif will be centered over the spot.
Count over the number of threads from the center of the fabric to the left or right side of the center line of the motif. Then, working from the back, bring the needle up through both the shirt and evenweave fabric. Be careful to bring your needle up through up through the open holes of the evenweave fabric to prevent splitting the threads. Leave a small tail on the back for weaving in later.
Work all the stitches in one row then turn your work and follow the next row of the pattern. Continue until you reach the top of the motif. Once the first half is complete return to the center row and work the second half in the opposite direction.
Continue working row by row until the motif is complete. Secure thread ends neatly on the back.
After creating the motif and weaving in the ends of your yarn cut the excess evenweave fabric away then carefully remove the remaining evenweave by pulling strands of the fabric out one at a time. Once you are done removing the evenweave you will have a kogin motif sewn directly to your garment.
Kogin-zashi patterns are worked in horizontal rows, with stitches typically spanning an odd number of threads. The signature of kogin-zashi is its counting method: stitches pass over and under one, three, five, or seven threads. It’s a simple matter of reading each row of the chart and stitching what you see on it. Each horizontal row of stitches sets snuggly against the neighboring rows to build the solid motif.
Tips for successful stitching:
Maintain even tension; stitches should lie flat but not pucker the fabric.
Count threads carefully—precision is crucial for the pattern’s symmetry.
Pay attention to the pattern’s overall flow and alignment, especially if stitching a repeating band or motif.
Use shorter lengths of thread to minimize fraying and tangling.
You can use this same technique using cross stitch patterns and simple embroidery stitches. The evenweave fabric ensures your stitches are straight and the same size every time!
Caring for Your Kogin-Zashi Embellished Garment
Because Colonial Persian Wool is virgin wool, we recommend hand washing with a no-rinse soap and drying flat.
Weaving Old and New
Bringing kogin-zashi to your wardrobe is more than embellishing fabric; it’s about honoring a legacy of ingenuity, patience, and artistry. Whether you stitch for mindfulness, fashion, or the thrill of learning, using kogin-zashi for visible mending a garment offers a tangible connection to history and a canvas for your own story.
So, gather your threads, choose a garment, and stitch a little piece of the Tsugaru spirit into every wear. Each pattern, every careful row, is a celebration not only of the past but of the creative present—one stitch at a time.
Kogin is completely different than anything else we have ever done before. We love learning and exploring new-to-us techniques and styles of making all the things and kogin-zashi was ticking all the boxes. Creating these gorgeous stitch patterns with such a mindful practice is exciting for us and keeps us motivated to create and explore further. We particularly loved applying kogin to some of our own garment designs and to projects that are common fair among sewists and crafters. Kogin adds a next level of richness to these projects and adds to our understanding of textile creation and use.
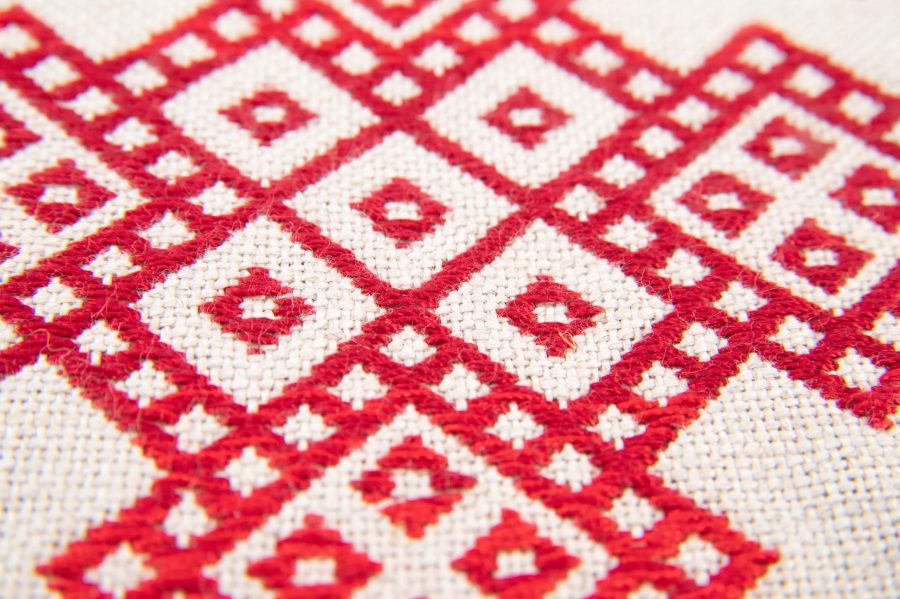
Kogin-zashi is a type of darned embroidery meaning the stitches lay closely against one another to reinforce and enhance the base fabric the stitches are worked onto. Kogin is a type of counted thread work with a shared DNA evident in other forms of darned embroidery, counted threadwork, pattern darning, and needle weaving from Norway, Yugoslavia, Ukraine, Medieval Middle Eastern counted thread embroidery, and Mamluk pattern darning found in the Middle East and Egypt.
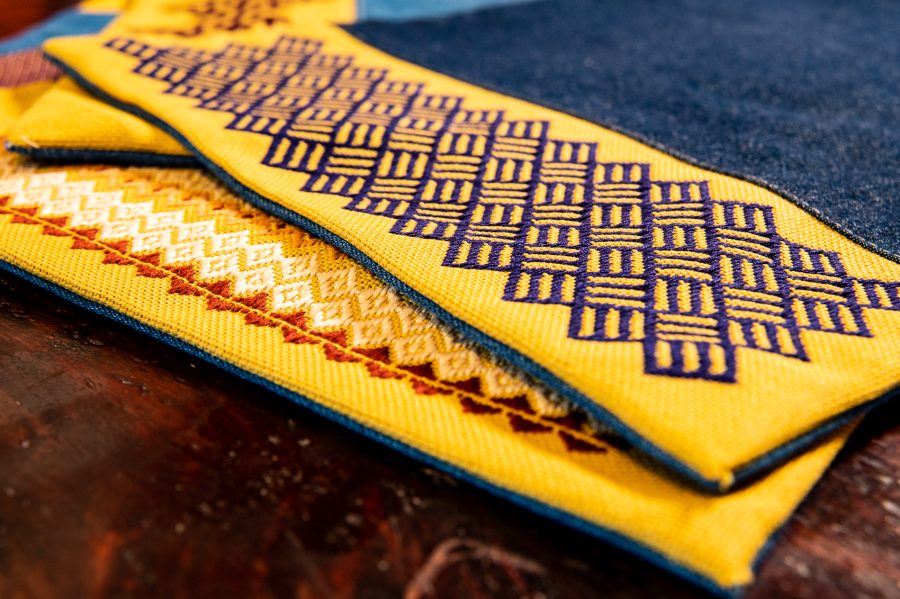
Like other forms of sashiko, kogin-zashi was created by Japanese folx living in cold climates with short growing seasons. Kogin needlework was originally done to reinforce and fortify fabric not as a leisure craft but as a necessity for survival. At the time kogin-zashi was developed (Edo Period, 1603-1867), cotton was a scarce commodity due to the short growing season and the overall cold climate of the Tsugaru region, Aomori, Japan – kogin-zashi’s area of origin. In addition to the scarcity of cotton, it was forbidden for use as a garment fabric by anyone but the ruling class in Japan. This meant folx used fibers derived from plants like ramie, hemp, and tree barks to weave their cloth. Unlike cotton fabric, such fabric does not offer optimal protection from the elements and layering did not provide the needed protection either. Being resourceful, and downright clever, they used kogin stitches made with cotton thread to fill in the gaps in the woven fabric. This created a denser fabric that provided protection and warmth while skirting the strict laws regarding cotton’s use in garment fabric. Fabrics with kogin stitching are complex and dense and contain patterns from geometric borders and lines to intricate key forms and tiled marvels of design. Kogin-zashi fabric is inherently practical but through the lens of time, this practical handwork task has become art and the craft we love today.
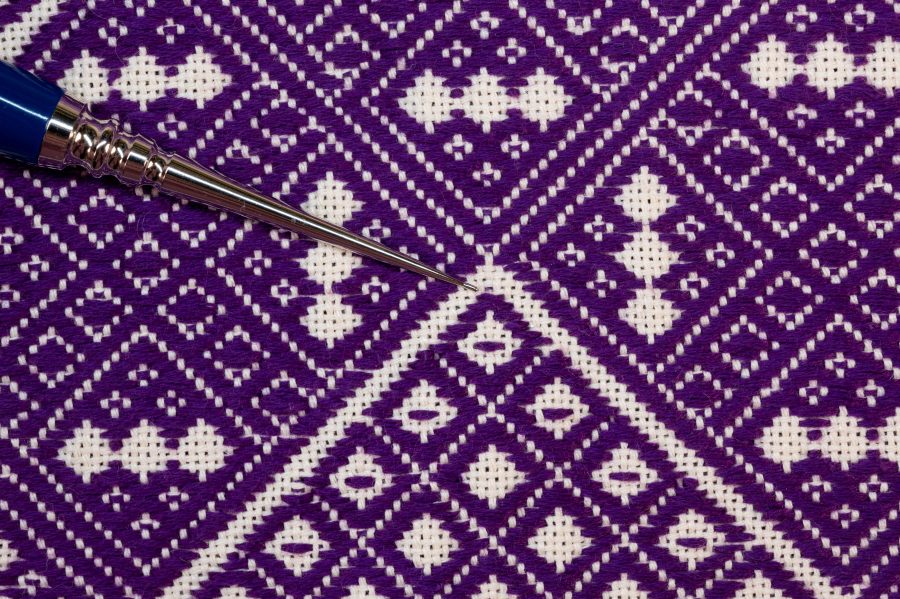
Kogin-zashi designs are created by counting the vertical threads of the base fabric and working the needle over and under those threads following the space between the horizontal threads (warp threads) of the base fabric. The stitches are worked into the spaces created by the intersection of the horizontal and vertical threads, filling in the gaps in the woven fabric.
Kogin-zashi was not used to reinforce fabrics by fastening down patches or binding together multiple layers of fabric. Instead, kogin reinforces fabric by weaving thread between the vertical and horizontal threads of loosely woven fabric. The result is a denser fabric that is stronger, more durable, offers greater protection from the elements and, without a doubt, is stunning to behold. Modern kogin-zashi, uses embroidery floss, thread or even fine weight yarns with evenweave fabric such as Congress Cloth, Davosa, or Lugana to create projects.
We discovered kogin-zashi as part of our research for our book Boro & Sashiko: Harmonious Imperfection. We were most excited by the intricate designs created by easy one line at a time stitching. For us, the most exciting part of kogin is how accessible it is as a skill. Regardless of their background as makers and creators, folx can learn the introductory parts of needle handling and pattern reading, almost immediately creating complex graphic designs on fabric. It’s exciting to see the results unfold one line at a time right before your eyes and it motivates you to keep stitching so see that happen. Even if folx have never done hand needlework before, they are going to be able to pick up kogin-zashi and make something right away. The instant gratification factor is big with this craft. For folx who are familiar with handwork and needlework, this is a refreshing change from the norm and we believe they are going to find the same exhilaration and satisfaction we have from this form that is juuuuuuust different enough to be exciting but not so different that is alienating.
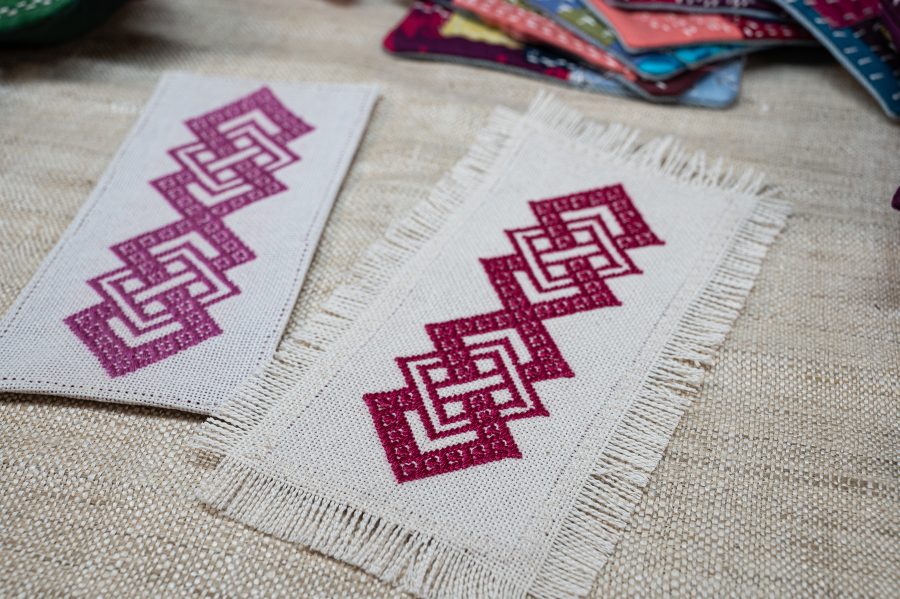
For this project, we created a woven knot motif. The pattern was originally released as part of our Maker’s Moments series of workshops on our website at shannonandjason.com. To learn more about kogin-zashi and other forms of sashiko, checkout our books Boro & Sashiko – Harmonious Imperfection and Contemporary Kogin-zashi. Both titles are available on our website at shannonandjason.com or from your favorite local bookseller.
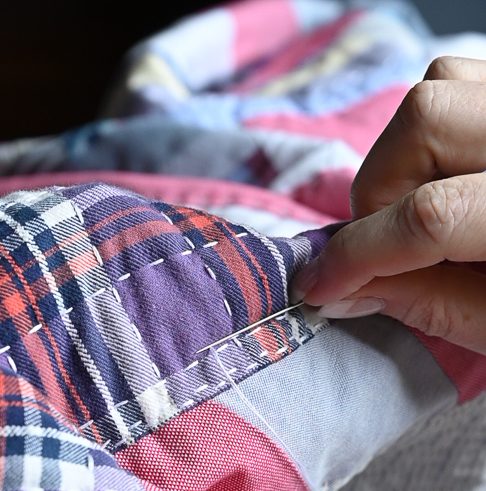
It’s no secret that we have a special place in our hearts for scrappy quilting and we carry just as bright of a torch for hand quilting with sashiko style stitches. We have done our fair share of machine quilting on our domestic machine (as in our latest book Scrappy Wonky Quilt Block Extravaganza) but nothing comes close to the texture of a hand stitched sashiko style running stitch. For our last couple of projects, we have used the new palm thimble from Colonial Needle Company to make this process even easier and certainly more enjoyable for us. We certainly still use this versatile thimble for all of our sashiko projects and mending but it is a game changer for big stitch quilting. Paired with the John James long darners, and Presencia 12 weight thread held double, the combo is a hand quilter’s dream team.
Now you might want to sit down for this part because we are going to say something controversial.
But stick with us.
Here goes:we don’t like buying new fabric.
<insert gasps here>
We know… who doesn’t like perusing racks and aisles of freshly bolted fabrics in immeasurable variations of color, prints, solids, weave, and content types? We do like looking at them but purposely buying yardage is reserved for specific projects like garments and quilts that require a certain type of fabric or unifying fabric such as a single background color. But, when it comes to every day stitching and projects, we like to shop the flat fold and odd cuts section of our fabric store. More than once we have absolutely raided the clothing and fabric piles at tag sales and the 50¢ racks at thrift stores are not safe from us. Everything comes home and goes into a sanitizing wash and is pressed before disassembling into large pieces of flat fabric. This process of rescuing and repurposing found fabric is almost magical to us and we love the textiles they create.
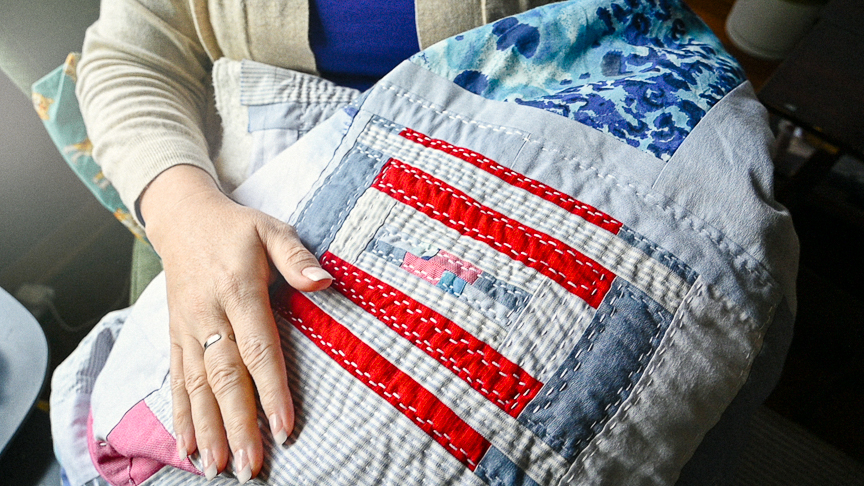
Our latest joy has been working on our clothing quilts. We made a clothing quilt a while back for a charity auction and NEEEEEDED one of our own. For our personal clothing quilt, we sourced all of the fabric from our own garments which wasn’t exactly difficult considering we don’t throw away anything that even remotely resembles fabric. We sorted through bags and boxes of “old” clothes, the mending pile (from which we used anything that had been in there for longer than a year), and clothes that didn’t fit anymore or weren’t exactly suited to us anymore.
As a result, assembling and quilting this piece has been a walk down memory lane. That purple plaid flannel shirt that Shannon used to wear hiking when we took the Shibakidz everywhere with us. The stripped “designer label” button up that was a gift from one of us to the other when we were first married (that was thirty years ago, y’all) and both of us wore as a throw on top layer until it was pretty threadbare. Jason’s red western shirt he used to wear when we went dancing, the fancy shirt he used to wear to teach in. All of these bring back memories of times and places as we assemble them into new textile panels and create this quilt that will live with and beyond us.
The esthetics of this type of fabric cannot be ignored. The amazing feel of these newly created textiles as they move through our hands. The feel of the needle slipping through the layers of fabric and batting. The crinkle (if you know… you KNOW) of the fabric after a section of stitches are completed. And the weight and density of the layers of fabric and batting is like nothing else.
Overall, the process of making a clothing quilt is very different from a patterned quilt made using more traditional quilting cottons off the bolt. The top is pieced together with panels of individual framed improv motifs and larger sections of fabric as well as smaller scrap pieces tucked in to fill space. The back is large panels put together with as few seams as possible to make the quilting easier so the needle doesn’t have to go through too many odd seams at a time. The batting is organic cotton from Hobbs batting pieced together from leftover panels from our last quilting book. Every piece and seam is thought out and considered as part of the whole and serves to create the intricate decoration of the quilt but also is a meditative practice for us where we disregard any of the outside <waves arms about wildly> stuff-n-things that put our nerves on edge. We can, for a time, immerse ourselves in the physical sensation of the weight of the fabric, the feel of the fabric texture, and the ssshhhhhhp sound of the thread being pulled through the quilt layers.
Did this turn into a love letter to fabric quilts and hand stitching? Probably. Do we suddenly feel compelled to go sit and stitch on our quilt again? Definitely. So yeah… gotta go.
But seriously, we hope this inspires you to consider using found fabric for at least one project this year. There is so much joy in repurposing fabrics and in giving them new life while giving our planet a little bit of a break from just that much more fashion and textile waste. Now, really, it’s time for a cup of tea and some ssshhhhhhp, ssshhhhhhp.
– Shannon & Jason
*For a video tutorial of using the CNC Palm Thimble for Big Stitch Quilting, see our YouTube video:

