The buttonhole stitch is one of those classic hand-sewing techniques that beautifully balances form and function. While its name suggests it’s only used for buttonholes, this versatile stitch has long been valued for its durability, decorative potential, and ability to create clean, finished edges.
Whether you’re sewing garments, embellishing embroidery projects, or exploring heirloom techniques, the buttonhole stitch is a skill worth mastering.
What Is a Buttonhole Stitch?
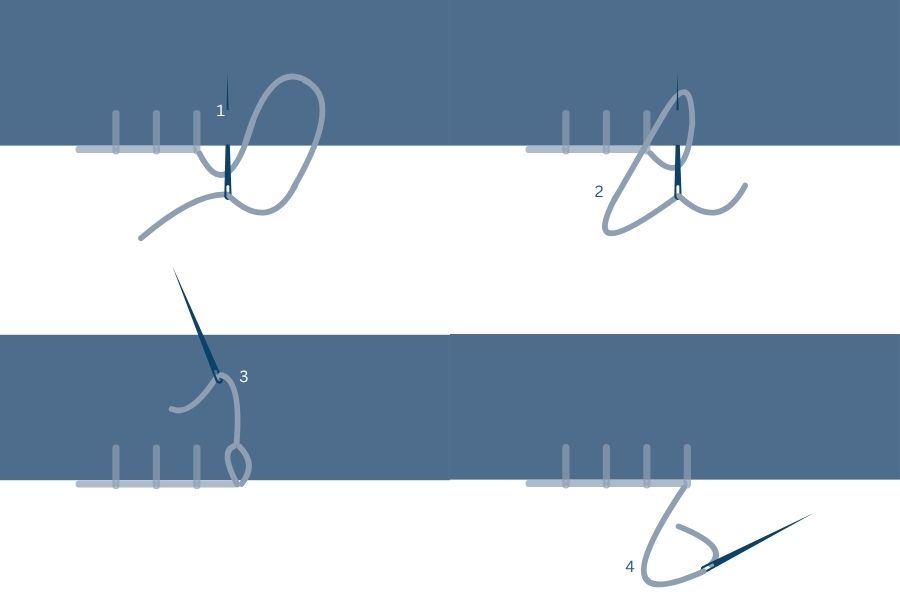
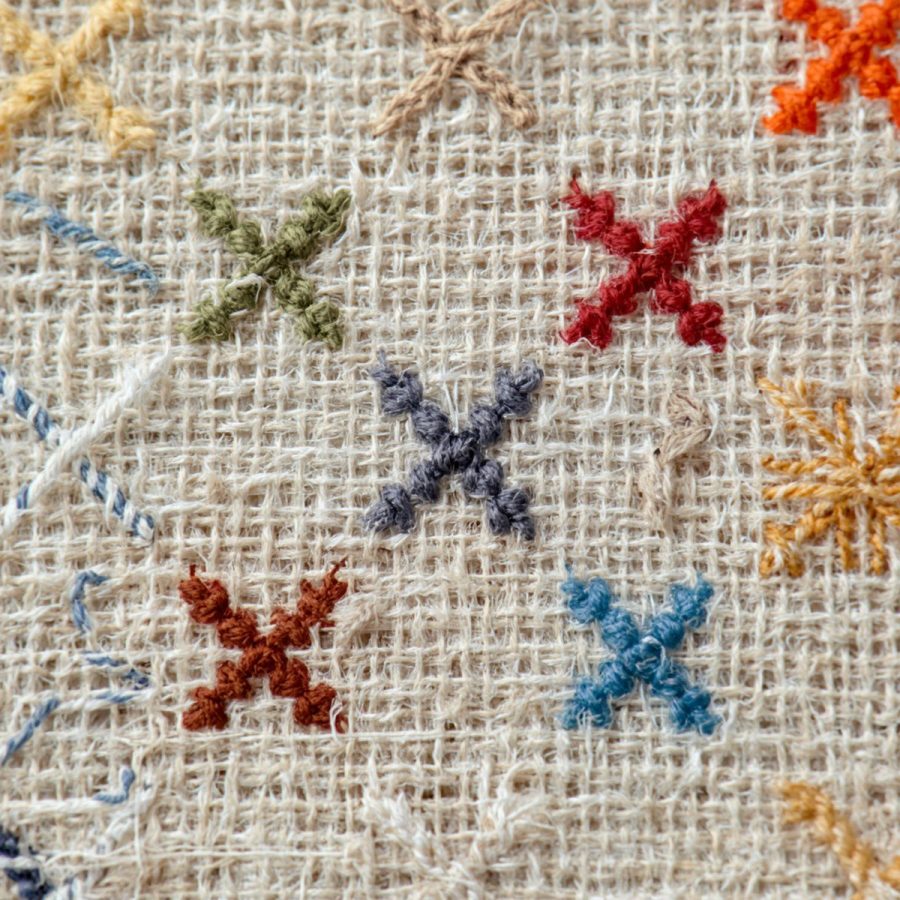
The buttonhole stitch is a looped edge stitch designed to reinforce cut edges and prevent fraying. Each stitch forms a small knot along the edge of the fabric, creating a sturdy finish that stands up to repeated use.
Although it shares similarities with the blanket stitch, the buttonhole stitch is worked more closely together and features a distinct knotted edge that offers additional strength.
When & How It’s Used
The buttonhole stitch is ideal for both practical sewing and decorative embroidery.
It’s best for:
Hand-worked buttonholes
Reinforcing fabric edges
Heirloom sewing projects
Wool appliqué
Decorative borders
Finishing felt ornaments and accessories
Because of its strength, it’s especially useful anywhere a finished edge will experience wear and tear.
Cross stitch on linen and evenweave has a look all its own—soft texture, delicate detail, and beautifully defined stitches. But these fabrics behave differently than standard Aida cloth, and the needle you choose can dramatically affect both your stitching experience and your finished results.
If your thread twists, your fabric holes seem difficult to find, or your stitches feel bulky or uneven, your needle may be working against you instead of with you.
Let’s explore how the right needle supports smoother, more precise stitching on linen and evenweave fabrics.
The Stitching Scenario
Cross stitch on linen & evenweave
These fabrics are favorites for:
Heirloom samplers
Detailed counted cross stitch
Specialty stitches
Fine monogramming
Elegant finishing projects
Unlike Aida, linen and evenweave require stitching “over two” fabric threads, making precision and visibility especially important.
The Common Challenges
When stitching on linen or evenweave, stitchers often notice:
Difficulty seeing fabric holes
Twisted or worn thread
Uneven stitch tension
Splitting fabric threads accidentally
Eye strain or hand fatigue during detailed work
These fabrics reward precision—but they also require the right tool for the job.
Why the Right Tool Matters
Several needle characteristics improve stitching on linen and evenweave:
Point Style
This is where personal preference often comes into play.
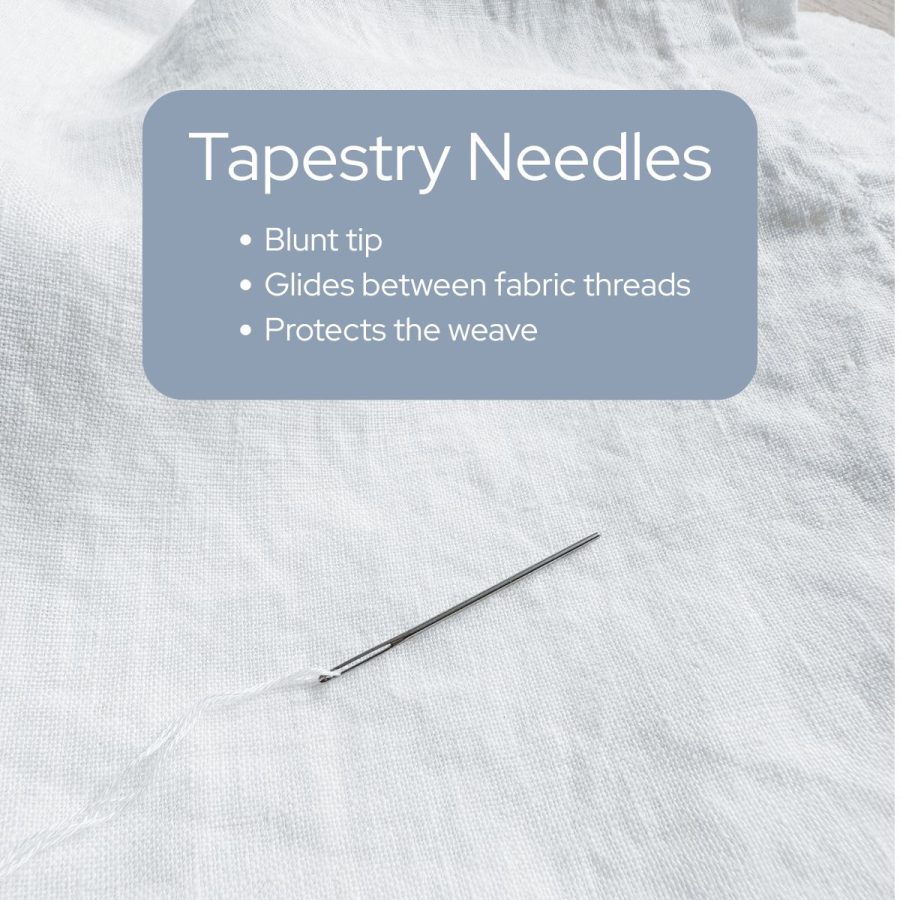
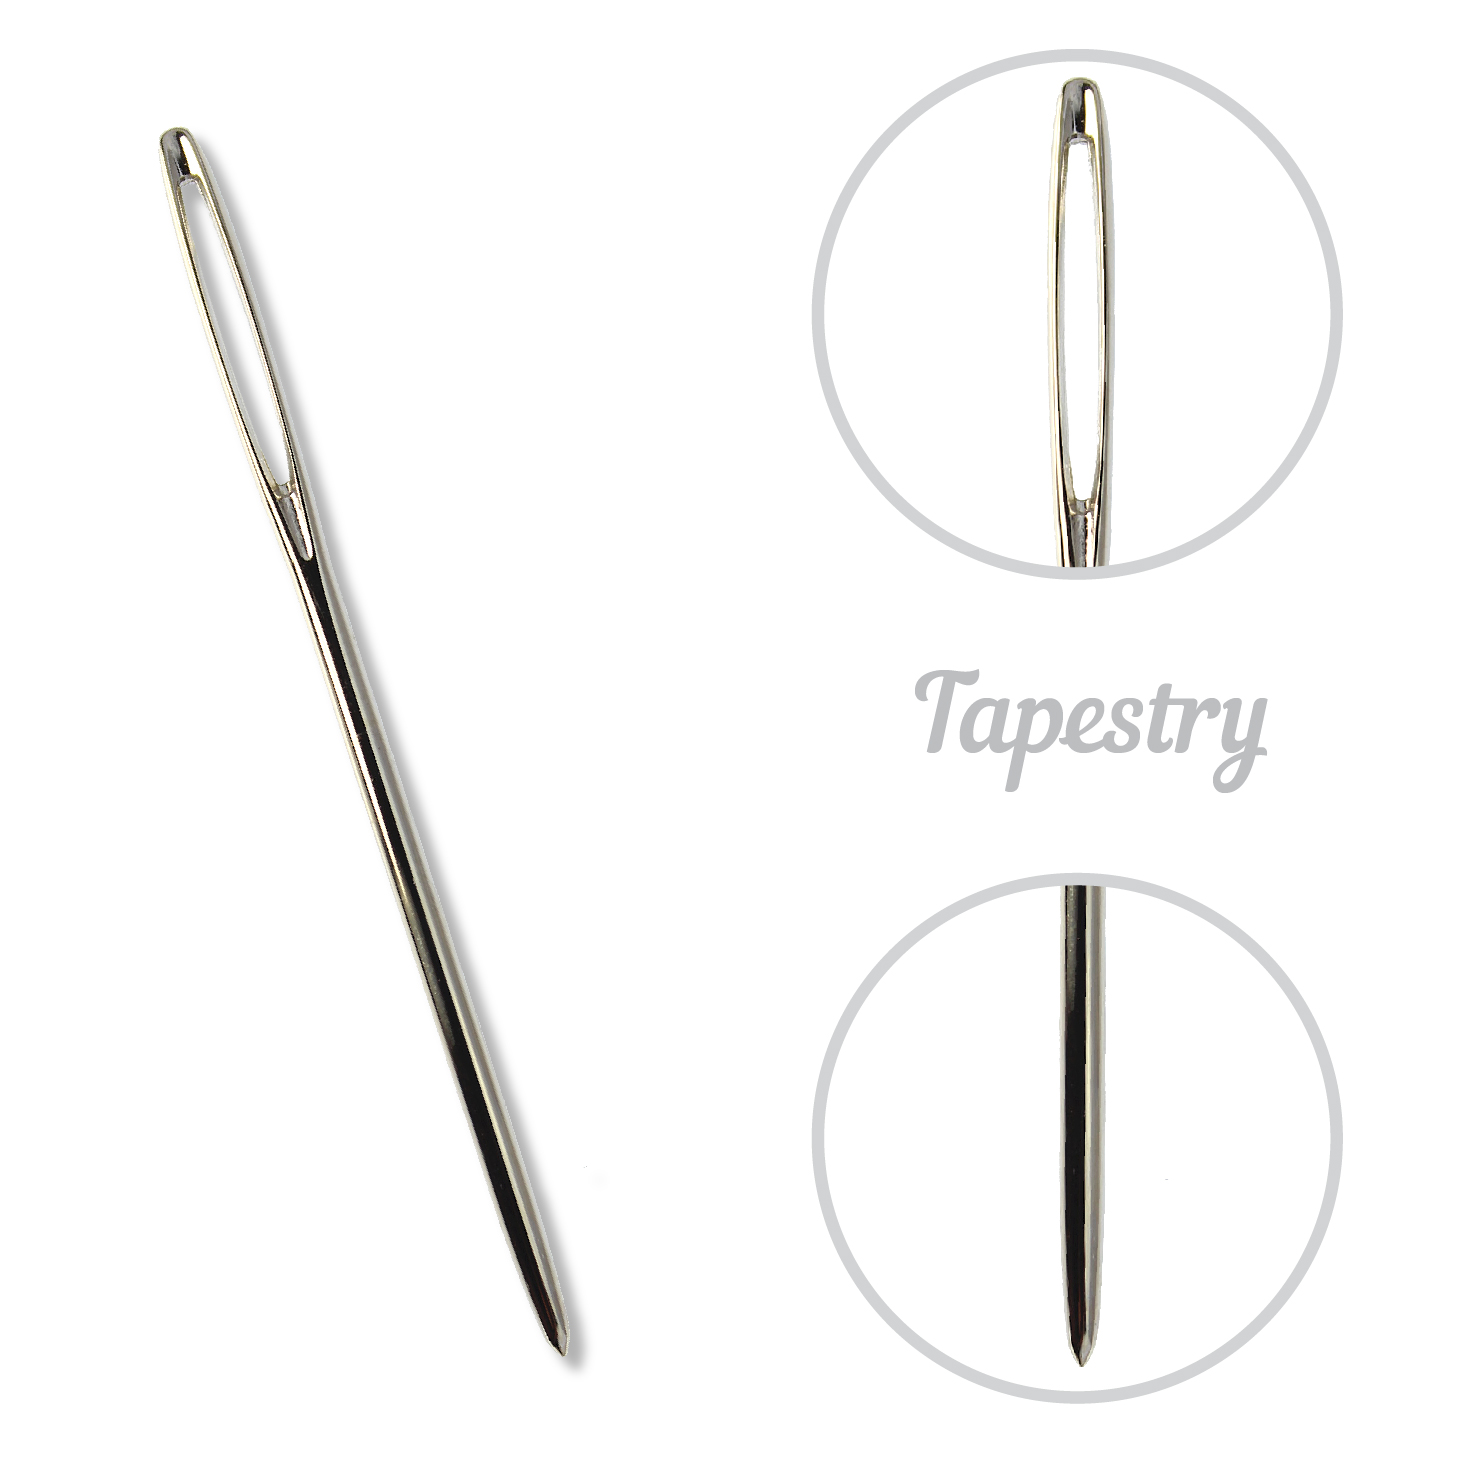
Many stitchers use blunt tapestry needles because they slide between fabric threads without piercing the weave. They’re especially helpful for maintaining fabric structure and preventing thread splitting.
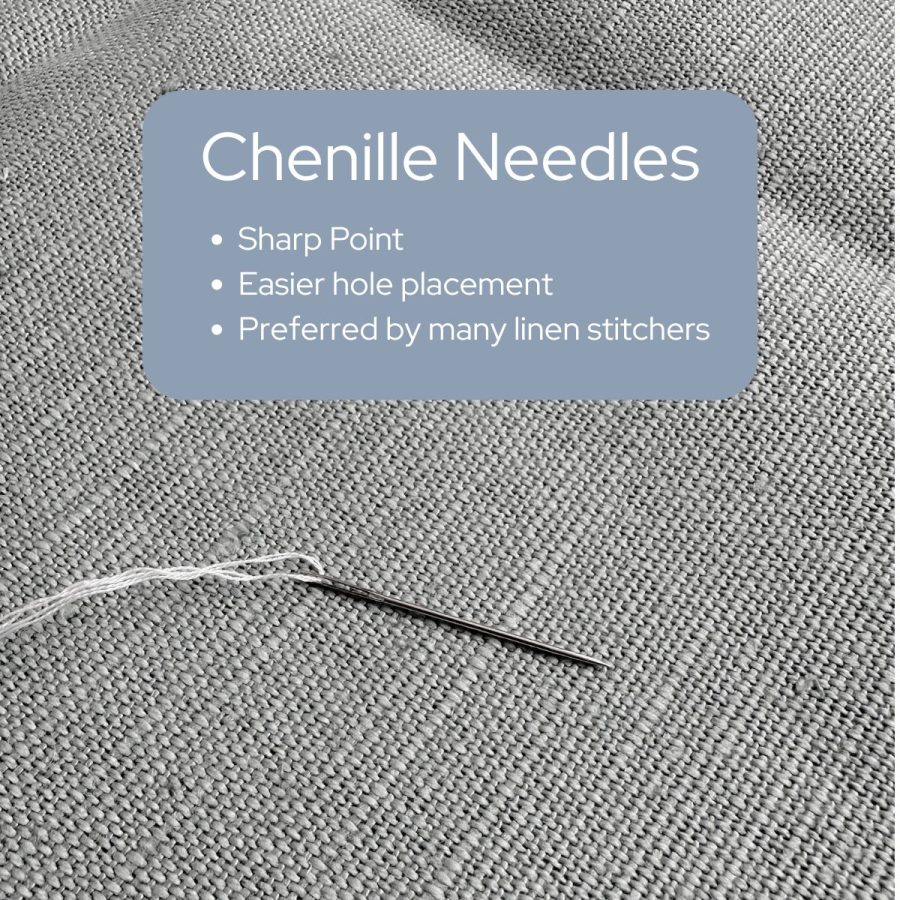
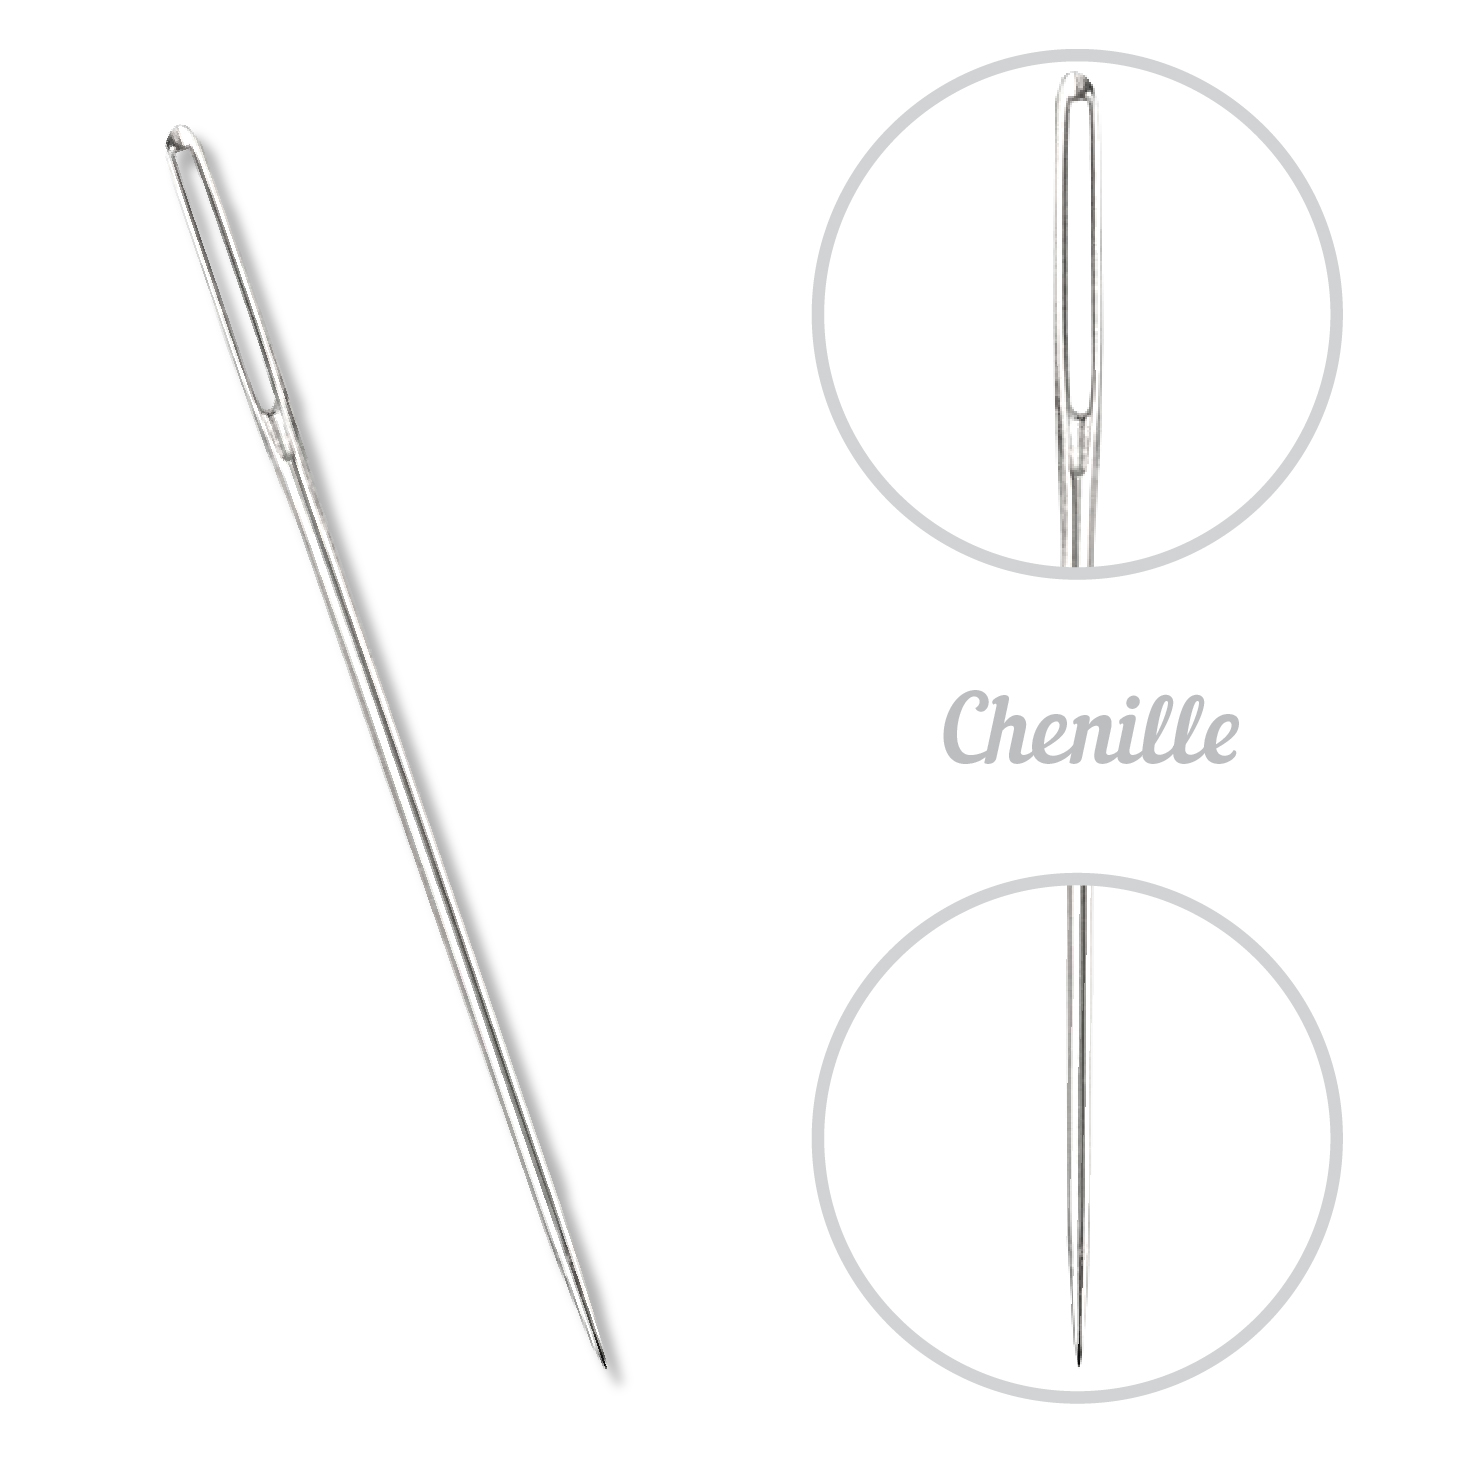
However, many experienced linen stitchers prefer chenille needles for cross stitch on linen and evenweave. Because chenille needles have a sharp point paired with a large eye, they allow for more precise hole placement—especially on higher-count fabrics or natural linens where holes can be harder to see.
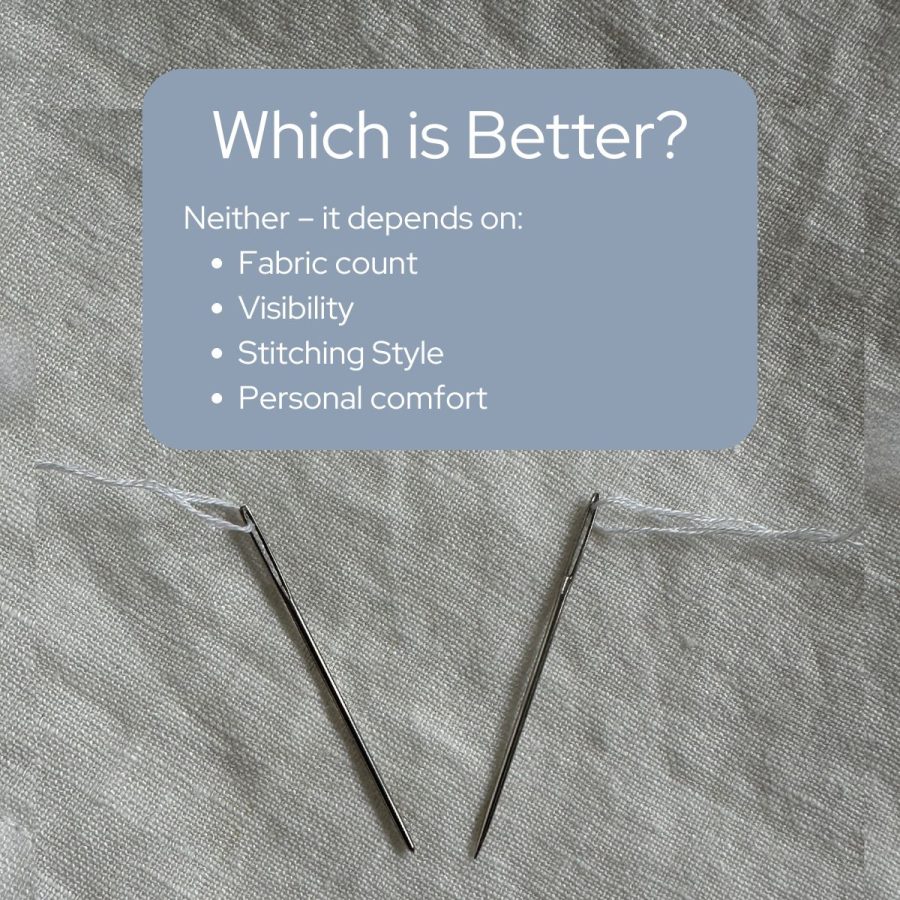
The best choice often depends on:
fabric count
lighting and visibility
stitching style
personal comfort
Eye Size
The eye should comfortably accommodate your floss without causing fraying or drag.
Needle Size
A finer needle works better on higher-count fabrics because it passes easily through smaller openings without enlarging holes.
Needle Length
Comfort matters—some stitchers prefer shorter needles for control, while others like slightly longer needles for rhythm and grip.
The goal is smooth movement through the fabric with minimal resistance.
Our Recommendation: Needles for Cross Stitch on Linen & Evenweave
Tapestry Needles – Sizes 24–28
A classic choice for counted cross stitch. Their blunt point glides between fabric threads, helping preserve the weave and reduce accidental splitting.
These are especially popular for:
standard cross stitch,
lower-count fabrics,
and stitchers who prefer a softer feel against the fabric.
Chenille Needles – Sizes 24–28
A favorite among many linen stitchers, chenille needles combine:
a sharp point,
a long eye,
and easy threading.
The sharp tip allows for more precise hole placement, which can be especially helpful on:
high-count linen,
uneven natural fibers,
specialty stitches,
or projects stitched “over two.”
Many stitchers find chenille needles easier to control when fabric holes are less visually defined.
Pro Tip: Try Both
If you’ve only ever stitched linen with tapestry needles, try a chenille needle on your next project—or vice versa.
Some stitchers love the glide of a tapestry needle, while others prefer the precision of a sharp chenille point. Small differences in point style can dramatically change how comfortable and accurate stitching feels.
There’s no universal “best” needle—only the one that works best for you and your fabric.
Special Considerations for Higher-Count Fabrics
As fabric count increases:
Needle size generally decreases
Smaller eyes reduce bulk
Finer needles help maintain fabric structure
Using a needle that’s too large can distort stitches and widen holes over time.
Reader Takeaway: Quick Checklist
When stitching on linen or evenweave:
✔ Point depends on preference, but try a blunt tapestry needle or sharp chenille when starting a new project ✔ Match needle size to fabric count ✔ Use finer needles for higher-count fabrics ✔ Avoid forcing the needle through the weave
Small adjustments create cleaner, more even stitches.
Looking Ahead
Next month in The Right Tool for the Stitch, we’ll explore needle choices for portable summer stitching and travel projects—because great stitching should go wherever you do.
Until then, enjoy the rhythm and precision that linen and evenweave bring to every stitch.
We Have Five Rolls of Handy Tape in Our Studio. Here’s Why:
You know a tool has become indispensable when you stop putting it back in the drawer because you might need it close at hand at any given moment. We have Handy Tape everywhere. One roll lives on the peg board over the cutting table, another lives in the top drawer of the sewing machine cabinet, and there’s one in the studio “miscellaneous supplies” box. Oh… then there’s one in the utility drawer in the kitchen for gallery wall projects and there’s one that’s currently sitting on Jason’s desk because we used it to wrap a present a few days ago instead of regular tape. Yes, you read that right. We used Handy Tape to wrap a gift. So yeah… we have it on hand pretty much everywhere. That’s how useful this stuff is.
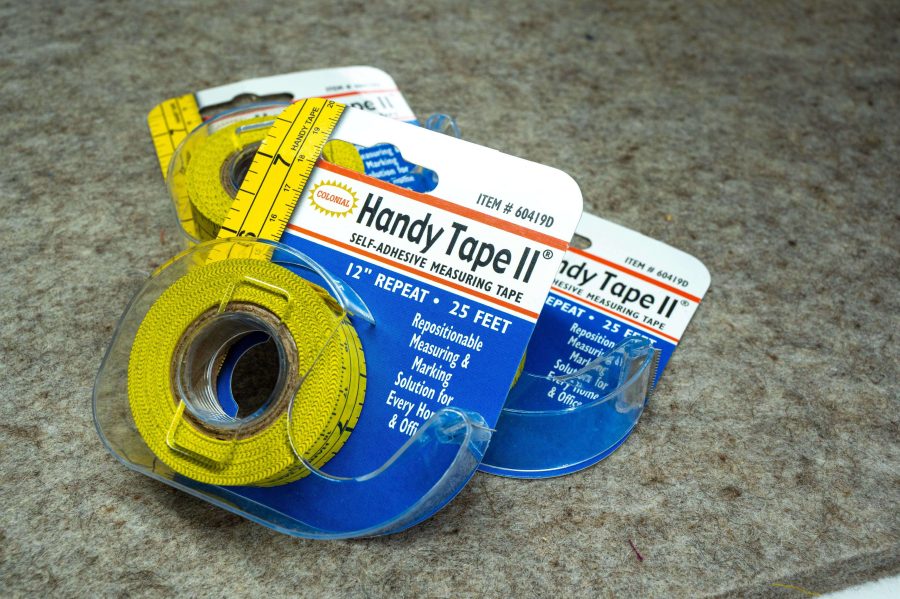
What Even Is Handy Tape?
On the surface, Handy Tape is exactly what it sounds like: a measuring tape with a low-tack adhesive backing that sticks to things. Fabric, walls, tables, your sewing machine, even skin (more on that later). But calling it “sticky measuring tape” is like calling a rotary cutter “a round blade.” Technically accurate but missing the entire point.
Handy Tape is the third hand you’ve been wishing for when you’re trying to measure something by yourself, mark guidelines without permanent lines, or create temporary grids that actually stay put while you work. It’s repositionable, it doesn’t leave residue, and once you start using it, you’ll find yourself reaching for it in situations that have nothing to do with measuring. Like wrapping presents. (We’re still a little surprised by that one ourselves.)
How We Actually Use It (The Real List)
The Temporary Design Wall
This is probably our most-used application. We hang a flannel sheet on the wall (flannel because quilt blocks stick to it), then apply strips of Handy Tape to create a grid or border. Suddenly we have a design wall where we can space out quilt blocks, test different layouts, rearrange components of a textile art piece, and see the whole composition without committing to anything permanent.
The tape sticks to the flannel, the blocks stick to the flannel, and everything stays put while we audition different arrangements. When we’re done, we peel off the tape and the flannel sheet is clean.
Why this matters: Most design walls are either expensive foam boards or permanent installations. Either way, they take up valuable space that, personally, we don’t have. This solution costs about $12 and packs flat when you’re not using it.
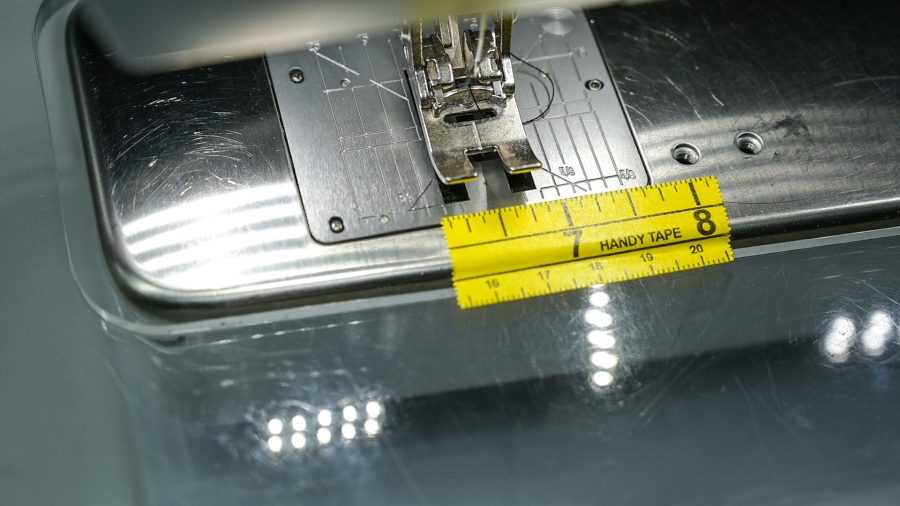
The Sewing Machine Seam Guide
We have guides etched into our sewing machine’s stitch plate. They’re fine. They’re also tiny, hard to read, and easy to lose track of when you’re chain-piecing at speed. And if you sew on a machine that has seen some years of use, those lines can be worn down and faded making them all but useless. Handy Tape applied directly to the machine in front of the stich plate stitch plate creates a bold, high-contrast guide that’s impossible to miss. Just line up one of the marks on the tape with where your needle is set, and follow the clear, bold Handy Tape lines. And the low-tack backing makes it easy to reposition Handy Tape or remove it entirely without leaving sticky residue.
Bonus: It’s much easier to see on camera than etched metal lines. When we’re recording workshops or tutorials, we don’t have to zoom in and out constantly to show measurements. The tape is visible, clear, and stays exactly where we put it.
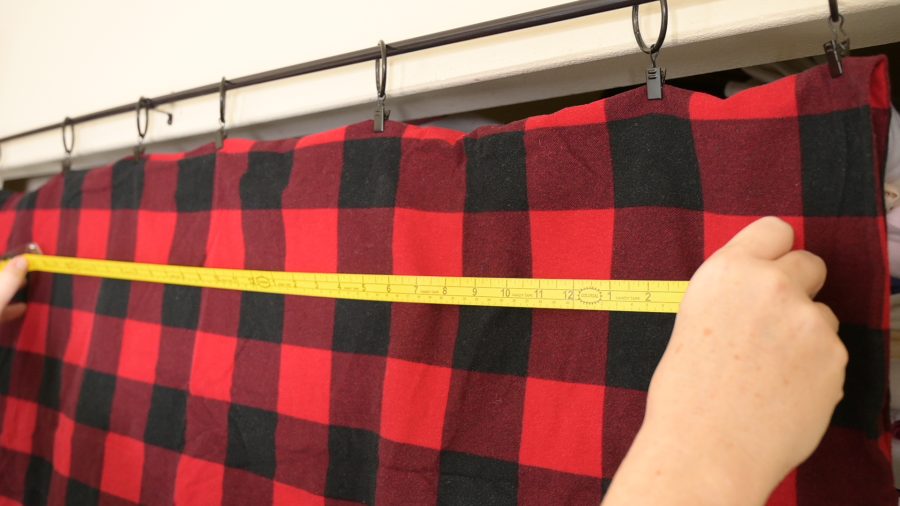
The Solo Measuring Solution for Awkward Spaces
Try measuring a doorway by yourself with a regular tape measure. One end wants to snap back. You’re holding it at arm’s length. You’re squinting to read the numbers while simultaneously trying to keep tension on the tape.
Now try it with Handy Tape: stick one end to the door frame, walk it across, stick the other end down, read the measurement. Done.
We’ve used this for:
A large living room window (trying to figure out curtain yardage or curtain rod length)
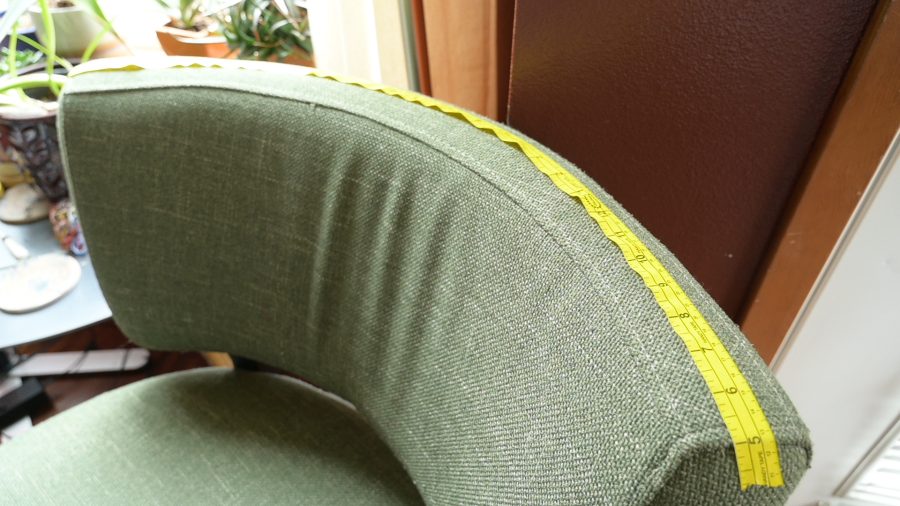
A curved chair back we were reupholstering (impossible with a rigid measuring tape or cloth tape)
Walls when we’re planning furniture placement and art placement
Any situation where you need a third hand but you’re working alone
The curved chair was a revelation. Regular measuring tapes bend but they don’t stay in place. Previously, we would use a separate roll of tape to hold our cloth tapes in place but Handy Tape does it all quickly and efficiently. We laid Handy Tape on the curve and had our measurements without the gymnastics.
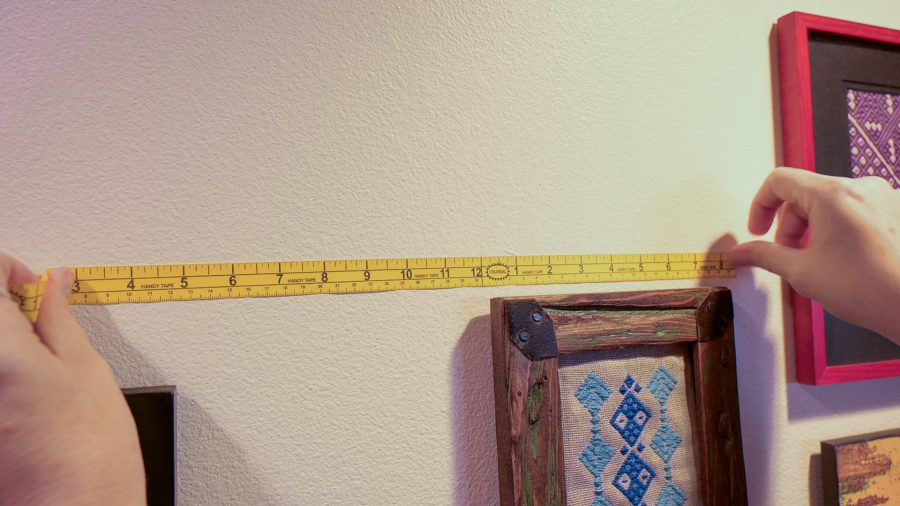
Gallery Wall Spacing (No More “Oops” Holes)
Hanging multiple pieces of art or textile work in a grid is an exercise in spatial geometry and crossed fingers. Measure wrong, and you’ve got unnecessary holes in your drywall. Handy Tape lets you plan first, drill later. Stick strips to the wall to map out where each piece will go. Step back. Adjust. Move things around. When the spacing looks right, mark your hook or nail spots, hang your pieces, and peel the tape away.
No guessing. No regrets. No spackle.
Body Measurements (The Solo Solution)
Here’s a use case we discovered by accident and now recommend all the time:
Taking your own body measurements is awkward. Getting someone else to take them for you is either impossible (you live alone) or uncomfortable. Not everyone wants hands-on help, and not everyone has a person available who knows how to measure correctly. And it’s not like we’re going to run to the neighbor’s and ask them to hold the tape for us. GAH!).
Handy Tape sticks lightly to fabric and skin without leaving residue or pulling uncomfortably. Wrap it around yourself – bust, waist, hips, whatever you’re measuring – stand straight, mark the overlap point with a marker, remove the tape, and count the inches. It’s like having a tailor’s assistant who doesn’t ask questions and doesn’t judge your measurements. We give this advice constantly now. It’s especially helpful for people who sew their own garments but don’t have a sewing buddy nearby to help with fitting.
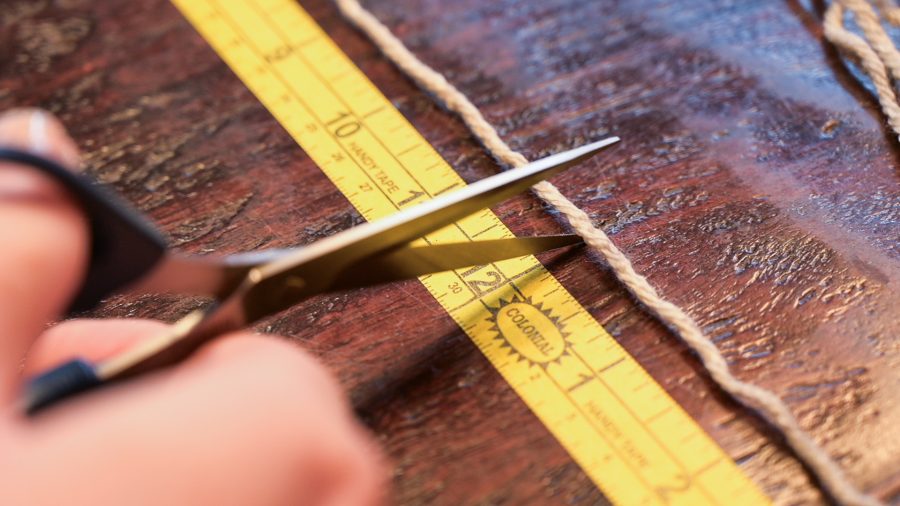
The “Not Actually Measuring” Uses
And then there are the times we use Handy Tape for things that have nothing to do with measuring at all.
In place of washi tape for mixed media art: The measuring tape marks add visual interest, and the low tack adhesive means it repositions easily on paper and fabric without tearing.
Wrapping presents: This happened just a few days ago. The tape dispenser was sitting next to a roll of washi tape we’d been using. We needed to wrap a gift. We grabbed the Handy Tape instead because it was right there. It worked perfectly. We’re not even mad about it.
Scrap bin organization: We stick strips to the top of our scrap bin lids so we can instantly check if a piece of fabric is large enough for a project without digging out a ruler or clearing off the cutting mat.
Teaching tool for workshops: When we’re demonstrating spacing for sashiko grids or blanket stitch edges, we apply Handy Tape directly to the fabric. Students can see the measurements clearly on the overhead video regardless of the classroom lighting situation. IYKYK
The Bottom Line: It’s Not Just a Measuring Tape
Here’s what we’ve learned after going through multiple rolls of this stuff:
Handy Tape isn’t solving one problem. It’s solving the “I need a measurement guide that stays put, doesn’t damage anything, and works in situations where regular tools don’t” problem.
It’s the tool you didn’t know you needed until you try it once, and then suddenly you have five rolls scattered around your workspace and house because you keep finding new uses for it. Fair warning: order a few extra rolls because others will discover just how handy Handy Tape is and yours will mysteriously disappear. Just sayin’…
Handy Tape may not be the flashiest gadget in your toolbox, but it’s one of those quiet workhorses that makes everything else easier. Measure solo. Mark temporarily. Create grids that actually stay where you put them. Wrap the occasional gift when the regular tape just isn’t special enough.
If April was all about texture and dimension, May is about softness, shading, and color blending.
The Long & Short Stitch is a classic embroidery technique used to create smooth transitions between colors and realistic, painterly effects in thread. From flower petals to animal fur, this stitch helps embroidery designs come to life with depth and movement.
While it may look advanced, learning the basics of long & short stitch opens the door to a whole new style of embroidery.
What Is Long & Short Stitch?
The long & short stitch is a filling stitch made by alternating stitches of different lengths. By layering rows of slightly uneven stitches and blending thread colors together, embroiderers can create gradual shading and soft transitions.
Rather than creating a perfectly uniform fill, the irregular stitch lengths help colors merge naturally — much like brushstrokes in painting.
When & How It’s Used
This stitch is ideal whenever you want embroidery to feel soft, dimensional, or realistic.
It’s best for:
Floral petals and leaves
Realistic embroidery designs
Shading and color blending
Animal fur or feathers
Filled embroidery motifs
It’s one of the foundational stitches used in thread painting and advanced embroidery techniques.
As spring settles in, quilting projects often come back into focus. Whether you’re finishing a winter quilt or starting something new, hand quilting offers a rhythm that’s both productive and calming.
From traditional, fine hand quilting to the bold, modern look of big stitch quilting, the tools you choose can dramatically shape both your experience and your results.
If your stitches feel inconsistent, your needle is difficult to control, or your hands tire quickly, the issue may not be your technique—it may be your needle.
Let’s explore how the right needle supports both traditional and big stitch quilting.
The Stitching Scenario
Hand quilting & big stitch quilting
This includes:
Traditional hand quilting with small, even stitches
Big stitch quilting using thicker thread
Quilting through layered cotton, batting, and backing
Finishing quilt edges or adding decorative quilting
These techniques require stitching through multiple layers, which makes needle choice especially important.
The Common Challenges
When hand quilting, stitchers often experience:
Difficulty rocking the needle through layers
Uneven stitch size
Needle bending or breaking
Hand fatigue or finger strain
Trouble maintaining a smooth stitching rhythm
Layered fabrics and batting create resistance, so the needle must be both strong and responsive.
Why the Right Tool Matters
For quilting, a few key needle characteristics make all the difference:
Length & Flexibility Shorter needles are easier to rock in a quilting motion, while slightly flexible needles help create even stitches.
Shaft Strength The needle must be strong enough to pass through multiple layers without bending.
Eye Size A small eye works well for fine quilting thread, while a larger eye is necessary for thicker threads used in big stitch quilting.
Point Style A sharp point helps penetrate layers cleanly, reducing strain on your hands.
Choosing the right combination allows for smoother stitching and better control.
Our Recommendation: Needles for Hand Quilting
Betweens (Quilting Needles) – Sizes 8–10 These short, slightly stiff needles are designed specifically for traditional hand quilting. Their length makes it easier to rock the needle and create small, even stitches.
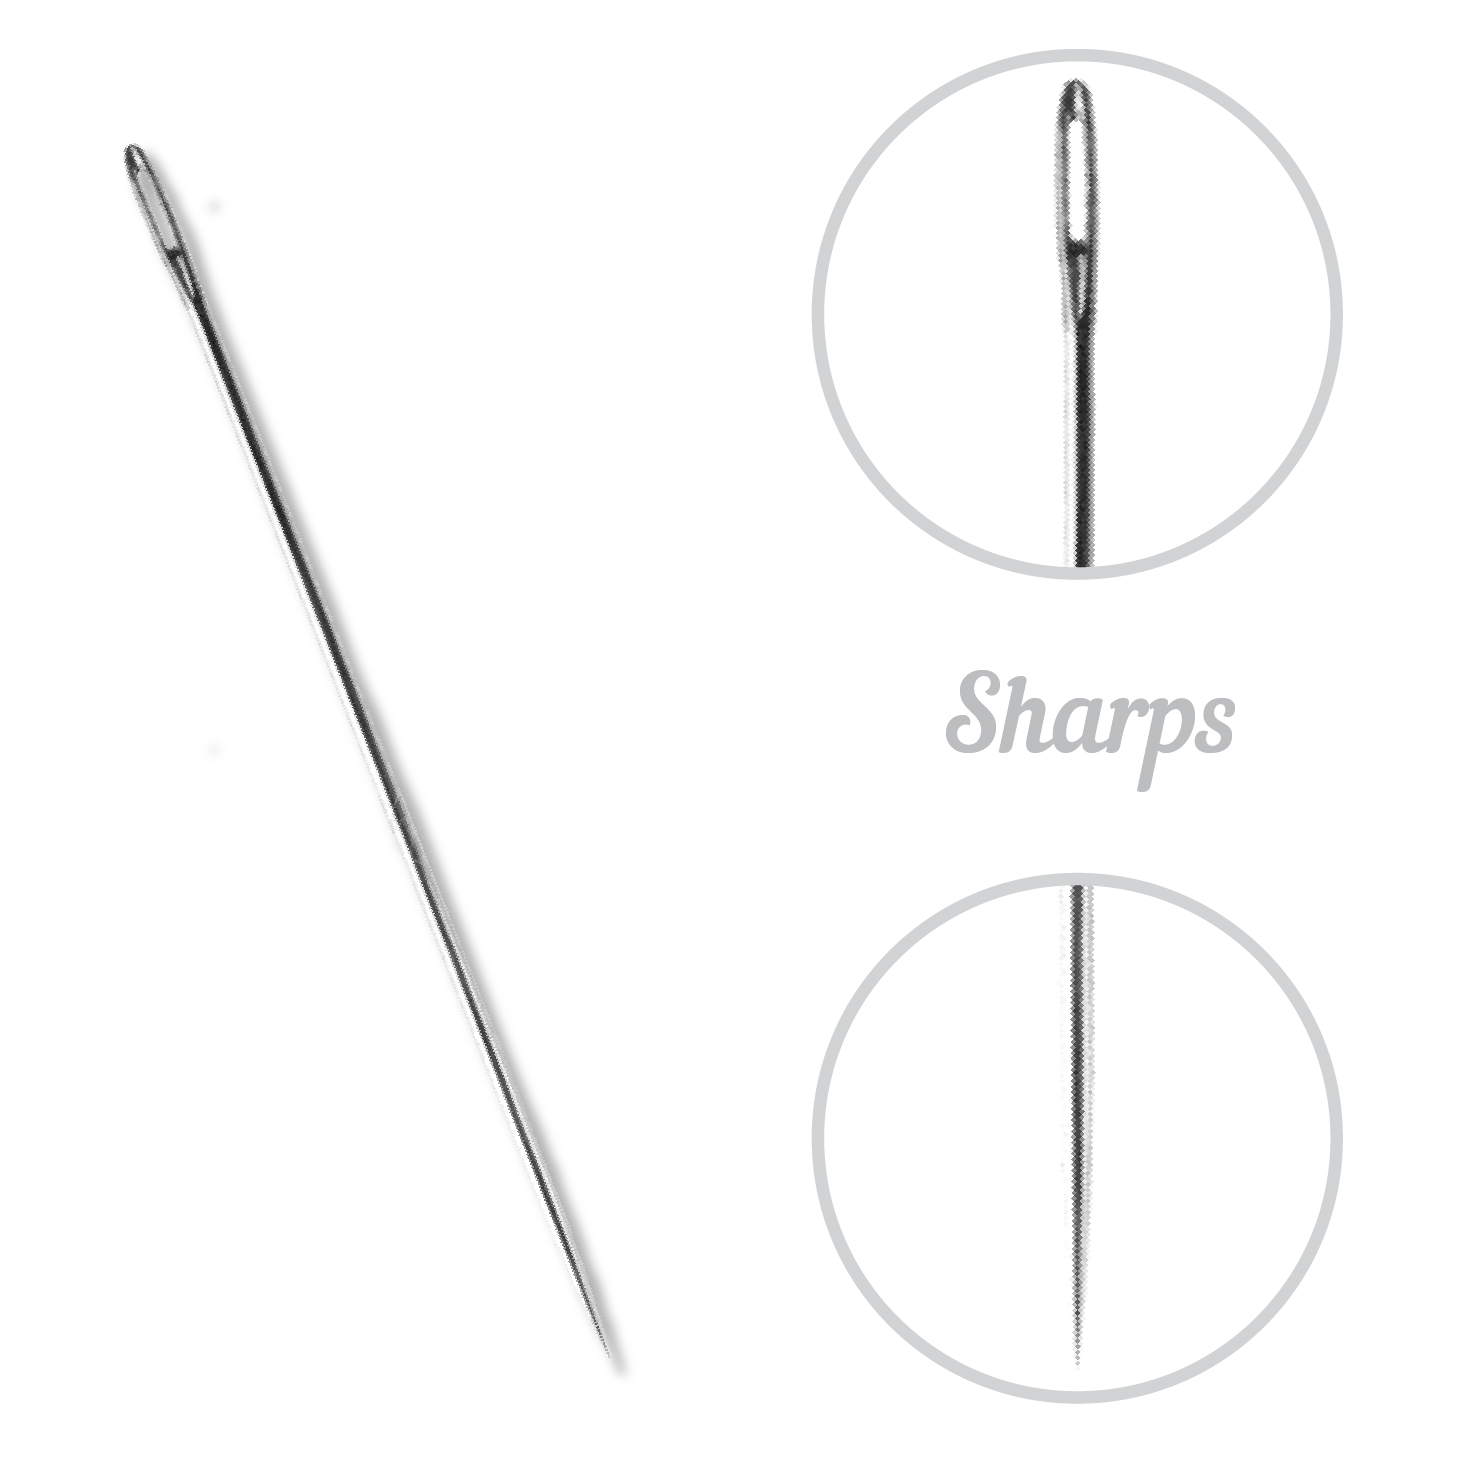
Sharps – Sizes 7–9 A versatile option for quilters who prefer a slightly longer needle or need more reach through thicker layers.
Our Recommendation: Needles for Big Stitch Quilting
Embroidery (Crewel) Needles – Sizes 5–7 With a longer eye, these are ideal for accommodating thicker threads like perle cotton while maintaining a sharp point for easy stitching.
Longer Sharps – Sizes 5–7 Helpful for creating longer, more visible stitches with a smooth, steady rhythm.
Pro Tip: Find Your Rhythm
Hand quilting is as much about rhythm as technique.
Load several stitches onto your needle at once (the “rocking” method)
Keep your grip relaxed
Let the needle do the work
If stitching feels forced, try a different needle size or length—comfort and consistency go hand in hand.
Special Considerations for Batting & Layers
Different batting types affect how your needle performs:
Cotton batting offers more resistance and may require a stronger needle
Poly or blends are easier to pass through but still benefit from a sharp point
If you feel resistance, don’t force the needle—adjust your tool instead.
Reader Takeaway: Quick Checklist
When hand quilting:
✔ Choose short needles (betweens) for fine stitches ✔ Use longer needles for big stitch quilting ✔ Match eye size to your thread thickness ✔ Let the needle move smoothly through layers—don’t force it
The right needle helps you stitch with ease and consistency.
Looking Ahead
Next month in The Right Tool for the Stitch, we’ll explore needle choices for cross stitch on linen and evenweave—where precision and fabric awareness are key.
Until then, enjoy the rhythm of stitching and the satisfaction of bringing your quilt to life, one stitch at a time.
Hi! I’m Megan Zaniewski, author of Stumpwork Studio: Mastering 3-D Embroidery (C&T Publishing), and I’m guest writing for Colonial Needle today to share some tips for selecting the correct needle type for your stumpwork embroidery projects.
What is Stumpwork?
Stumpwork is the term used to describe any and all types of 3-dimensional embroidery. It includes a wide variety of techniques that create varying degrees of depth and dimension. Everything from slightly raised embroidery stitches to fully sculptural free-standing designs fall under the broad umbrella of stumpwork. In this guide, I will be sharing needle recommendations for the following stumpwork embroidery techniques: surface beading, thread-wrapped beading, beaded slips, wireslips, fabric applique, felt padding, and dimensional stitches.
Why is needle choice important?
Did you know there are 100’s of needle variations? Navigating the many needle options out there can feel overwhelming even for an experienced embroiderer. And though the differences between different types of needles may seem slight or insignificant, choosing the appropriate needle for your project can make a big difference in both your stitching experience and the quality and look of your finished work.
When worked with stranded cotton embroidery thread, many stumpwork techniques can be accomplished with Sharps or Embroidery/Crewel needles . In some cases, though, you may find it easier or even necessary to work with other types of needles. While it can be helpful to have a small variety of needles available on hand, you certainly do not need to stockpile every needle type. With just the following 6 needles, you’ll be able to comfortably accomplish a wide variety of stumpwork techniques.
An Overview of My 6 Essential Needles
Needles have four variables: their point profile, diameter (i.e. thickness), eye size, and length. Understanding each needle type’s unique characteristics and how those features affect its function will help inform your needle choice.
Sharps These are general purpose sewing needles with a sharp point and small, rounded eye. They are well suited for many embroidery techniques and stitches done with sewing, silk, and cotton thread.
Embroidery/Crewel Embroidery/Crewel needles have a longer eye than a standard Sharps needle that can better accommodate multiple strands of thread. It also makes threading the needle easier. Otherwise, their length, diameter and point profile is the same as a Sharps needle. They are also suitable for many embroidery techniques worked in silk and cotton thread.
Tapestry Tapestry needles feature a blunt tip, large eye, and thick profile. They are designed to accommodate thicker, often delicate fibers like tapestry wool. The needle’s thick diameter creates a hole large enough for the thread to pass through the fabric easily with very minimal friction (which can cause wear and tear). Its blunt tip does not pierce fabric well, so this needle is best suited for canvaswork. The blunt tip also makes it an ideal needle for working dimensional stitches in stumpwork designs, such as woven stitches and detached stitches which require careful maneuvering apart from a fabric base.
Chenille Chenille needles are identical to Tapestry needles in length, diameter, and eye size. These features make it well suited for working with thicker, textured, or more delicate specialty fibers like tapestry wool, silk ribbon, wool-silk blends, metallic threads, linen threads, and more. The difference between a Chenille needle and Tapestry needle is its point profile. A Chenille needle has a sharp point, enabling the needle and fiber to pass through even thick or coarse fabrics easily.
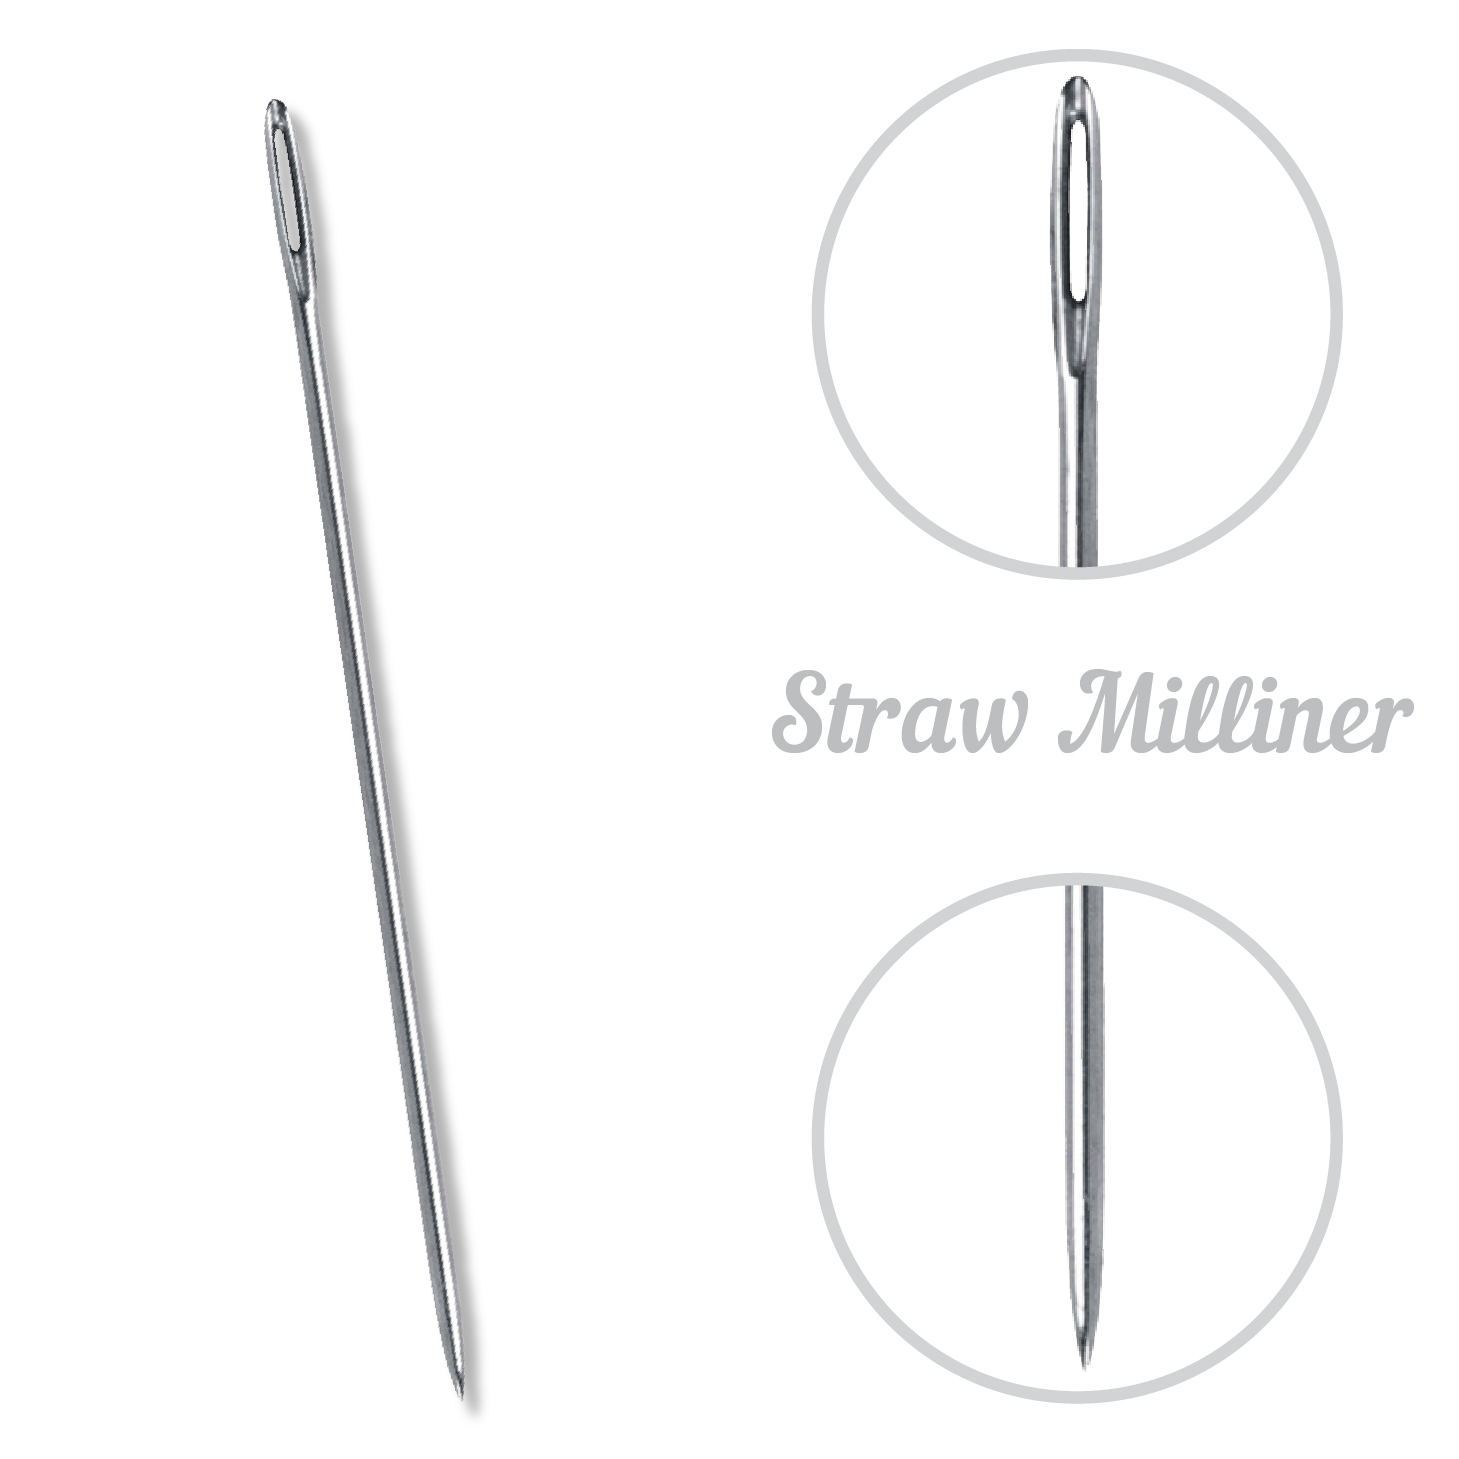
Milliner Milliner needles are similar to a Sharps needle. They have the same sharp point profile and small rounded eye as a Sharps needle, but they are longer. Their long length and small eye make them helpful needles for working dimensional stitches that require wrapping the thread around the needle multiple times (like Cast-on Stitch and Bullion knots).
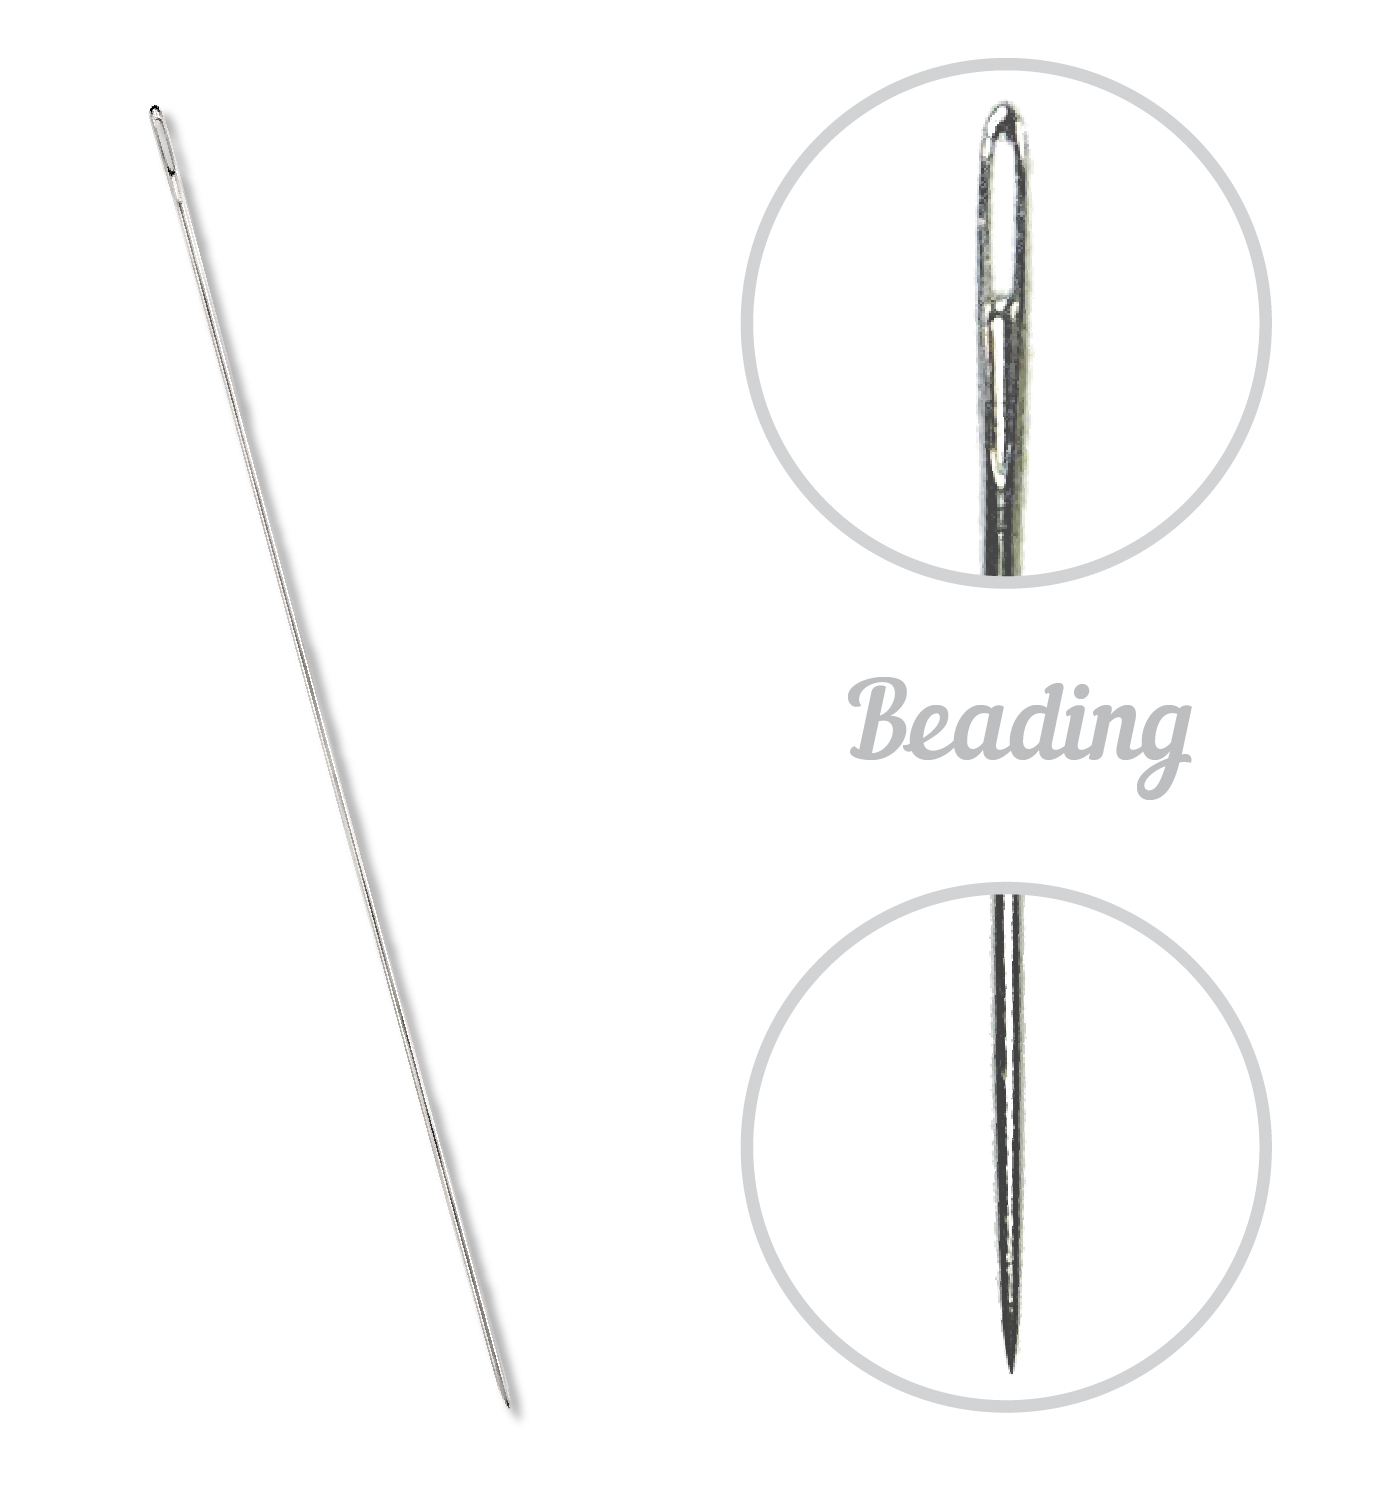
Beading Beading needles are made from steel wire, with a sharp point and a very long and thin profile. The eye is also small, allowing the needle to pass through beads and sequins easily without getting stuck. The long length allows you to easily scoop up and thread multiple beads at once.
With the defining features of each needle type in mind, let’s take a look at some stumpwork techniques and my recommended needle for each one.
Needles for Beading Techniques
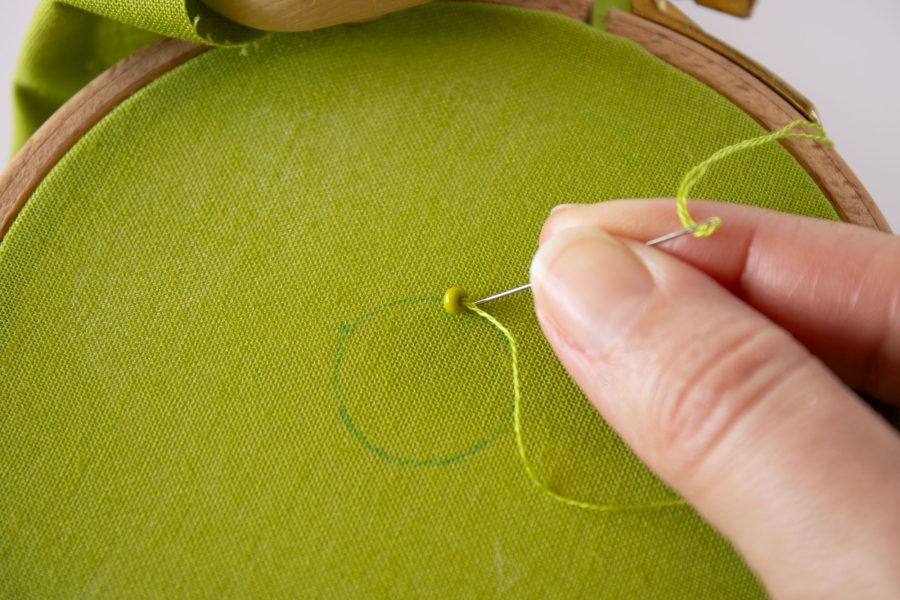
Beads are a highly versatile material in stumpwork embroidery. As surface decoration, beads can elevate a design with texture, dimension, and sparkle. Beading needles are most often the suitable choice for embroidering with beads. Their elongated and uniformly thin profile allows you to easily scoop and thread even the smallest seed beads. Keep in mind, these needles are very long and pliable so they are prone to bending if used too roughly. If you find beading needles too difficult to maneuver, you can try working with a thin-sized embroidery/crewel needle such as a size #11 instead. This size will still accommodate many bead sizes, even the smallest seed beads.
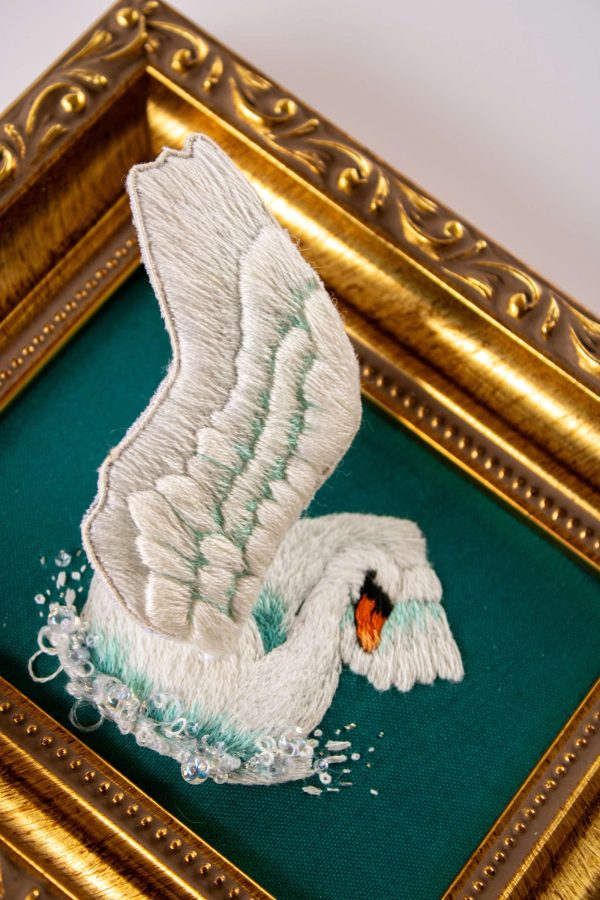
Surface beading is used to mimic bubbles and add sparkle to this stumpwork swan design
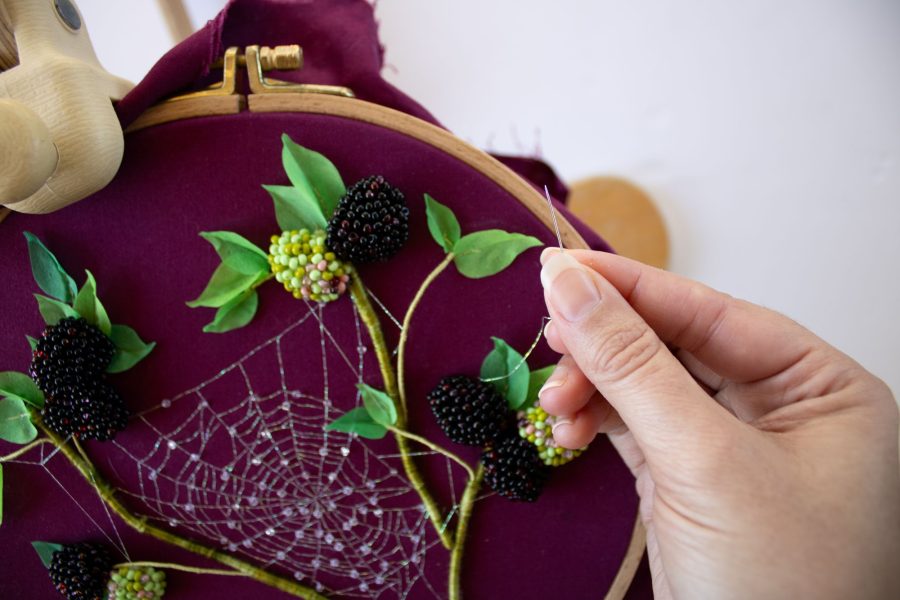
Beads can also be used to create more sculptural forms with a technique called a beaded slip. With this technique, beads are embroidered onto a flat surface before being sewn into a rounded shape. This technique is helpful for recreating things like berries or a flower center, though it can be modified in many ways for an entirely different look (ex. try using French knots instead of beads). Beading needles are again the most suitable needle for working this technique, though thin embroidery/crewel needles may also be used as an alternative for most bead sizes.
Embroidering beads onto a beaded slipBlackberries made from a beaded slip
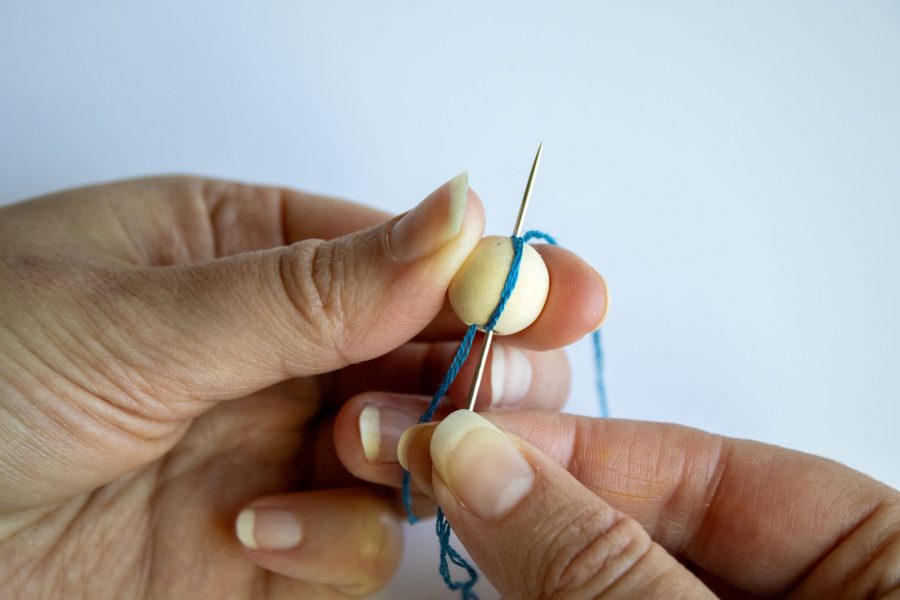
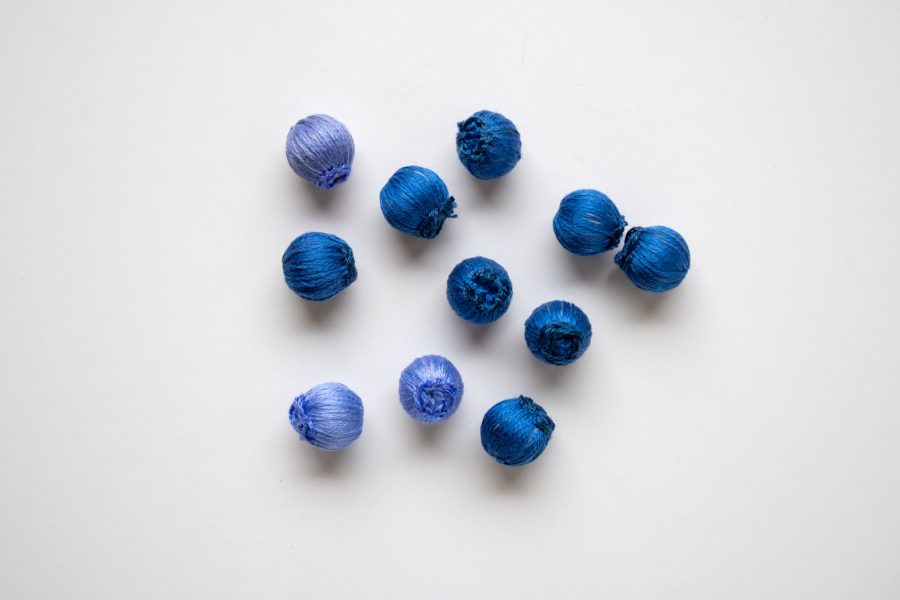
Another way that beads can be used as a sculptural element in an embroidery design is through a bead-wrapping technique. Bead-wrapping involves covering the bead (or another similar bead-like form made from clay, paper, cotton, etc) with thread. Wrapped-beads can be used in innumerous ways. In nature motifs, they can serve as berries, insect eyes, flower buds, seeds, eggs, and more. Beads with larger holes make the best forms for this technique, as they can better accommodate the thread’s bulk as it is wrapped around the bead. Because the interior of the bead can become quite densely packed with thread, I recommend using a chenille needle for this technique. Its strong and sharp profile will prevent it from bending or breaking under pressure as you pass it through the densely packed bead.
Wrapping a bead with cotton thread and a chenille needleBlueberries made from thread-wrapped beads
Needles for Raised Stitches
Raised stitches are a simple yet effective way to add texture and dimension to an embroidery design without additional materials or supplies. All you need is a needle and thread.
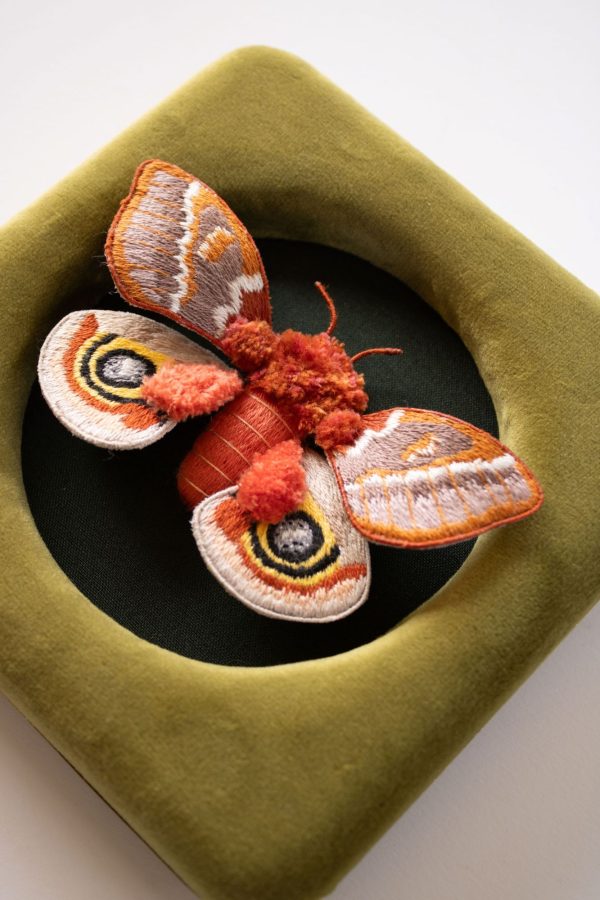
The type of needle you need will depend on the type of stitch and fiber you are working with. For many stitches worked in stranded cotton embroidery thread, a Sharp or Embroidery/Crewel needle is suitable. For example, Turkey Stitch, which produces a tufted rug-like effect that can be trimmed and shaped, can be worked with cotton thread and a crewel needle to add a fuzzy texture to a design.
Turkey stitch worked in stranded cotton onto the wings and body of an Io moth
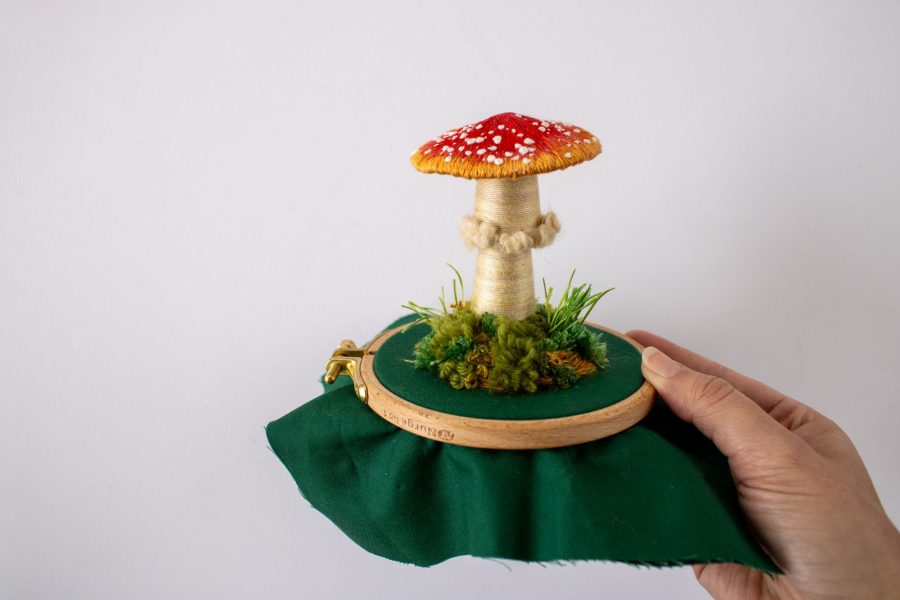
When working the same stitch with larger or more delicate fibers, such as silk or wool, I recommend using a chenille needle. The thicker profile will allow the threads to pass through the fabric more easily, preventing fraying or breakage.
Turkey Stitch moss and grass created with a variety of wool and silk threads and a chenille needle
If you find yourself struggling with some raised stitches, you may find that switching to a Milliner’s needle makes all the difference. For example, stitches that require you to wrap the thread around the needle multiple times before passing it through the fabric, such as French Knots and Bullion Knots, are best executed with a Milliner’s needle. Its long, straight shaft has an even diameter from tip to eye, allowing the wrapped threads to glide through more easily, preventing tangles and knots.
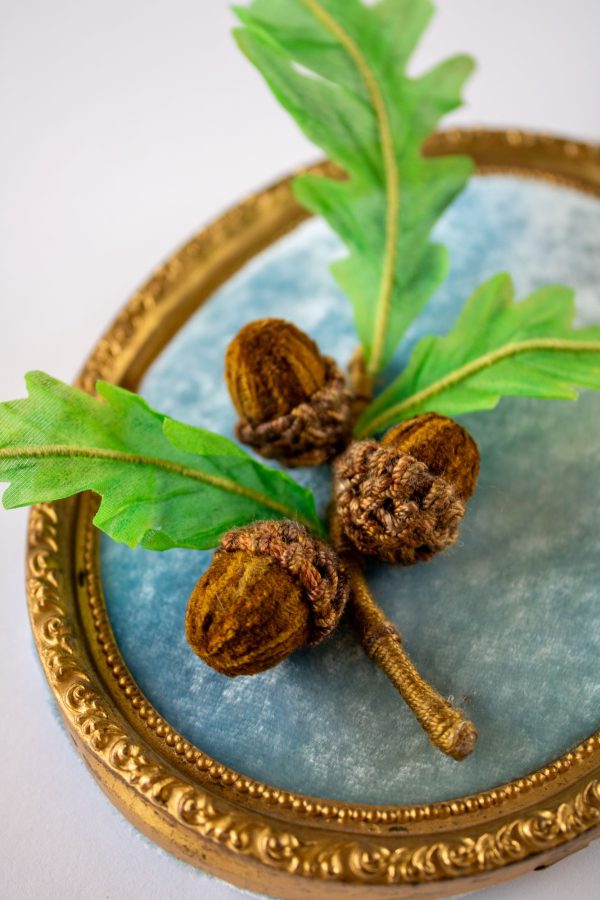
With other dimensional stitches that require you to weave or manipulate the thread in more complicated maneuvers (such as the Woven Picot or a Brussels Stitch), I suggest using a tapestry needle. Its blunt tip will help prevent you from piercing the thread as you weave the stitches.
An acorn cap stitched with a woven Brussels Stitch, using a wool-silk blend thread and tapestry needle
These are just a few examples of the many ways that stitches can be used in stumpwork designs, giving your embroidery a 3-dimensional effect. If you are trying out a new-to-you stitch and are unsure of what needle to use, as a general rule, consider the characteristics of the thread you are working with (ex. stranded cotton vs a more delicate fiber) and how the stitch is executed (ex. surface, woven, wrapped, etc). These factors can help guide you.
TIP: For stitch tutorials and inspiration, I highly recommend checking out the Stitch Bank by the Royal School of Needlework, a free and comprehensive resource that includes over 500 stitches with information about their history, applications, and full step-by-step video and photo instructions.
Needles for Wirework
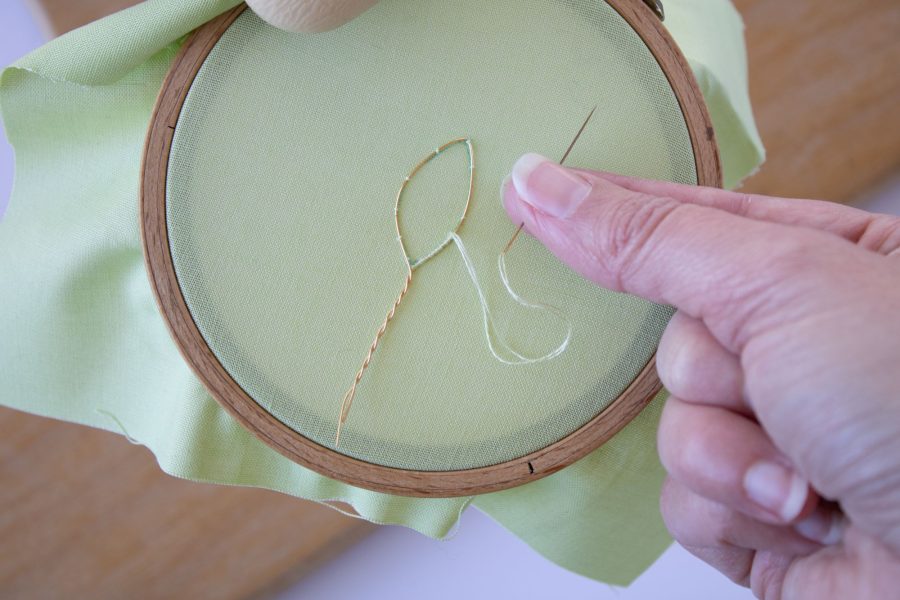
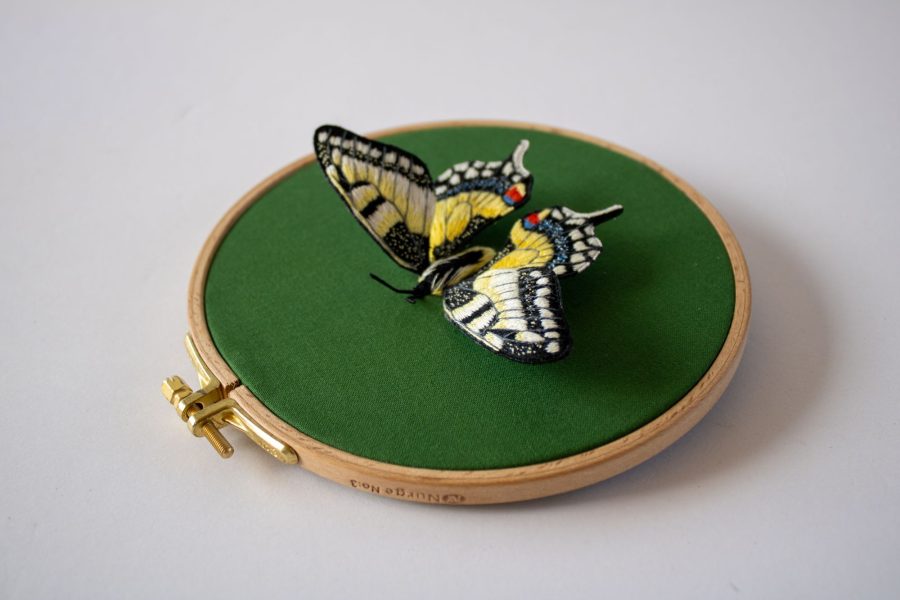
Wires can be used in a variety of different ways to add dimension to an embroidery design. One popular and easy-to-learn technique is called a wireslip, where wire is embroidered along the edge of a design. This framework allows you to cut out the embroidery and either display it alone or attach it to a base as a 3-dimensional feature. When embroidering over the wire, it is important to keep your stitches as neat and precise as possible and work with a fine yet strong cotton or silk thread. For this reason, I always recommend using a Sharp or Embroidery/Crewel needle when working a wireslip (a size #10 is ideal when working with 1 strand). The thin point and profile of these needles allow you to stitch as closely to the wire as possible, resulting in a clean and tidy edge to your design.
Embroidering over a wireslip leaf with a single strand of cotton thread and a size 10 embroidery needleWings worked with the wireslip technique give this Old World Swallowtail butterfly a 3-dimensional, life-like look
Needles for Padding and Applique
Fabrics can serve as more than just a base for your embroidery. With a couple of applique techniques, fabrics can add height and texture to your embroidery design.
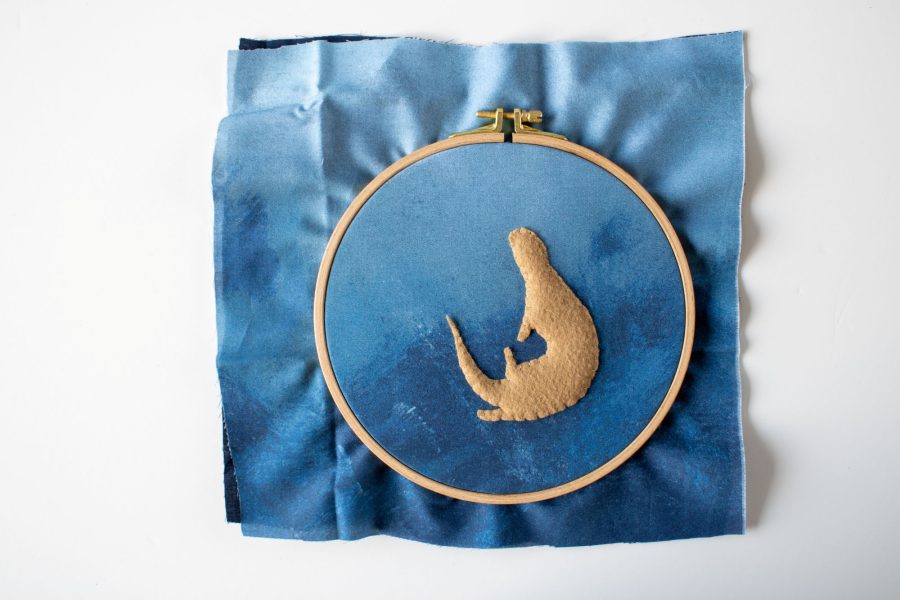
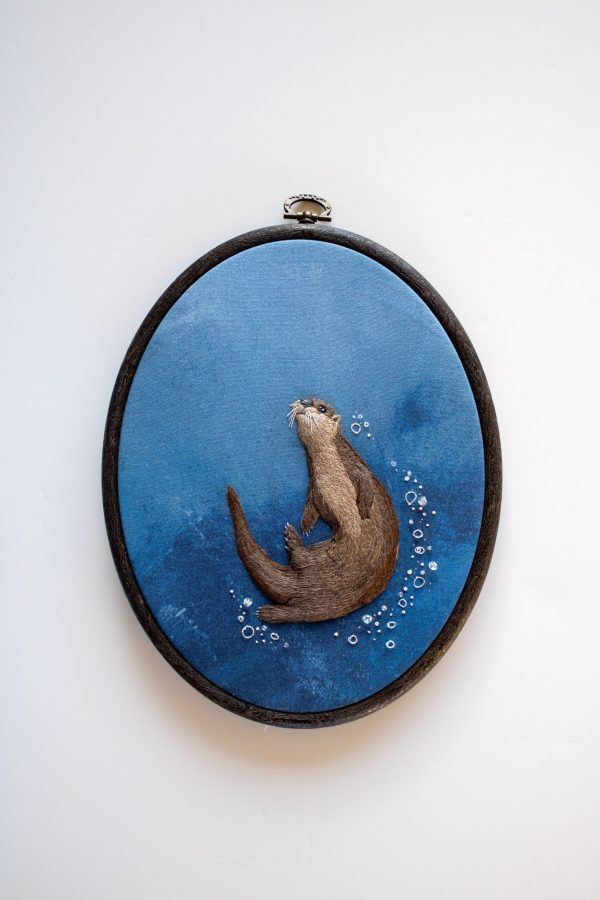
Felt padding is a beginner-friendly technique that creates a raised shape to embroider over. In this technique, layers of wool felt are stitched to your fabric base in increasing size, resulting in a firmly padded form that rises above the fabric background. These wool felt pieces are appliqued in place with a single strand of cotton thread. To ensure that you are creating neat stitches as close to the edge of the felt as possible, I recommend using a size 10 Sharp or Embroidery/Crewel needle.
Felt padding stitched to a fabric base, ready to be embroideredThe finished stumpwork river otter embroidered over the padded base
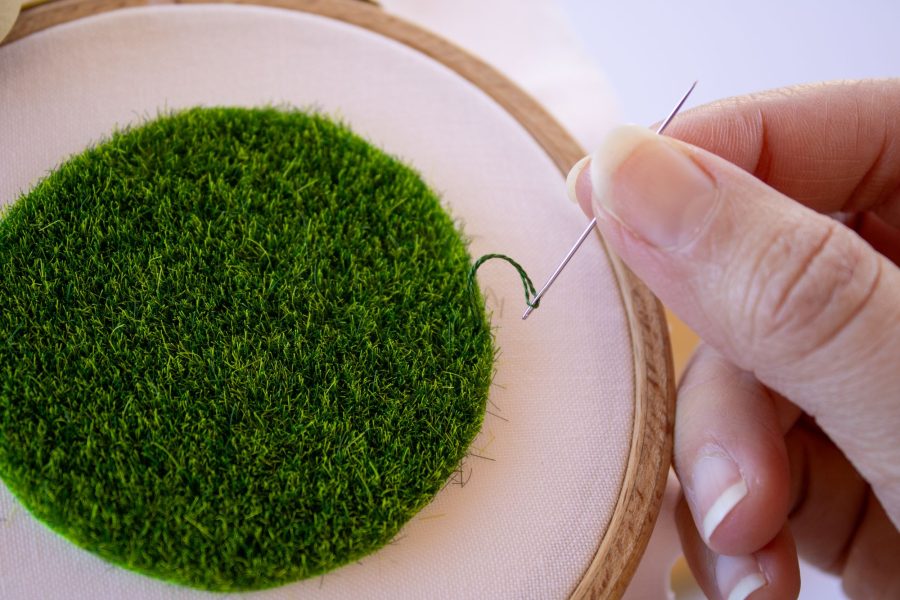
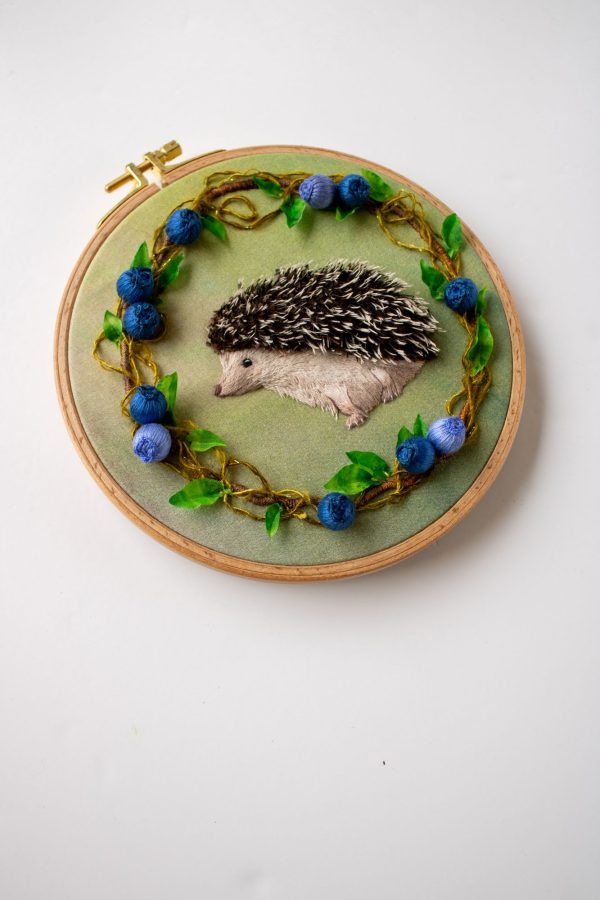
Fabrics can also be used to add visual interest to a design with padded applique. Textured fabrics, such as fleece, velvet, faux fur, leather, and vinyl are ideal for this technique as they offer interesting textures and do not fray when cut. The cut fabrics can either be sewn directly to the base or padded with a layer of stuffing between it and the base for extra height. This technique is also worked with a single strand of cotton thread near the edge of the fabric. So to keep your stitches precise and well-disguised, I again recommend using a size 10 Sharp or Embroidery/Crewel needle.
Appliqueing grass on a fabric base with a single strand of cotton thread and an embroidery needleA hedgehog stitched with the padded applique technique
These are just a few of the ways you can explore stitch, fiber, and technique to create 3-dimensional embroidery designs. For more ideas and in-depth step-by-step tutorials, please check out my book, Stumpwork Studio: Mastering 3-D Embroidery. I hope that this needle selection guide helps take some of the guesswork out of choosing the right needle for your projects, especially if you are exploring stumpwork embroidery for the first time. While this guide can help you make an informed choice between your needle options, please remember there are no rules when it comes to embroidery. Above all else, stitching should be comfortable and fun. So, I encourage you to experiment with different needle types to get a feel for what works best for you.