What’s the Stitch?

Bullion Knot: The Twisted Rose Stitch That Adds Beautiful Texture

If January was about invisible mending, February is about texture, dimension, and a little romance.

The Bullion Knot is a wrapped stitch that creates raised coils of thread — often used to form roses, flower buds, wheat sheaves, and dimensional embellishments. It’s decorative, elegant, and surprisingly versatile once you get the rhythm.


What Is a Bullion Knot?

A bullion knot is made by wrapping thread multiple times around your needle before pulling it through the fabric. The wraps form a smooth, raised coil that sits on top of the fabric.

Think of it as a longer, sleeker cousin of the French knot.

When & How It’s Used

Bullion knots shine in:

• Floral embroidery (roses, lavender, buds)
• Vintage linens
• Heirloom sewing
• Crazy quilting
• Dimensional embellishment
• Monograms with texture

They’re especially popular in spring projects — but work beautifully year-round for adding interest and depth.


What You’ll Need

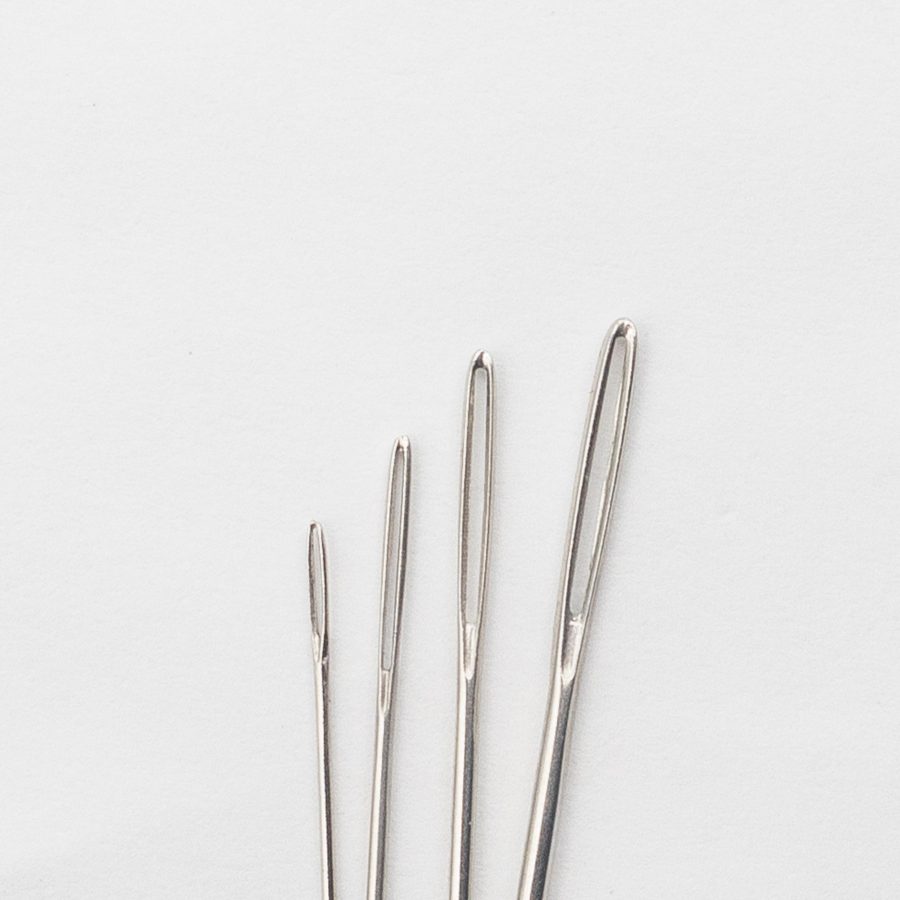
• Embroidery needle (milliners/straw needles work best)
• Embroidery floss or perle cotton
• Fabric in a hoop
• Small scissors

Pro Tip: Milliners needles are ideal because the shaft and eye are the same width — which makes sliding wraps much easier.


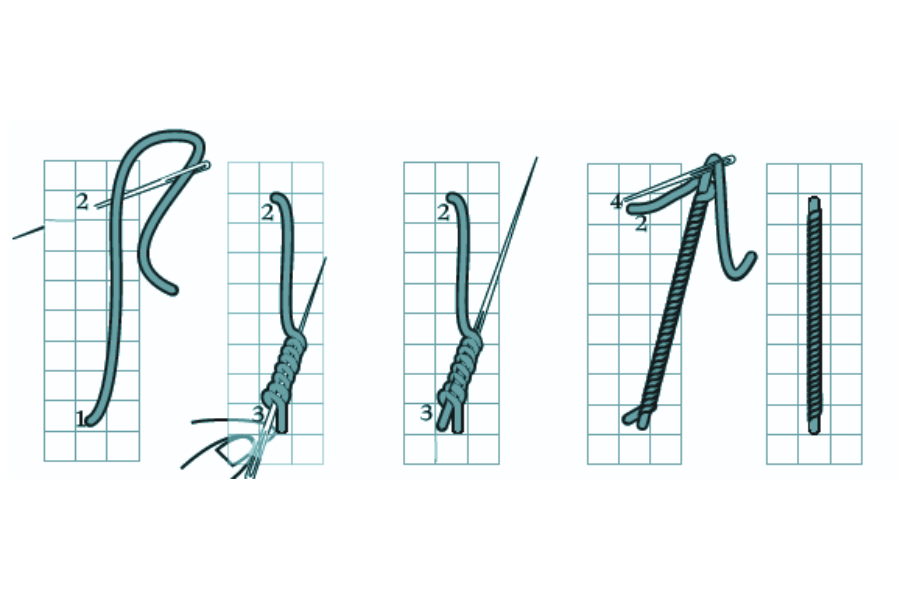
How to Make a Bullion Knot

  1. Bring needle up through fabric.
  2. Insert needle back down a short distance away — but don’t pull it through.
  3. Wrap thread around the needle 6–12 times (depending on desired length).
  4. Hold wraps firmly with your thumb.
  5. Gently pull needle through wraps.
  6. Lay coil smoothly against fabric and pull snug.

If it twists — don’t panic. Slow tension and steady hands are the key.


Why We Love It

Bullion knots instantly elevate simple designs. A cluster of them becomes a rose. A row becomes textured trim. A single one can anchor a delicate motif.

It’s the perfect stitch to practice patience — and it rewards you with dimension you just can’t get from flat stitches.

The Right Tool for the Stitch: Embroidery on Linen

February invites us to slow down.

Embroidery on linen is one of those techniques that rewards patience—smooth stitches, soft texture, and beautiful drape. But linen has a personality of its own. Its natural fibers, subtle slubs, and varying weave density mean that not every needle performs the same way.

If your thread is fraying, your fabric feels resistant, or your stitches look uneven, the solution may not be your technique—it may be your needle.

Let’s explore how to choose the right tool for embroidery on linen.


The Stitching Scenario

Surface embroidery on linen

This includes:

  • Crewel embroidery
  • Monogramming
  • Floral surface designs
  • Stitch samplers
  • Slow stitching projects

Linen’s strength and structure make it ideal for embroidery, but its tightly woven fibers require a needle that can glide cleanly without damaging the fabric.


The Common Challenges

When stitching on linen, you may notice:

  • Thread fraying or fuzzing
  • Difficulty pulling the needle through
  • Visible holes around stitches
  • Distortion or puckering
  • Hand fatigue during longer sessions

Linen fibers are strong but not forgiving—using the wrong needle can stretch or separate threads in the weave.


Why the Right Tool Matters

When working on linen, pay attention to:

  • Eye Size
    Your thread should pass smoothly through the eye without shredding. A polished, properly sized eye protects delicate embroidery floss or specialty threads.
  • Shaft Thickness
    A needle that’s too thick creates unnecessary holes. Too thin, and it may bend or feel unstable.
  • Point Style
    Linen benefits from a sharp but refined point—one that parts the fibers cleanly rather than forcing its way through.
  • Length
    Longer needles create rhythm for flowing stitches, while shorter needles offer control for detailed work.

Small differences create noticeable results.


Our Recommendation: Needles for Embroidery on Linen

Embroidery (Crewel) Needles – Sizes 7–10
A sharp point with a slightly elongated eye makes these ideal for most surface embroidery on linen. They accommodate stranded floss without excessive friction.

Sharps – Sizes 8–10
Excellent for fine monogramming or delicate detail work where smaller stitches are desired.

Chenille Needles – Smaller Sizes (if using thicker threads)
If working with wool, ribbon, or heavier fibers, a larger eye with a sharp point allows thicker thread to pass without strain.

Choosing size depends on:

  • Fabric weight
  • Thread thickness
  • Desired stitch scale

When in doubt, test on a scrap. Or use our handy Needle Wheel!


Pro Tip: Protect Your Thread

If your thread is twisting or fraying, try:

  • Using a slightly larger needle eye
  • Shortening your thread length
  • Allowing the needle to hang periodically to untwist

Smooth stitching is often about reducing friction.


Special Considerations for Mindful Stitching

Because February invites slower, intentional making, linen is a beautiful choice. Its texture encourages steady stitching and thoughtful pacing.

Using the right needle:

  • Reduces resistance
  • Minimizes strain
  • Creates cleaner, more defined stitches

The experience becomes calmer—and more enjoyable.


Reader Takeaway: Quick Checklist

When embroidering on linen:

✔ Choose a sharp needle with a polished eye
✔ Match eye size to thread thickness
✔ Avoid oversized needles that enlarge holes
✔ Test before beginning your final piece

A small adjustment can dramatically improve your results.


Looking Ahead

Next month in The Right Tool for the Stitch, we’ll explore needle choices for wool appliqué—another technique where precision and fabric awareness matter.

Until then, may your stitches be smooth, steady, and satisfying.

The Tool We Can’t Sew Without: The Sixth Finger Stiletto

If you’ve ever watched a professional sewist guide a tiny scrap of fabric toward a needle with terrifying precision, you might have wondered: How are their fingertips still intact?

For a long time, my “secret weapon” was actually a set of long acrylic nails. They were great for tucked pleats and guiding seams, but once I moved away from them, I realized I needed a replacement that was just as precise (and a lot more durable… ever snagged a needle on an acrylic nail? Ugh.).

Enter the Sixth Finger Stiletto from Colonial Needle Company. It has officially earned a permanent spot in the tool tray right next to our machines. Here is why this little tool is a total game-changer in our textile studio.

1. Safety Without Sacrificing Precision

The primary job of the Sixth Finger Stiletto is to do exactly what its name suggests: act as an extension of your hand. When you’re feeding fabric into the machine – especially at the very beginning or end of a seam ­– your fingers can get uncomfortably close to that very sharp, very fast-moving needle. The stiletto gives you ultimate control to nudge, push, and hold fabric flat without putting your actual fingers in harm’s way. Anyone else cringe hard at the memory of a needle-meets-finger moment?

2. The EPP “Glue-Saver” Hack

We discovered a brand-new use for this tool last year that we can’t stop talking about. If you do English Paper Piecing (EPP), you know the struggle of glue-basting:

  • Glue gets on your fingertips.
  • Your sticky fingertips then touch the front of your beautiful fabric.
  • The fabric sticks to you instead of the template.

We started using the flat prong of the Sixth Finger Stiletto to fold the fabric over the edges of the EPP templates. It creates a crisp, tight fold and keeps the glue exactly where it belongs – on the paper, not on your hands! A quick swipe with a damp cloth or a small sponge kept on the side and the prong is clean of glue residue and you are on your way again.

3. It’s Always Within Reach

Some tools end up buried in a drawer, but the Sixth Finger is a “front-row” tool. Whether I’m guiding a bulky seam allowance, holding a ribbon in place, or helping a feed dog grab a slippery silk, it’s sitting right there in the tray. It’s simple, ergonomic, and honestly, I feel a little lost sewing without it now.

Bonus: Pressing Tool

Unlike some rounded pressing assist tools, we absolutely love using the flat prong of the Sixth Finger Stiletto to open and then “finger press” a seam open. Even with shorter nails, I don’t like dragging them across my fabric to set a pre-crease so this tool is perfect for that. Then, we hold the flat edge across the seams securing them while pressing the seam open. It slides easily along the seams holding it in place ahead of the tip of the iron. Safety and precision all in one!

Pro Tip: Because it’s made by Colonial Needle Company, the quality is top-notch. It’s sturdy enough to handle heavy denim but precise enough for delicate appliqué and slippery gauze and silks.


What’s Next?

Tune in! Make sure you check our YouTube video demonstration where we show you the Sixth Finger Stiletto in action at the machine and give you a close-up look at our EPP folding technique and all the ways we use this versatile tool in our studio.

Do you use a stiletto in your sewing room, or are you still risking your fingertips? Let us know in the comments!