
by Judy Moore Pullen
There are so many ways to applique, both by hand and by machine. For many stitchers, the word “applique” is not pleasant. I avoided it when I first began making quilt tops, even though I do love to work with my hands. And…I am somewhat less annoying when I am hand stitching. I well remember the first time I saw a young woman doing needle turn applique at a quilt show several years ago. I was amazed at how easily she shaped the heart applique and made nearly invisible stitches. The appliqued heart appeared to float on the background fabric. I knew that was something I wanted to learn to do. Now, however, there are several things that I especially enjoy about needle turn applique.
Thing 1: For needle turn applique, I spend very little time on preparation for stitching, as opposed to prepared applique techniques. I can more leisurely spend time stitching, and less time turning the seam allowance and securing it with glue, starch and a hot iron or basting thread, etc. Not to be negative about prepared applique, however, there certainly are advantages, about which I will write in blogs to come.
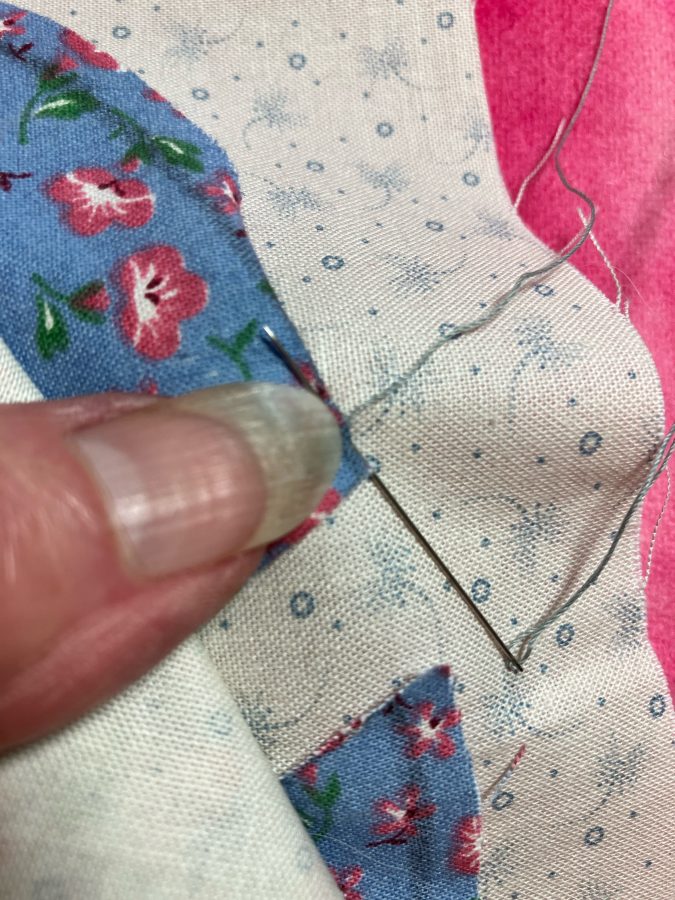
Thing 2: I love using these Milliners Needles from John James in a size 10 for hand applique. The Signature Collection needles are manufactured of the finest steel, polished so they smoothly glide through fabric. The points of these needles are so sharp that they pierce rather than push the fabric, which is so helpful for accuracy, and allows me to continue stitching for a longer period of time. The longer length of Milliners needles allows me to smoothly sweep under the seam allowance. To be more specific, I sweep the seam allowance under the extended thumbnail of my fabric-holding left hand. That thumbnail is a great tool, and I suggest it on my workshop supply lists. A claw-length thumbnail is not necessary, but long enough to secure the seam allowance in place as you use your Milliners needle and 60 weight thread.
Thing 3: There are several things about thread that also help to make your hand applique stitches nearly, if not completely, invisible. Remember: The bigger the number, the finer the thread, and hand sewing needles. Just like us: the more candles on our birthday cakes, the finer we are!! (Machine sewing needles are just the opposite.) My thread of choice for hand applique is Presencia Finca 50-weight or 60-weight, preferably 60-weight if I can get a good color match with the applique fabric. Another memory: when I began hand applique, I used a thread color that matched the background, and no matter how hard I tried, my stitches showed. Then my internal light bulb came on and I tried a thread color to match the applique fabric. BINGO! What a winner of an idea!!
Now here’s another tip about thread color: unwind a length of thread, about 10 inches from the spool and puddle it on the applique fabric, rather than just laying the spool of thread on top of the applique, like we learned in high school Home Economics when making garments. If your applique fabric is multi-colored, make sure that the puddle of thread touches all of the colors. When in doubt, audition/puddle another color of thread, step back, look away, then look again. Make your choice.
One more thing! If your applique fabric has many strong colors, try auditioning Presencia 60-weight thread, color #352. It is a great gray neutral, and just might work well. It is also my thread color of choice for more most of my machine piecing, and 60-weight thread is so fine that it helps with machine piecing accuracy.
Thing 4: The needle threading and weight are the next important things that help your applique appear to float on top of the background. I thread my Milliners Needle from the spool of Presencia 60-weight thread and leave about a 4” thread tail at the eye end of the needle. Pinching the thread at the eye of the needle, I unwind the spool to about the middle of my upper arm (former muscle) and cut the thread straight across with sharp scissors. This end is where I make a tiny quilter’s knot that becomes buried beneath the background or between the background and applique. The eye of these Signature Collection needles is so smooth that your thread will not shred. And, Presencia thread is 100% long staple Egyptian cotton, which is smooth and so strong because it is 3-ply, another huge advantage of using these needles and threads. Especially important as you are also using your time, energy and creative efforts to make something beautiful and lasting.
One more thing before your stitch: adhere an adhesive Needle Grip-It circle to your forefinger and one to the thumb of your needle stitchin’ and pullin’ hand. This is so helpful in relieving stress from the repetitive motion of hand sewing, allowing you to sit and stitch with ease. You won’t even notice the Grip-Its are there!
Thing 5: Now for the nearly invisible stitch. Prepare to stitch by making a “puppet” of your background by folding the outer edge, opposite of where you will be stitching, then gently roll the fold until your thumbnail is on top of the seam allowance of the applique. The neat roll of fabric will be nestled in the palm of your hand rather than all scrunched up. This helps prevent unnecessary wrinkles in your fabrics and helps to make your stitches more precise. It also helps relieve stress on your hand. If possible, begin where there is a straight or nearly straight side on your applique, and with your needle, sweep the seam allowance under your less dominant hand thumbnail, making sure that the marking of the seam allowance is just folded under. About 1/4” away from the folded edge of the applique, beneath the background fabric, or between applique fabric and background, come up just on the tiny edge of the fold of the applique, actually more to the back of the fold if possible, and pierce a couple threads of the applique fold with your needle. Slowly, to avoid knotting your thread, pull the thread through the edge of the folded seam allowance, keeping your thumbnail on top of the fold. Give a little tug on the thread near the end, then insert your needle into the background just beneath the fold where your thread came through the applique. Note: if you insert your needle to the left or the right or away from the fold, it WILL show, I promise.
Thing 6: Now, begin the next stitch by gently moving your thumbnail slightly away from the first stitch, and sweep the seam allowance under your thumbnail with the side of your needle. This is where the length of a Milliners Needle is so helpful. Depending on the weave of your fabric, you may need to use the point of the needle to position the seam allowance so that the mark of the seamline does not show. Then, sliding your needle about 1/16” or less beneath the background, come up on the back edge of the folded seam allowance, pierce the back edge of the fold, catching a couple of threads of the applique and slowly pull the thread upward. Tip: if your thread color so closely matches the applique, to find where to piece the background, gently pull the thread away from the applique, extending over the background, making a right angle with the thread to the edge of the fold. Now, tuck the point of your needle just under the fold, slide beneath and come up slightly away from your last stitch. Be patient with yourself if you are a beginning beginner or even an advanced beginner. This is the work of your hands, not computer-generated, which in my opinion, is of great value. Learning, doing, and practicing are so valuable.
Thing 7: Keep going, but take some breaks. I also highly recommend using a lighted magnifier directly over your work and your hands as you stitch. Using a lighted magnifier right over my sewing hands allows me to continue what I love to do, sculpting fabric and making pretty things. My eyes are rested, my hands are not sore, and I am relaxed with the process of hand applique, especially if I rest my work and my hands on a pillow on my lap as I stitch. A pillow for your lap is also on my workshop supply lists. It can be used for a nap as needed…
I have read that we can learn from our mistakes, therefore I have certainly learned a lot. Be kind to yourself, and others. Take someone under your wings and share what you have learned and what works well for you. Thank you for taking your time to read and try these tips, tricks, and techniques. I hope they are helpful.
Happy sewing,
Judy Moore Pullen