
At first glance, the running stitch may seem like the simplest stitch in hand sewing. It’s often one of the first stitches we learn, used for quick repairs, gathering fabric, or temporary basting.
But around the world, this humble stitch has been transformed into something extraordinary.
From the intricate geometric patterns of Japanese Sashiko to modern visible mending, the running stitch has become both a practical tool and an art form. With just a needle, thread, and a little creativity, you can reinforce worn fabrics, create decorative designs, or simply enjoy the calming rhythm of stitching.
What Is a running Stitch?
The running stitch is created by passing the needle in and out of the fabric at regular intervals, forming a line of evenly spaced stitches.
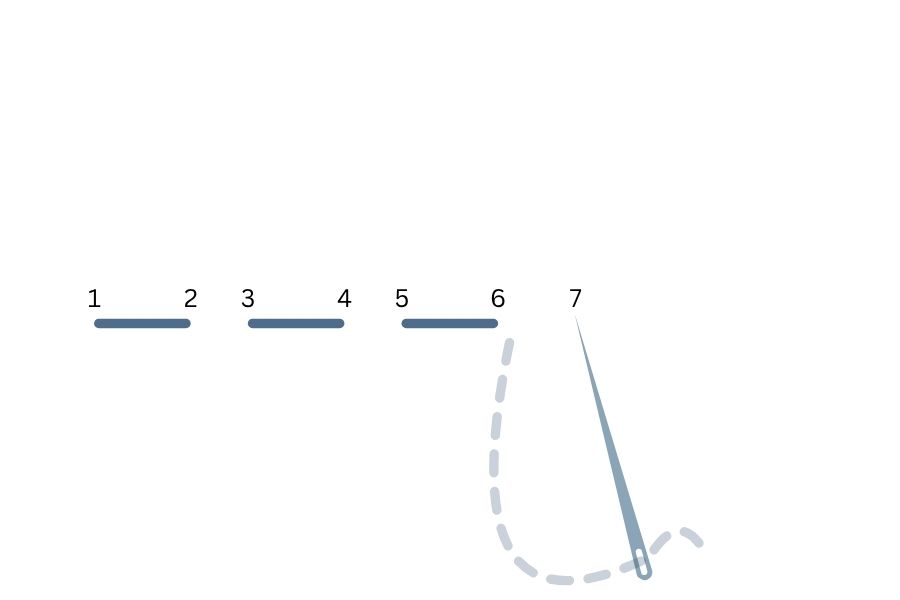
Its simplicity makes it incredibly versatile. Change the stitch length, spacing, thread weight, or pattern, and the running stitch can shift from functional construction to decorative embroidery.
When & How It’s Used
The running stitch is ideal for:
- Visible mending and decorative repairs
- Sashiko-inspired stitching
- Quilting and big stitch quilting
- Gathering fabric
- Temporary basting
- Decorative borders
- Hand quilting
- Simple embroidery accents
It is one of the most versatile stitches every maker should know.
What You’ll Need
- Hand-sewing (like Long Darners) or Sashiko needle
- Cotton sewing thread or heavier decorative thread
- Fabric
- Embroidery hoop (optional)
- Fabric marking pencil or washable marker
- Scissors
Pro Tip: For visible mending or Sashiko-inspired projects, choose a thicker cotton thread in a contrasting color to highlight the stitch pattern.
How to Sew a Running Stitch
- Step 1: Mark Your Stitch Line – Lightly draw a straight line or pattern on your fabric if desired.
- Step 2: Bring the Needle Up – Bring the needle up through the fabric at the beginning of your line.
- Step 3: Weave the Needle – Pass the needle in and out of the fabric in evenly spaced intervals, loading several stitches onto the needle before pulling it through.
- Step 4: Continue the Pattern – Repeat the process, maintaining consistent stitch lengths and spacing.
- Step 5: Finish the Thread – Secure the thread on the back of the fabric with a small knot or weave it beneath existing stitches.
Tips for Beautiful Running Stitches
- Keep stitch length as even as possible.
- Practice loading multiple stitches onto the needle for efficiency.
- Use contrasting thread to emphasize decorative patterns.
- Experiment with curved lines and geometric designs.
- Don’t strive for perfection—the handmade character is part of the charm.
Common Projects Using Running Stitch
The running stitch is perfect for:
- Visible clothing repairs
- Sashiko-inspired coasters and placemats
- Quilted table runners
- Decorative tote bags
- Hand-quilted projects
- Embroidered borders
- Slow stitching journals
Whether you’re repairing a favorite pair of jeans or creating a beautiful decorative pattern, the running stitch proves that the simplest techniques often have the greatest impact.
Next Month: We’ll explore the Pad Stitch, a tailoring technique that adds hidden structure and professional finishing to handmade garments.