

The buttonhole stitch is one of those classic hand-sewing techniques that beautifully balances form and function. While its name suggests it’s only used for buttonholes, this versatile stitch has long been valued for its durability, decorative potential, and ability to create clean, finished edges.
Whether you’re sewing garments, embellishing embroidery projects, or exploring heirloom techniques, the buttonhole stitch is a skill worth mastering.
What Is a Buttonhole Stitch?
The buttonhole stitch is a looped edge stitch designed to reinforce cut edges and prevent fraying. Each stitch forms a small knot along the edge of the fabric, creating a sturdy finish that stands up to repeated use.
Although it shares similarities with the blanket stitch, the buttonhole stitch is worked more closely together and features a distinct knotted edge that offers additional strength.
When & How It’s Used
The buttonhole stitch is ideal for both practical sewing and decorative embroidery.
It’s best for:
- Hand-worked buttonholes
- Reinforcing fabric edges
- Heirloom sewing projects
- Wool appliqué
- Decorative borders
- Finishing felt ornaments and accessories
Because of its strength, it’s especially useful anywhere a finished edge will experience wear and tear.
What You’ll Need
- Sharp hand-sewing Embroidery or Crewel needle
- All-purpose Sewing Thread or Embroidery floss
- Fabric
- Small embroidery scissors
- Fabric transfer pen or pencil (optional)
Pro Tip: For traditional buttonholes, use a strong sewing thread. For decorative applications, embroidery floss creates a beautiful finish.
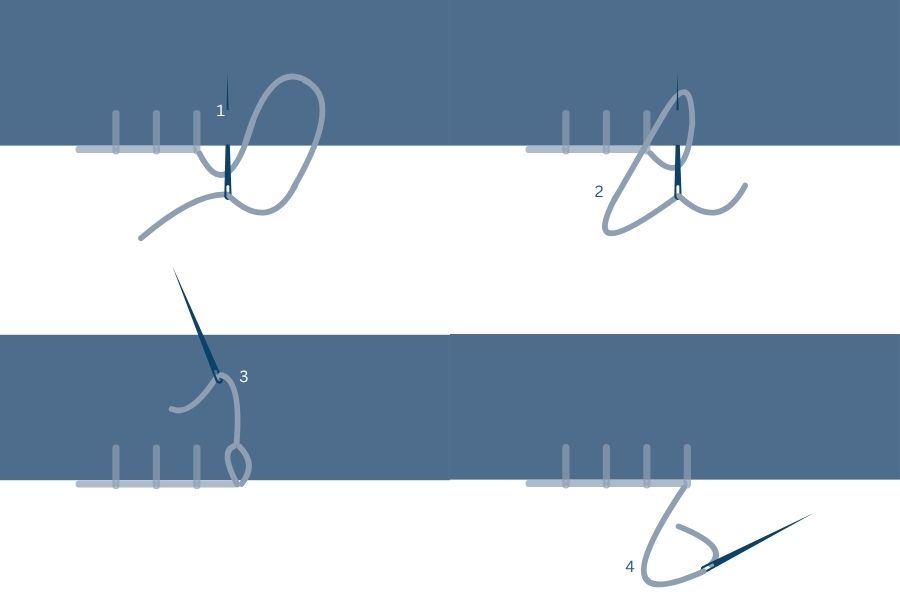
How to Sew a Buttonhole Stitch
- Step 1: Mark Your Edge – Identify the edge you’ll be stitching along. If making a buttonhole, carefully cut the opening first.
- Step 2: Bring the Needle Up – Bring the needle up from the back of the fabric near the edge.
- Step 3: Form the Loop – Insert the needle from front to back a short distance away, leaving the working thread beneath the needle tip.
- Step 4: Pull Through – Pull the thread snugly so the loop forms a small knot against the fabric edge.
- Step 5: Continue Along the Edge – Repeat the process, spacing stitches evenly and keeping the knot aligned along the edge.
- Step 6: Secure the Thread – Finish with a small knot on the back of the fabric.
Tips for Beautiful Buttonhole Stitches
- Keep stitch spacing consistent
- Pull loops snugly, but not tightly
- Use smaller stitches on curves
- Practice on felt before working on garments
- Match thread weight to your project
Common Projects Using Buttonhole Stitch
Try the buttonhole stitch on:
- Handmade garments
- Felt ornaments
- Wool appliqué projects
- Decorative samplers
- Memory bears and soft toys
- Heirloom linens
This timeless stitch offers a wonderful blend of beauty and practicality.
Next Month:
We’ll revisit an old favorite with a fresh perspective as we explore Running Stitch for Visible Mending and Sashiko-Inspired Designs.