
The gift-giving season sneaks up fast. One minute you’re enjoying the last cozy days of fall, the next you’re scrolling madly through websites and scrambling wildly through crowded stores looking for presents that don’t feel like they came from a cold, impersonal assembly line. Really? Does anyone deserve yet another pair of taco covered socks that seemed hilarious online at 1am or a scented candle that smells of mystery musk?
Here’s the good news: You’re a maker. Which means you probably already have everything you need to make a heartfelt but useful gift already sitting in your craft nook.
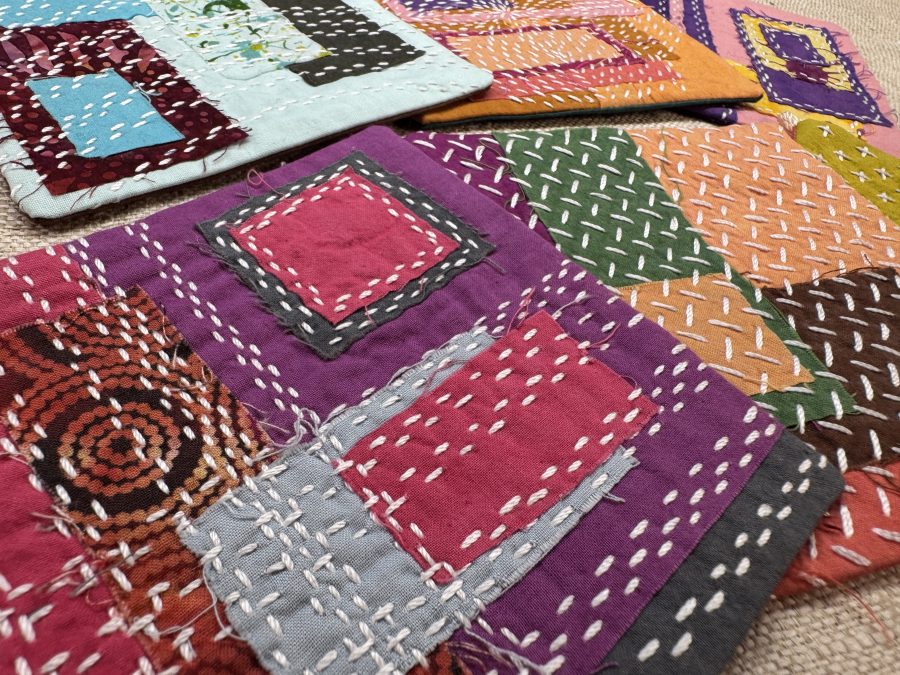
We present the sashiko & boro coasters! This isn’t just another project. These are little squares of stitched-up sustainability that are equal parts practical and beautiful. These coasters combine two iconic Japanese textile traditions (boro and sashiko) with fabric scraps that might otherwise go sit languishing in a box or *gasp* be thrown away. The result? Handmade gifts that protect your furniture, start conversations, and prove that “leftover” fabric is just fabric that’s waiting for its moment to shine.
What makes these coasters such a perfect gift? We’re glad you asked!
There’s something satisfying about making gifts that people will actually use. Coasters certainly check that box, but these aren’t your basic squares of cork from the discount bin at the local big box store. The thoughtful mending aesthetic of boro patchwork paired with the rhythmic, careful stitching of sashiko creates texture, color, and character. Each one is unique because, well… every scrap is unique. No two coasters are going to look exactly the same.
A Quick History Lesson (We Promise It’s Interesting)
Boro and sashiko are certainly experiencing a revival over the past several years, but they weren’t always the trendy, fashionable techniques they are today. Boro and sashiko were born from necessity in rural Japan where fabric was precious and throwing anything away was unthinkable. Boro refers to the patchwork mending of textiles where a person layers scraps to reinforce worn or torn areas and extend the life of garments and household items. Sashiko, with its distinctive running stitch, served both to strengthen fabric and to hold patches in place. You can have sashiko without boro, but you can’t have boro with sashiko.
Over time, what started as a necessity evolved into the art form and craft we know today. The stitches are decorative, the patterns are intentional, and the philosophy behind them of honoring materials, embracing imperfection, and celebrating repair over replacement resonates across cultures. Today, when we stitch boro patches with sashiko thread, we’re tapping into that same spirit of resourcefulness and sustainability.
What You’ll Need to Get Started
Materials:
- 1 fat quarter of Cherrywood Hand Dyed Fabric (or any quilting cotton) for tops and bottoms. We also like using denim for the backing fabric for an even more durable coaster. Really whatever you have on hand that can stand up to repeated use is great.
- Fabric scraps for boro patches – random shapes and sizes work perfectly. We used our Cherrywood scraps for the samples but really, we reach for whatever is in our scrap bins when we are making these.
Tools: Our Colonial Needle Company Dream Team for Sashiko
- John James Long Darners – These needles are perfect for sashiko stitching. The length gives you more stitches per pass, they are a little flexible so that give a little over the patches, and the sharp point handles multiple fabric layers without complaint.
- Palm Thimble – If you’ve never used one of these, prepare to wonder how you lived without it. It sits in your palm and lets you push the needle through layers with control and zero finger pain.
- Hand sewing needle – For closing up the turning opening. We are a divided household on our preferred hand sewing needles. Jason likes his JJ Sharps in size 7 or 9, while Shannon keeps a supply of JJ Betweens in size 11 and JJ Milliners in size 11 at hand.
- Presencia 12wt thread for sashiko stitching – Presencia 12wt has the weight and texture that makes sashiko stitches really stand out. It glides through fabric smoothly and creates the signature dimensional texture that makes sashiko stitches so beautiful.
Other:
- Roxanne glue stick (for temporarily holding patches in place)
- Pins or clips for machine sewing
Cut:
- Six, 5.5″ squares for coaster tops
- Six, 5.5″ squares for coaster bottoms
- Random cuts from scraps for boro patches. Really…we’re talking random here. All shapes and sizes and be ready to trim them to size as you go.
Step-by-Step: Making your boro & sashiko coasters
- Step 1: Arrange Your Patches
Lay out your 5.5″ top squares and start playing with scrap placement. There’s no wrong way to do this so have some fun with it. Overlap them, leave gaps, go wild with color or keep it subdued – boro is about intuition, not rules. Don’t be afraid to explore your creative side here. Take your time and let your scraps tell you where they want to go. - Step 2: Glue Baste
Once you’re happy with how your patches look, use your Roxanne glue stick to tack the pieces in place. This temporary hold keeps everything from shifting when you start stitching. Just a little dab will do ya! (Hey that’s catchy!) Just a few strategic dabs will do is all it takes to hold the scraps secure while you stitch. Which brings us to… - Step 3: Sashiko Time
Thread your John James Long Darner with Presencia 12wt thread. Traditional sashiko uses a running stitch with a distinctive rhythm. The stitches are typically longer than the spaces between them, creating that signature look. If you aren’t familiar with this style of hand stitching, practice a little on some extra fabric until you feel comfortable enough to dive in. But remember this: This is hand stitching. It’s never going to look like machine stitching. Like our sashiko book title says, it’s that harmonious imperfection that makes boro and sashiko look so amazing.
Once you get going, you can sashiko over the entire piece, creating a grid or pattern that unifies all your patches, or you can stitch just around the edges of each patch to secure them. Both approaches look stunning and we usually make some of each.
To use the traditional method of making sashiko stitches, load multiple stitches onto your needle before pushing it through. This is where the length of the Long Darner comes in handy. Use your Palm Thimble to push the needle through the layers without wearing out your hand then pull the needle the rest of the way through.
Don’t stress about perfection here. Sashiko is meant to be rhythmic and meditative, not measured with a ruler. Stitches that wander a bit? That’s the beauty of hand stitching. Your stitches will become more even the more you stitch but there will still be times when they skew a bit here and there. And that’s okay. - Step 4: Pin Fronts to Backs
Once you are finished stitching, place your finished top and the backing square right sides together. Pin or clip around the edges to keep everything aligned. - Step 5: Sew Around the Edges
Machine or hand sew around all four edges with a ¼” seam allowance, leaving a 2″ opening in the center of one side for turning. This opening is your escape hatch for getting everything right-side-out. We always mark the two sides of the opening to make sure we don’t accidentally sew it shut. Not that we’d ever do such a thing. Keep a seam ripper handy… just in case. - Step 6: Trim the Corners
Clip the corners close to (but not through!) your stitching line. This reduces bulk and helps you get crisp corners when you turn everything right-side-out. - Step 7: Turn Right Side Out
Reach through that 2″ opening and pull the coaster right side out. Use a chopstick or turning tool to gently push out the corners so they’re nice and sharp. - Step 8: Press Flat
Give everything a good press with your iron. This is the moment your coaster goes from “lumpy fabric sandwich” to “Hey! This actually looks pretty great!” We usually press from the back side of the coaster and lay the face side down on a fluffy towel or wool pressing mat to keep from flattening out the stitches. - Step 9: Close the Opening
Use a slip stitch or ladder stitch to hand-sew that turning opening closed. These stitches are nearly invisible when done correctly so just take your time and catch tiny bits of fabric from each side. - Step 10: Press Again
One final press and you’re done. Admire your work. Make five more. Hide them from everyone because you want to keep them all. Just us? Maybe make another set to give away.
Tips for Success
Stitch tension matters. Keep your sashiko stitches snug but not tight. You want them to sit on top of the fabric with a little dimension, not pull it into puckers. No puckers!
Embrace imperfection. Boro is literally about making do with what you have. If your patches are wonky or your stitches aren’t uniform, that’s not a mistake. That’s the character of modern boro-style patchwork.
Batch assembly is your friend. Cut all your squares at once, arrange all your patches, then move through the steps assembly-line style. You’ll be surprised how quickly a set of six comes together. Or two sets. Really… you’re going to want to keep one for yourself. Trust us on this.
Save your fingers and hands. Sometimes we get carried away with our layers. What look pretty isn’t always ideal for stitching through. We have stubbornly layered entirely too much heavy or dense fabric before and had to make one stitch at a time. Still fine… but our hands always pay the price the next day.
So there you have it. Small pieces of handmade textile are for you and for friends. Look, we know that handmade gifts walk a fine line. You want them to feel personal and thoughtful, but you also want them to be something people actually use instead of tucking them in a drawer and only pull out when you come over for a visit. Coasters fit squarely into that category. They’re practical, compact, and these boro and sashiko versions are beautiful enough to leave out on the coffee table. Again, they are textile art that start conversations.
Make a set of six for a host gift. Stitch up a batch in someone’s favorite colors. Pair them with a bag of good coffee beans, tea, or a bottle of wine. However you gift them, these coasters carry the message: I made this for you, with my own two hands.
And if you end up keeping them all for yourself? We totally understand. Giving yourself an awesome little gift is definitely encouraged.
Watch and Learn
If you’re in a visual learner mood or want to see some of these steps in action, we’ve created a companion video tutorial that walks through the key points of the process. It’s a helpful reference as you work through the written instructions.
▶️ Watch the video tutorial on YouTube here:
Get Your Supplies
Ready to turn your scraps into something special?
🧵 Shop Presencia threads here
🪡 Shop John James needles here
📄 Download the project handout below
For more sashiko, visit our website at shannonandjason.com and be sure to check out our workshop and our latest book, Stitching Sashiko.
Now gather those scraps, thread that needle, and start stitching. Your coffee table, and anyone luck enough to receive these, will thank you.
STITCH ON!!
S&J