

As spring arrives and floral embroidery begins appearing everywhere, there’s one stitch that shines above the rest for outlining stems, vines, and flowing designs: the Stem Stitch.
This classic embroidery stitch creates a smooth, slightly twisted line that follows curves beautifully. It’s easy to learn, versatile, and ideal for everything from floral embroidery to lettering.
If you’re building your hand-stitching skills, the stem stitch is one you’ll return to again and again.
What Is a Stem Stitch?
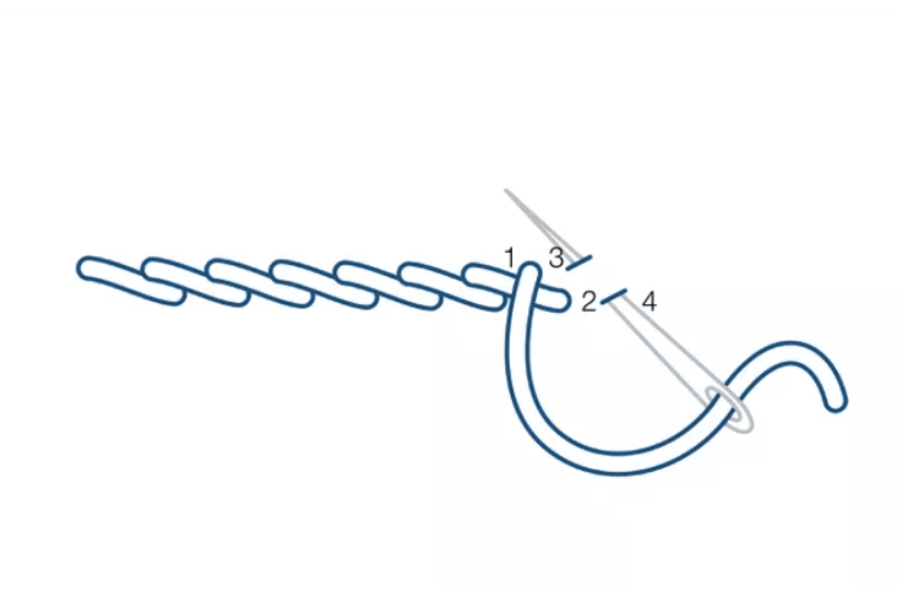
The stem stitch is an embroidery stitch worked in a series of slightly overlapping stitches that form a continuous line. Each stitch begins just ahead of the previous stitch and comes up halfway along the previous stitch.
This overlapping structure creates a soft rope-like line that naturally curves — which is why it’s traditionally used for stitching plant stems in embroidery.
When & How It’s Used
Stem stitch works especially well for designs that require flowing lines or delicate outlines.
Best for:
- Floral stems and vines
- Outlining embroidery designs
- Script lettering and monograms
- Curved borders
- Nature-inspired embroidery
Because the stitch curves smoothly, it’s often easier to use than backstitch when working around rounded shapes.
What You’ll Need
- Crewel or embroidery needle – Our brands are available here
- Embroidery floss or perle cotton – Presencia can be found here
- Fabric (cotton or linen works well)
- Embroidery hoop (recommended) – Shop our hoops here
- Small scissors
Tip: A hoop helps maintain even tension and keeps your stitch line smooth.
How to Sew the Stem Stitch
- Step 1: Bring Needle Up
Bring your needle up through the fabric at the starting point of your line. - Step 2: Make the First Stitch
Insert the needle slightly ahead along the line and bring it back up halfway between the starting point and the end of the stitch. - Step 3: Continue the Line
Repeat this motion, always bringing the needle up halfway along the previous stitch. - Step 4: Keep the Thread to One Side
For consistent results, keep the working thread on the same side of the needle each time. - Step 5: Follow the Design Line
Continue stitching along your design, adjusting stitch length for curves.
Tips for Beautiful Stem Stitches
- Keep stitches small and consistent
- Maintain even tension
- Keep the working thread on the same side for a uniform twist
- Use shorter stitches on tight curves
With a little practice, stem stitch becomes incredibly rhythmic and relaxing.
Common Projects Using Stem Stitch
Stem stitch appears in many traditional and modern embroidery projects. Try it for:
- Floral embroidery patterns
- Decorative lettering
- Hand-stitched monograms
- Botanical illustrations in thread
- Nature-inspired borders
Once you master it, stem stitch quickly becomes one of the most useful stitches in your embroidery toolkit.
Next Month:
We’ll explore a stitch that adds bold texture and structure to designs — the Couching Stitch.